Get control of data loads in Azure Synapse
Azure SQL Database
Load Source data to DataLake
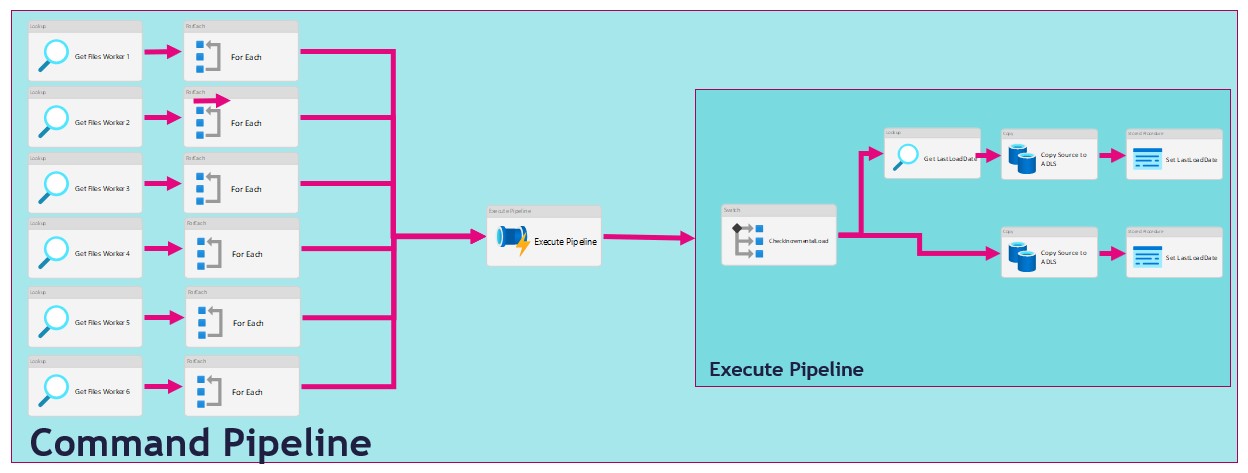
There are several ways to extract data from a source in Azure Synapse Analytics or in Azure Data Factory. In this article I'm going to use a metadata-driven approach by using a control table in Azure SQL in which we configure the metadata(The data which we need to extract). We then load data from an Azure SQL Database to a Azure Data Lake. We will use 2 Pipelines for this activity:
- The Command Pipeline in which we configure our metadata-driven approach
- The Execute Pipeline in which we perform the actual data copy activity

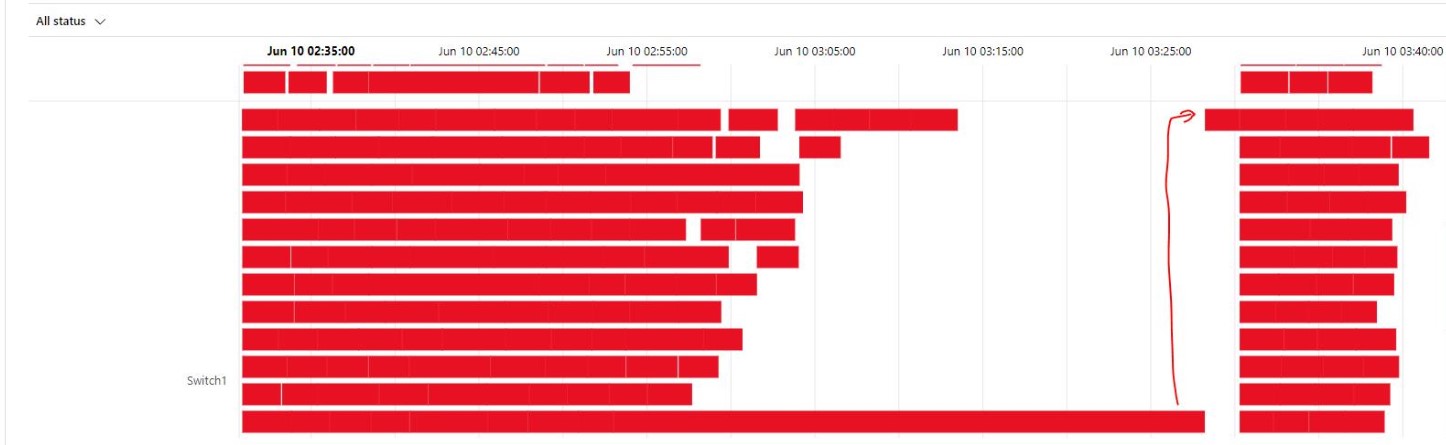
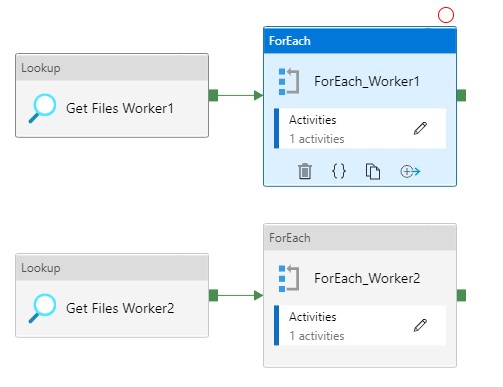
As you can see in the figure above we use the For Each activity to call the execute pipeline. But when we use the For Each Activity, the Execute Pipelines are assigned during the start of the For Each Activity and not during run time. We will only see this behaviour while extracting a large amount of tables. I have noticed that slots are idle and not starting a new task before one the other task are finished. Due to this behaviour we will see gaps in the Execution window as we can see in the figure below.
In the article below I will give you a solution to get control of your data loads by using the Lookup Activity and based on a control table where we can define the workloads.
Metadata
When you're already using a database where you store your Metadata, use this database otherwise create a new one. We then need to create the table below where we store the table names which we need to extract.
[sql]
CREATE TABLE [configuration_demo].[Source_Parameter](
	[Id] [int] IDENTITY(1,1) NOT NULL,
	[SourceName] [nvarchar](500) NULL,
	[SourceSchema] [nvarchar](500) NULL,
	[SourceQueryCustom] [nvarchar](max) NULL,
	[DataLakeCatalog] [nvarchar](500) NULL,
	[Worker] [int] NULL,
	[WorkerOrder] [int] NULL,
	[TableDestinationName] [nvarchar](500) NULL,
	[TableDestinationSchema] [nvarchar](500) NULL,
	[IsActive] [bit] NOT NULL,
	[IsIncremental] [bit] NULL,
	[IsIncrementalColumn] [nvarchar](50) NULL,
	[LastLoadtime] [datetime] NULL,
 CONSTRAINT [PK_Source_Parameter] PRIMARY KEY CLUSTERED
(
	[Id] ASC
)WITH (STATISTICS_NORECOMPUTE = OFF, IGNORE_DUP_KEY = OFF, OPTIMIZE_FOR_SEQUENTIAL_KEY = OFF) ON [PRIMARY]
) ON [PRIMARY]
[/sql]

| ColumnName | Definition |
| SourceName | Name of the Source Table or view |
| SourceSchema | SchemaName of the Source Table or view |
| SourceQueryCustom | Your own custom select querie to load data, do casting or just get a subset of columns |
| DataLakeCatalog | Name of the datalake folder to store raw parquet files |
| Worker | To divide and order the workload, a source can be assigned to 6 workers. These unassigned sources running parallel in batches of 30 (1-6) |
| WorkerOrder | The loading order for the sources assigned to workers 1 till 6. |
| TableDestinationName | Name of the datastore table to store source data |
| TableDestinationSchema | Name of the datastore schema to store source data |
| IsActive | Activate or disable the source from loading (1|0) |
| IsIncremental | Set to 1 if the source needs to be delta loaded (1|0) |
| IsIncrementalColumn | If above setting is set to 1, on which datetime column do we need to base the incremental load |
| LastLoadtime | This field is updated on runtime when the source is loaded. |
With the Worker we can define the workload, we can add a same set of tables, a mix of small and large tables, together. This worker can be changed any time.
Once we have filled the configuration we can start creating our Linked Services for the connections.
Create Linked Services
For these 2 Pipelines we need to create 4 different Linked Services.
Azure Key Vault (LS_AKV_OXGN), if you haven't created a Linked Service for Azure Key Vault before please read this page.
Azure Data Lake Storage Gen2 (LS_ADLS_DLS2), linked to your Azure Data Lake.
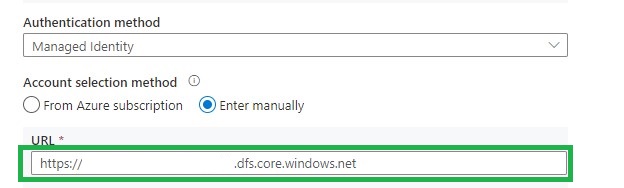
Grant workspace service managed identity access to your Azure Data Lake Storage Gen2.
Azure SQL Source database (LS_ASQL_SOURCE)
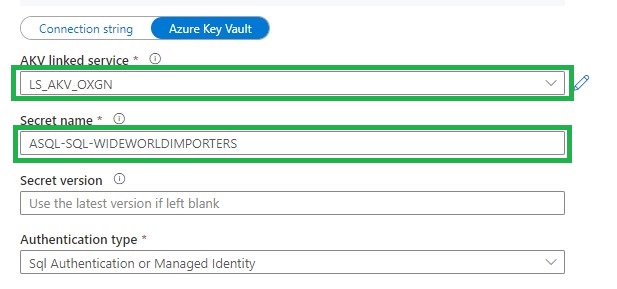
Create a entry in your Azure Key Vault secrets for the connection string =>
integrated security=False;encrypt=True;connection timeout=30;data source=xxxxxxxxxx.database.windows.net;initial catalog=WideWorldImporters;user id=xxxxxx;password=xxxxxx
Grant workspace service managed identity access to your Azure SQL Database or create a read-only account in your Source Database
Azure SQL Configuration database (LS_ASQL_CONFIG)
Create a entry in your Azure Key Vault secrets for the connection string =>
Integrated Security=False;Encrypt=True;Connection Timeout=30;Data Source=demoekeuwdvlmmssqloxgn01.database.windows.net;Initial Catalog=your configurationdatabase
Integration Datasets
Before we can start building our Pipeline we need to create the Integration Datasets.
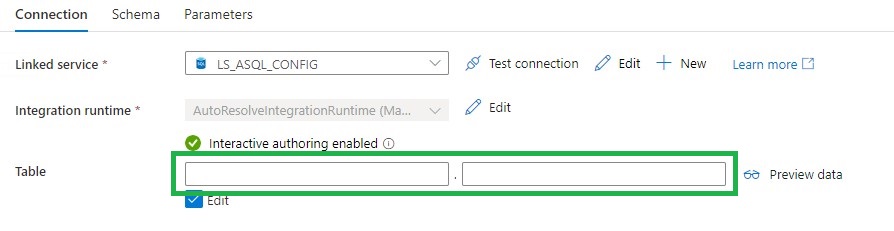
Source database (DS_ASQL_SOURCE_DEMO)
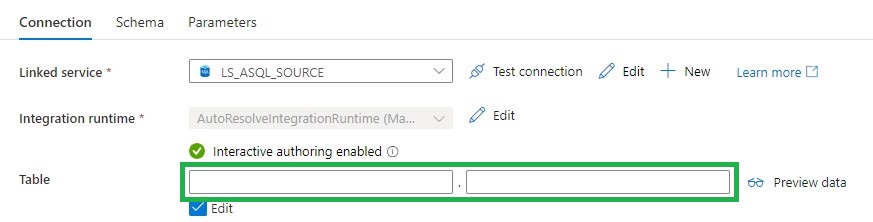
Leave the Table Schema and Name empty,
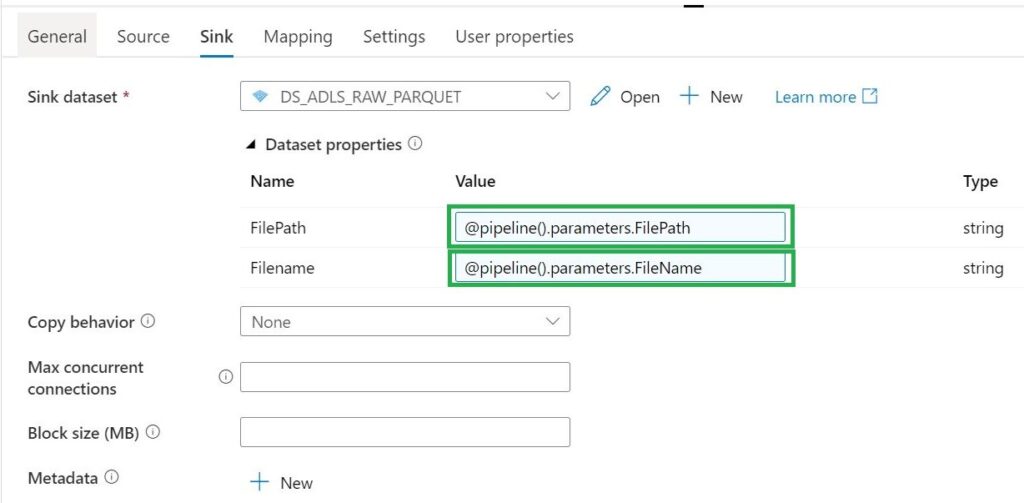
Sink Datalake (DS_ADLS_RAW_PARQUET)
Parameters
- FilePath
- Filename
Metadata DB (DS_ASQL_CONFIG)
Leave the Table Schema and Name empty,
Pipeline
The last step is to create 2 Pipelines, which you can both download over here.
Command Pipeline
Name: (PL_COMMAND_COPY_ASQL_TO_ADLS_WORKER_DEMO)
Lookup Activity
Lookup activity can retrieve a dataset from any of the Azure Data Factory / Azure Synapse -supported data sources. For this case we use a query to load the Metadata from the control table so that we know which tables we need to extract.
For above Query I've created a view, in the view I have defined the name of the folder and the Filename with the DataLake based on the metadata from the control table.
[sql]
CREATE view [execution_demo].[Load_DataLake_Files]
AS
/**********************************************************************************************************
* View Name:  [execution_demo].[Load_DataLake_Files]
*
* Purpose:    View to show the records which should be processed
*
*
* Revision Date/Time:

**********************************************************************************************************/
SELECT	 SP.Id as [PipelineParameterId]
		,SP.[SourceName]
		,isnull(CASE WHEN SP.[SourceSchema] != '' THEN SP.[SourceSchema] END, 'Unknown')  as SourceSchema
		,case when Worker not in (1,2,3,4,5,6)  then 1 else Worker end Worker
		,WorkerOrder
		,case	when	SourceQueryCustom is null
			then	'SELECT * FROM [' +isnull(CASE WHEN SP.[SourceSchema] != '' THEN SP.[SourceSchema] END, 'Unknown') + '].[' + SP.[SourceName] + '] where 0 = ' + convert(nvarchar(1),[IsIncremental]) + ' OR 1 = ' + convert(nvarchar(1),[IsIncremental]) + ' AND ' + isnull(SP.[IsIncrementalColumn],'1') +' >='''+convert(varchar(20),ISNULL([LastLoadtime], '1900.01.01'))+''''
			else	[SourceQueryCustom]
		 end As SelectQuery
		,'SELECT CASE WHEN ' + convert(nvarchar(1),[IsIncremental]) + ' = 1 THEN CONVERT(VARCHAR, MAX(' + isnull(SP.[IsIncrementalColumn],'1') +'), 120) ELSE CONVERT(VARCHAR, GETDATE(), 120) END AS [LastLoadDate] FROM [' +isnull(CASE WHEN SP.[SourceSchema] != '' THEN SP.[SourceSchema] END, 'Unknown') + '].[' + SP.[SourceName] + ']' AS [SelectLastLoaddate]
		,isnull(CASE WHEN SP.DataLakeCatalog != '' THEN SP.DataLakeCatalog END, 'Unknown') + '/' +
					isnull(CASE WHEN SP.[SourceSchema] != '' THEN SP.[SourceSchema] END, 'Unknown') + '_' +
					SP.TableDestinationName + '/' +
					FORMAT(GETUTCDATE(), 'yyyy') +'/'+
					FORMAT(GETUTCDATE(), 'MM') +'/'+
					FORMAT(GETUTCDATE(), 'dd')
           as  FilePath
		,isnull(CASE WHEN SP.DataLakeCatalog != '' THEN SP.DataLakeCatalog END, 'Unknown')  + '_' +
					isnull(CASE WHEN SP.[SourceSchema] != '' THEN SP.[SourceSchema] END, 'Unknown') + '_' +
					SP.TableDestinationName + '_' +
					FORMAT(GETUTCDATE(), 'yyyy') +
					FORMAT(GETUTCDATE(), 'MM') +
					FORMAT(GETUTCDATE(), 'dd') +
					FORMAT(GETUTCDATE(), 'HH') +
					FORMAT(GETUTCDATE(), 'mm') +'.parquet'
                --Equal to Filename
			 as [FileName]
		,SP.[TableDestinationName]
		,SP.[ProcessType]
		,cast(SP.[IsActive] as BIT) AS [IsActive]
		,cast(SP.[IsIncremental] as BIT) AS [IsIncremental]
		,isnull(SP.[IsIncrementalColumn],1) as [IsIncrementalColumn]
		,case when [LastLoadtime] is null then '1900.01.01' else LastLoadtime end  as LastLoadtime
FROM [configuration_demo].[Source_Parameter]  as SP
[/sql]
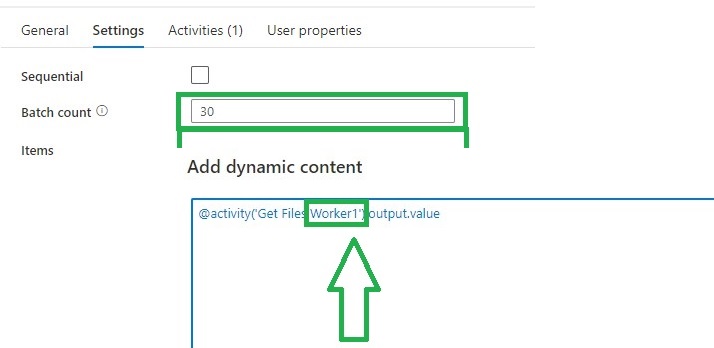
For each Activity
The ForEach Activity defines a repeating control flow in your pipeline. In this case it will call the Pipeline Activity based on the output of Lookup Activity Get Files Worker XX.
Within each Activity we add a Pipeline Activity, to finalize this Pipeline we first need to create the Execute Pipeline.
Execute Pipeline
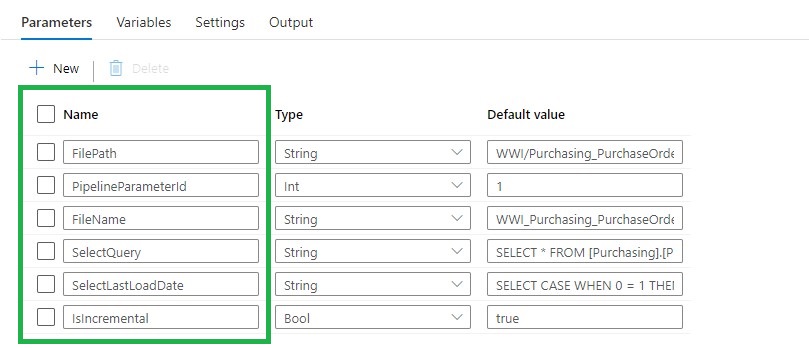
Name: (PL_EXECUTE_COPY_ASQL_TO_ADLS_DEMO)
Add the following Parameters to the Pipeline:
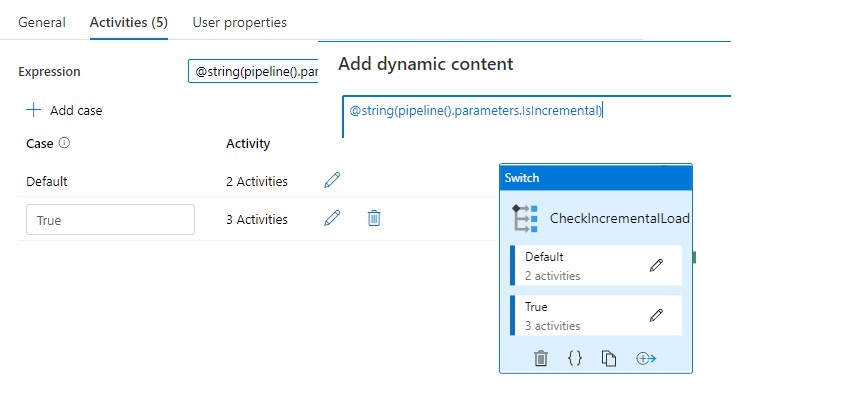
Switch Activity
The Switch activity provides the same functionality that a switch statement provides in programming languages. It evaluates a set of activities corresponding to a case that matches the condition evaluation.
In this situation we create a case for Incremental Loads or Full loads. Why do we do this? We pay for every activity and every activity will take time. If we have a full load we don't need the last load date from the source. So in this situation it will save you 1 activity and 15 sec for every Full load.
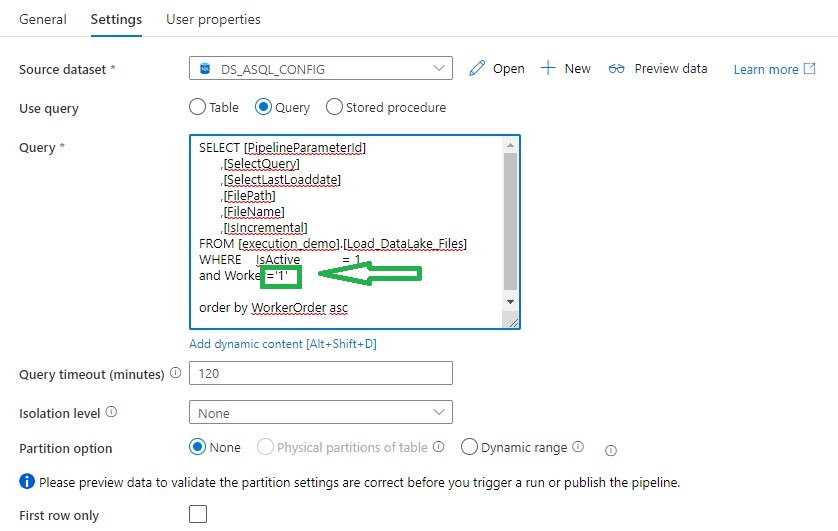
Lookup Activity
Use the Lookup Activity to get the LastLoadDateTime from a Source Table. We will store this value at the end of the process for incremental Loading purposes. In this way, we exactly know the correct value if we run the process the next time. This Activity is only used in the switch activity when the case Incremental = True .

Query = expression @{pipeline().parameters.SelectLastLoadDate}
Copy Activity
We can use the Copy activity to copy data among data stores located on-premises and in the cloud.
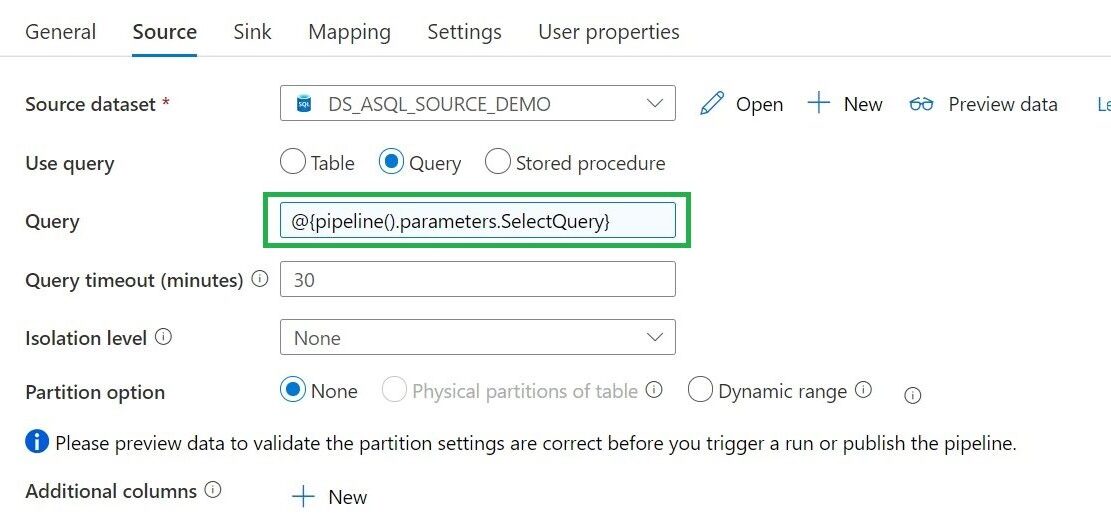
Query = expression @{pipeline().parameters.SelectQuery}
Stored procedure Activity
Use Stored procedure Activity to do data transformation activities in a Data Factory / Synapse pipeline to transform and process raw data into predictions and insights. We use it to update our control table with the Incremental Value from the source which we looked up in the beginning of our pipeline.
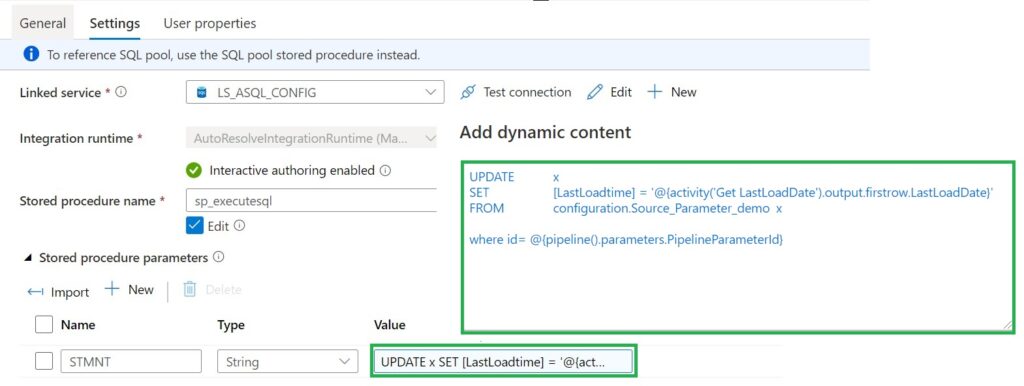
For the Full load Switch we replace "'@{activity('Get LastLoadDate').output.firstrow.LastLoadDate}' " with "getdate()"
Now we have finalized our execute pipeline we need to finalize the command pipeline.
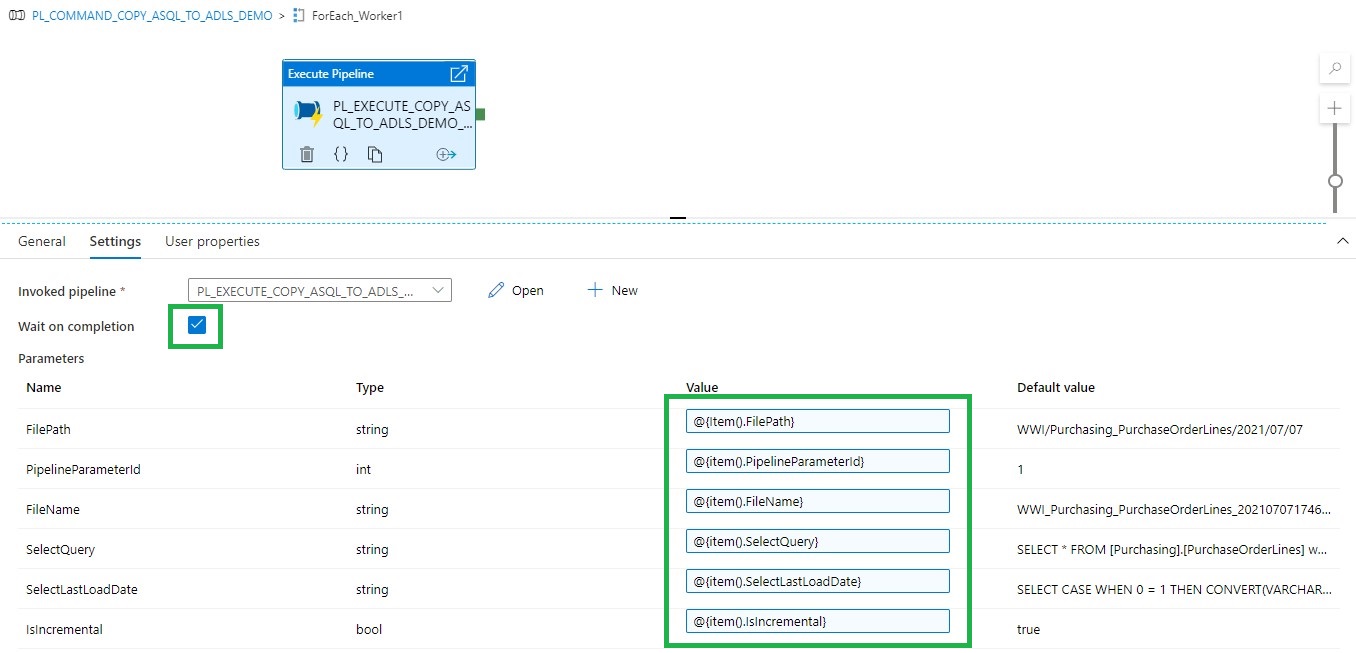
Fill in the parameters based on the output of the Get Files Worker1 and you're ready to rock.
Copy and Paste the Get Files Worker 1 and ForEach_Worker1 to the desired number or workers, rename them to 2,3,4,5 and so on. Change the worker number in the Lookup query or even easier just download both templates from my Github.
The great advantage of above solution is that you are now in control how your loads are running instead of the random slots in an For each Activity.
Hopefully this article has helped you a step further. As always, if you have any questions, leave them in the comments.
- Fabric Metadata Driven Framework July 2026 Release Notes

- Reassigning Microsoft Fabric Capacities in Bulk: Don’t Let an Expiring Trial Catch You by Surprise
- Bringing Column-Level Lineage from Microsoft Fabric to Microsoft Purview with FMD
- My first experience: Building a Fabric App
- Fabric Metadata Driven Framework update May 2026