This Saturday I've been speaking during DataSaturday #4 Oslo. If you want to visit more Datasaturday events please visit the Data Saturdays event page.
Azure Purview
I presented a session on Azure Purview Microsoft's answer to Data Governance and Data Lineage
More clarity about pricing and when Azure Purview goes to GA is likely to become clear during the event on September 28. You can register for this event via the link below.
EVENT=>Achieve unified data governance with Azure Purview
As always, in case you have any questions, please feel free to contact me.
In case you have any questions left please feel free to ask them via the comment or Socials
This week the Azure Purview Product team added some new functionalities, new connectors(these connectors where added during my holiday), Azure Synapse Data Lineage, a better Power BI integration and the introduction of Elastics Data Map. Slowly we are on our way to a GA status, on September 2021, 28th there will be a Digital Event. Please find below some of announcements in detail.
New connectors in Azure Purview
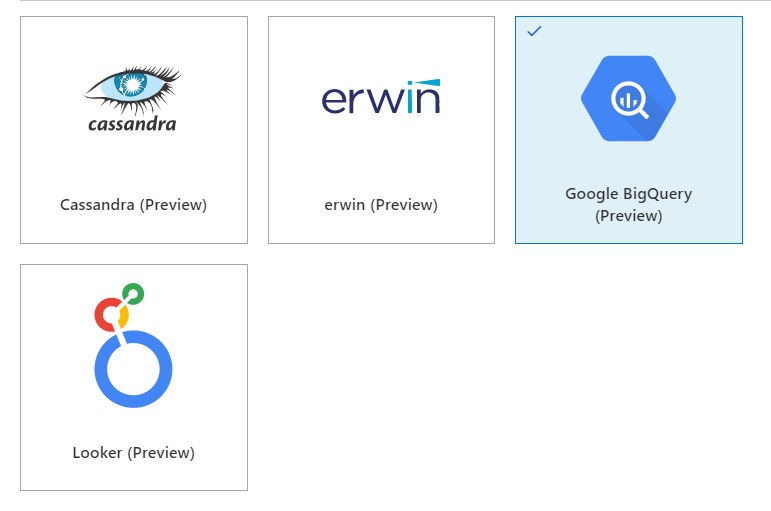
Over the past period, the Azure Purview team has worked hard, they have already added the necessary new connectors such as ERWIN, Looker, Cassandra and Google Big Query.
This week it was time for some new functionalities.
Azure Synapse Analytics Data Lineage:
This functionality currently only works for a copy activity, but the first step has been made. Where for Lineage from Azure Data Factory you still had to make a link in Azure Purview, for the Lineage from Azure Synapse, it is the other way around. You create the link to Azure Purview in Azure Synapse. How to create this link I described this a couple of months ago in one of my post and can be found here.
Some known limitations on copy activity lineage based on the docs.
Currently, if you use the following copy activity features, the lineage is not yet supported:
Copy data into Azure Data Lake Storage Gen1 using Binary format.
Copy data into Azure Synapse Analytics using PolyBase or COPY statement.
Compression setting for Binary, delimited text, Excel, JSON, and XML files.
Source partition options for Azure SQL Database, Azure SQL Managed Instance, Azure Synapse Analytics, SQL Server, and SAP Table.
Source partition discovery option for file-based stores.
Copy data to file-based sink with setting of max rows per file.
Add additional columns during copy.
In additional to lineage, the data asset schema (shown in Asset -> Schema tab) is reported for the following connectors:
CSV and Parquet files on Azure Blob, Azure File Storage, ADLS Gen1, ADLS Gen2, and Amazon S3
Power BI supports now automated discovery of columns, measures and datatypes of the Power BI.
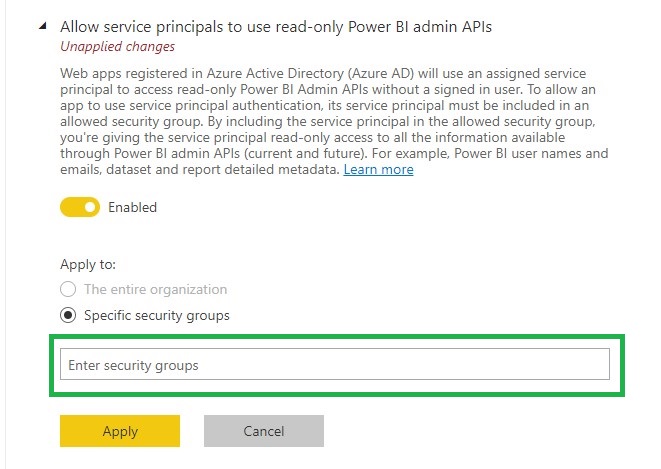
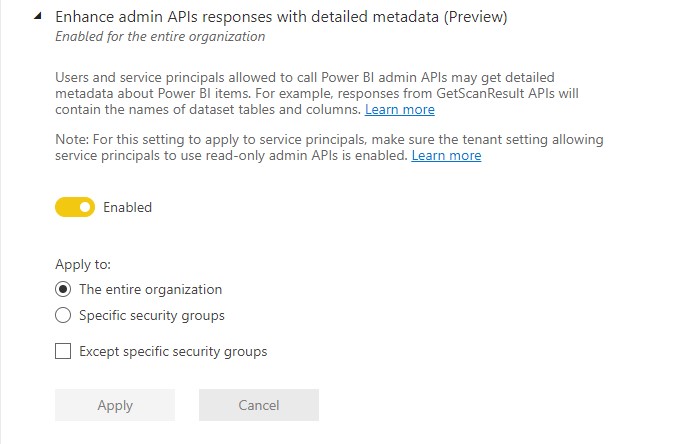
To enable this functionality you much enable the following settings in the Power BI tenant setting page(be aware that you need to be a Power BI Admin)
Allow service principals to use read-only Power BI admin APIs.
To use this setting create a Security group or use an existing one and add your Purview account to this SG.
Enhance admin APIs responses with detailed metadata
Elastic data map in Azure Purview
All Purview account created after August 2021, 18th are now created with the new Elastic data map concept. With this new concept your Purview account will come by default with one capacity unit and elastically grow based on usage. Each Data Map capacity unit includes a throughput of 25 operations/sec and 2 GB of metadata storage limit. So now when you're not using Purview you're not paying the default value of 4 capacity units.
The Data Map is billed on an hourly basis. You are billed for the maximum Data Map capacity unit needed within the hour. At times, you may need more operations/second within the hour, and this will increase the number of capacity units needed within that hour. At other times, your operations/second usage may be low, but you may still need a large volume of metadata storage. The metadata storage is what determines how many capacity units you need within the hour. Please read the documentation for a more detailed explanation and some examples
All existing Azure Purview accounts will be migrated in September/October to the Elastics data map concept.
The big question that remains open is what exactly does this Capacity Unit cost? For the time being during the Preview, it is still free, which can be read from the updated price page of Azure Purview..
More clarity about pricing and when Azure Purview goes to GA is likely to become clear during the event on September 28. You can register for this event via the link below.
EVENT=>Achieve unified data governance with Azure Purview
As always, in case you have any questions, please feel free to contact me.
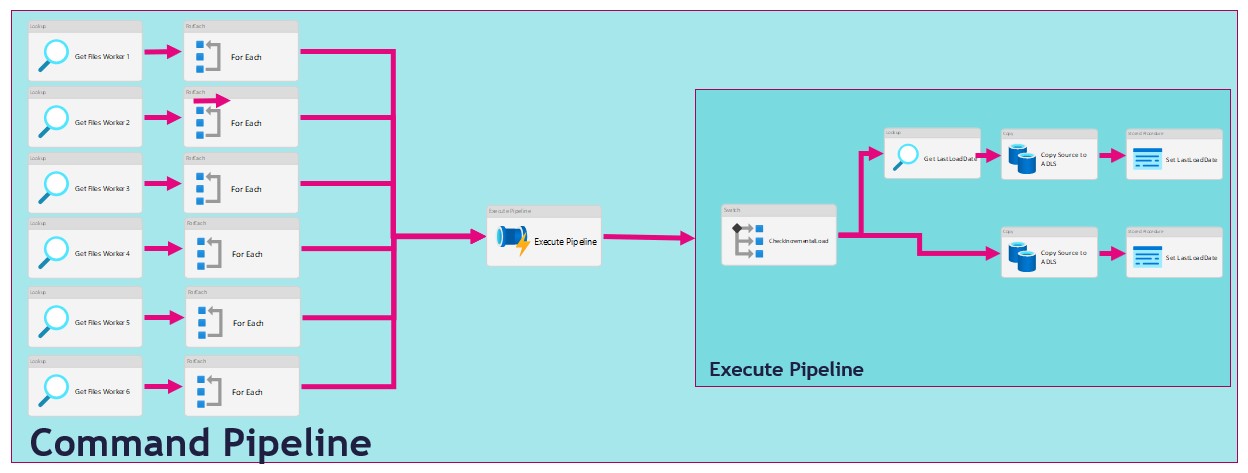
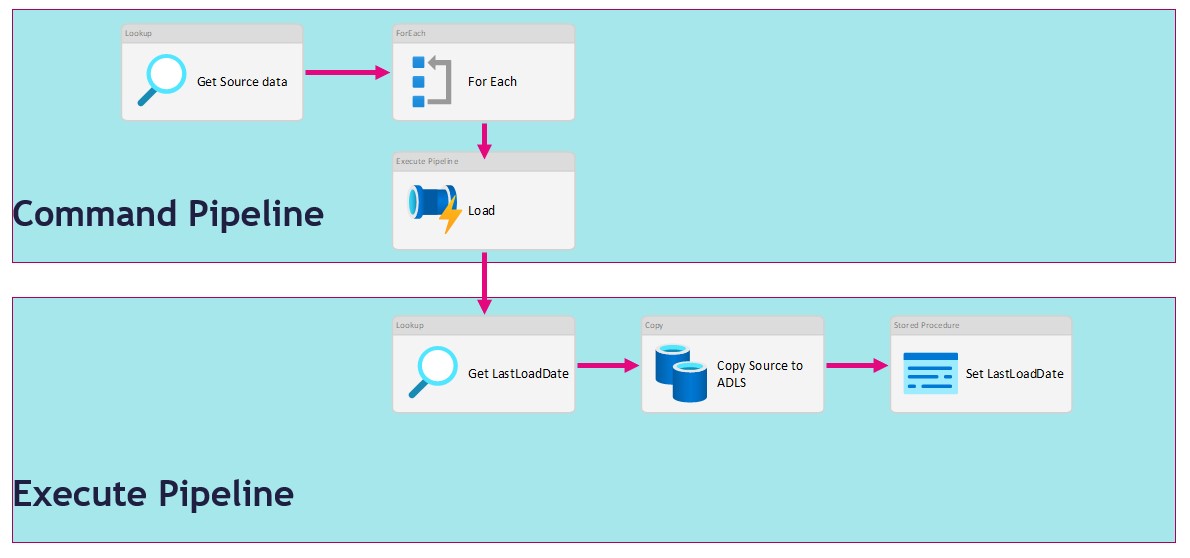
There are several ways to extract data from a source in Azure Synapse Analytics or in Azure Data Factory.In this article I'm going to use a metadata-driven approach by using a control table in Azure SQL in which we configure the metadata(The data which we need to extract).We then load data from an Azure SQL Database to a Azure Data Lake.We will use 2 Pipelines for this activity:
The Command Pipeline in which we configure our metadata-driven approach
The Execute Pipeline in which we perform the actual data copy activity
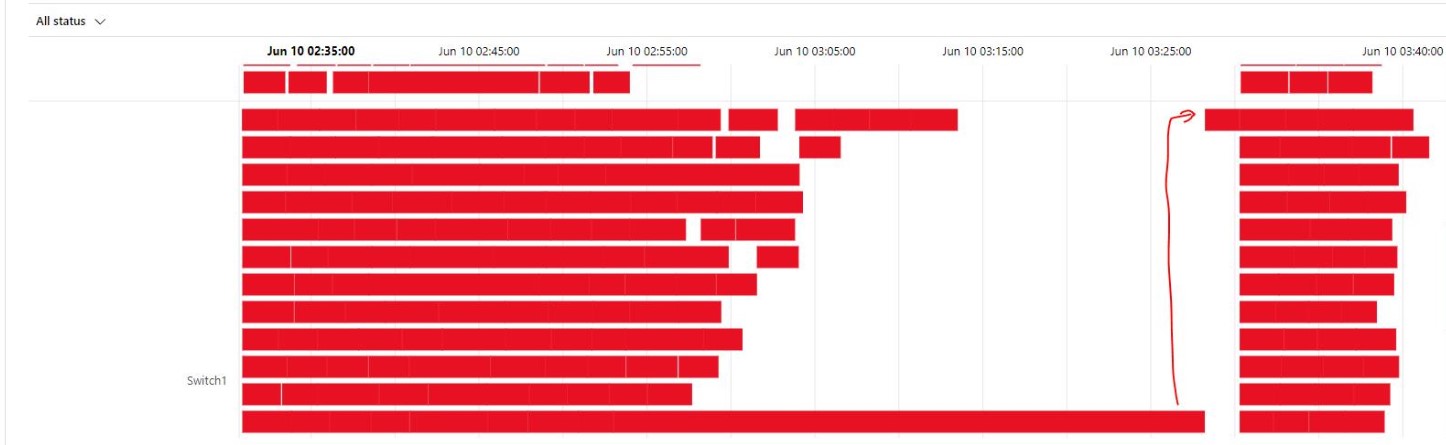
As you can see in the figure above we use the For Each activity to call the execute pipeline. But when we use the For Each Activity, the Execute Pipelines are assigned during the start of the For Each Activity and not during run time. We will only see this behaviour while extracting a large amount of tables. I have noticed that slots are idle and not starting a new task before one the other task are finished. Due to this behaviour we will see gaps in the Execution window as we can see in the figure below.
In the article below I will give you a solution to get control of your data loads by using the Lookup Activity and based on a control table where we can define the workloads.
Metadata
When you're already using a database where you store your Metadata, use this database otherwise create a new one. We then need to create the table below where we store the table names which we need to extract.
Your own custom select querie to load data, do casting or just get a subset of columns
DataLakeCatalog
Name of the datalake folder to store raw parquet files
Worker
To divide and order the workload, a source can be assigned to 6 workers. These unassigned sources running parallel in batches of 30 (1-6)
WorkerOrder
The loading order for the sources assigned to workers 1 till 6.
TableDestinationName
Name of the datastore table to store source data
TableDestinationSchema
Name of the datastore schema to store source data
IsActive
Activate or disable the source from loading (1|0)
IsIncremental
Set to 1 if the source needs to be delta loaded (1|0)
IsIncrementalColumn
If above setting is set to 1, on which datetime column do we need to base the incremental load
LastLoadtime
This field is updated on runtime when the source is loaded.
With the Worker we can define the workload, we can add a same set of tables, a mix of small and large tables, together. This worker can be changed any time.
Once we have filled the configuration we can start creating our Linked Services for the connections.
Create Linked Services
For these 2 Pipelines we need to create 4 different Linked Services.
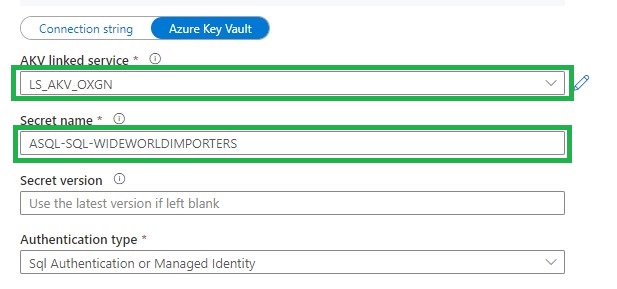
Azure Key Vault (LS_AKV_OXGN), if you haven't created a Linked Service for Azure Key Vault before please read this page.
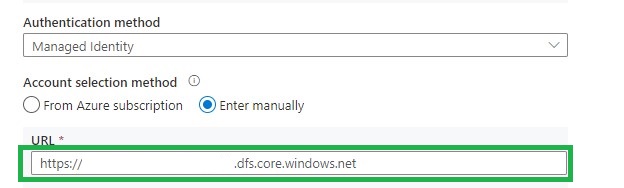
Azure Data Lake Storage Gen2 (LS_ADLS_DLS2), linked to your Azure Data Lake.
Before we can start building our Pipeline we need to create the Integration Datasets.
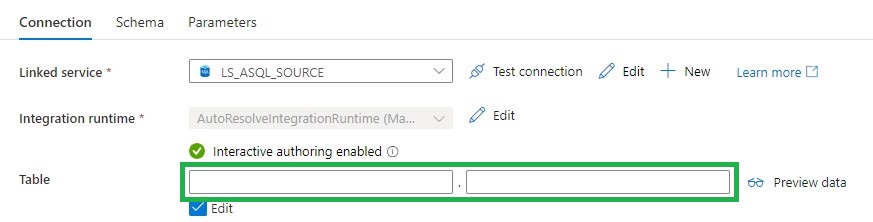
Source database (DS_ASQL_SOURCE_DEMO)
Leave the Table Schema and Name empty,
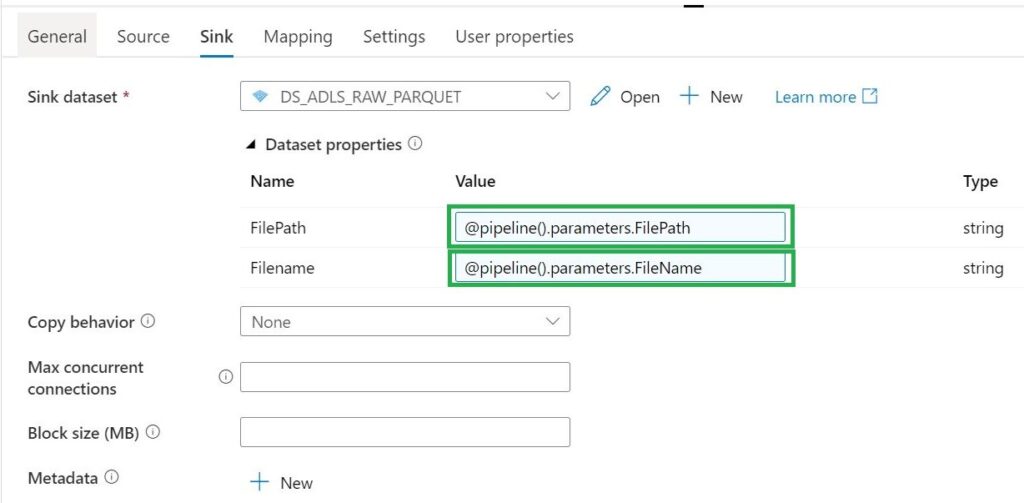
Sink Datalake (DS_ADLS_RAW_PARQUET)
Parameters
FilePath
Filename
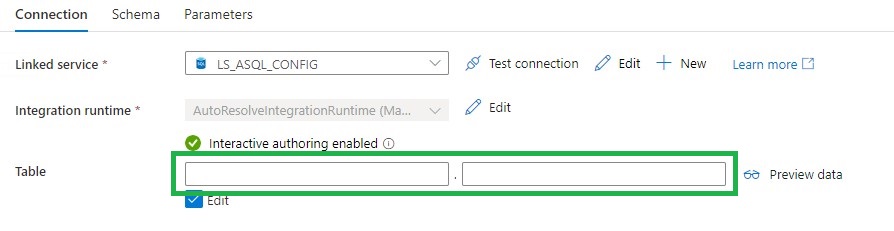
Metadata DB (DS_ASQL_CONFIG)
Leave the Table Schema and Name empty,
Pipeline
The last step is to create 2 Pipelines, which you can both download over here.
Command Pipeline
Name: (PL_COMMAND_COPY_ASQL_TO_ADLS_WORKER_DEMO)
Lookup Activity
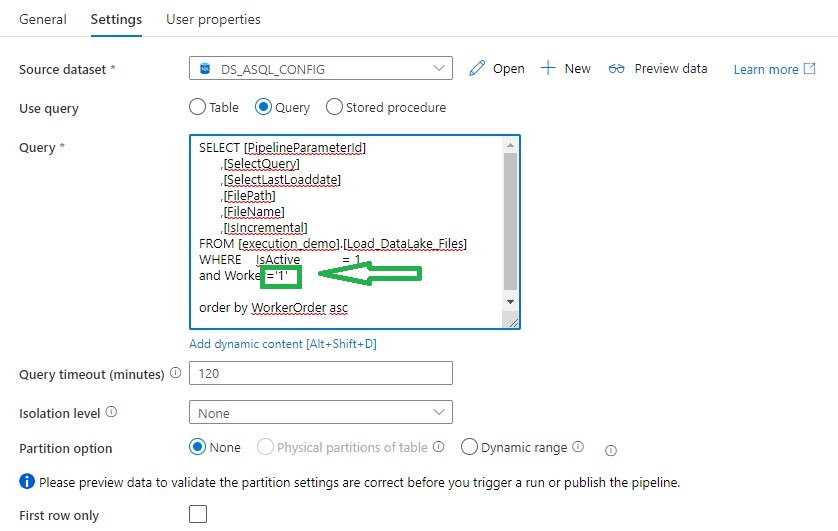
Lookup activity can retrieve a dataset from any of the Azure Data Factory / Azure Synapse -supported data sources. For this case we use a query to load the Metadata from the control table so that we know which tables we need to extract.
For above Query I've created a view, in the view I have defined the name of the folder and the Filename with the DataLake based on the metadata from the control table.
[sql]
CREATE view [execution_demo].[Load_DataLake_Files]
AS
/**********************************************************************************************************
* View Name:  [execution_demo].[Load_DataLake_Files]
*
* Purpose:    View to show the records which should be processed
*
*
* Revision Date/Time:

**********************************************************************************************************/
SELECT	 SP.Id as [PipelineParameterId]
		,SP.[SourceName]
		,isnull(CASE WHEN SP.[SourceSchema] != '' THEN SP.[SourceSchema] END, 'Unknown')  as SourceSchema
		,case when Worker not in (1,2,3,4,5,6)  then 1 else Worker end Worker
		,WorkerOrder
		,case	when	SourceQueryCustom is null
			then	'SELECT * FROM [' +isnull(CASE WHEN SP.[SourceSchema] != '' THEN SP.[SourceSchema] END, 'Unknown') + '].[' + SP.[SourceName] + '] where 0 = ' + convert(nvarchar(1),[IsIncremental]) + ' OR 1 = ' + convert(nvarchar(1),[IsIncremental]) + ' AND ' + isnull(SP.[IsIncrementalColumn],'1') +' >='''+convert(varchar(20),ISNULL([LastLoadtime], '1900.01.01'))+''''
			else	[SourceQueryCustom]
		 end As SelectQuery
		,'SELECT CASE WHEN ' + convert(nvarchar(1),[IsIncremental]) + ' = 1 THEN CONVERT(VARCHAR, MAX(' + isnull(SP.[IsIncrementalColumn],'1') +'), 120) ELSE CONVERT(VARCHAR, GETDATE(), 120) END AS [LastLoadDate] FROM [' +isnull(CASE WHEN SP.[SourceSchema] != '' THEN SP.[SourceSchema] END, 'Unknown') + '].[' + SP.[SourceName] + ']' AS [SelectLastLoaddate]
		,isnull(CASE WHEN SP.DataLakeCatalog != '' THEN SP.DataLakeCatalog END, 'Unknown') + '/' +
					isnull(CASE WHEN SP.[SourceSchema] != '' THEN SP.[SourceSchema] END, 'Unknown') + '_' +
					SP.TableDestinationName + '/' +
					FORMAT(GETUTCDATE(), 'yyyy') +'/'+
					FORMAT(GETUTCDATE(), 'MM') +'/'+
					FORMAT(GETUTCDATE(), 'dd')
           as  FilePath
		,isnull(CASE WHEN SP.DataLakeCatalog != '' THEN SP.DataLakeCatalog END, 'Unknown')  + '_' +
					isnull(CASE WHEN SP.[SourceSchema] != '' THEN SP.[SourceSchema] END, 'Unknown') + '_' +
					SP.TableDestinationName + '_' +
					FORMAT(GETUTCDATE(), 'yyyy') +
					FORMAT(GETUTCDATE(), 'MM') +
					FORMAT(GETUTCDATE(), 'dd') +
					FORMAT(GETUTCDATE(), 'HH') +
					FORMAT(GETUTCDATE(), 'mm') +'.parquet'
                --Equal to Filename
			 as [FileName]
		,SP.[TableDestinationName]
		,SP.[ProcessType]
		,cast(SP.[IsActive] as BIT) AS [IsActive]
		,cast(SP.[IsIncremental] as BIT) AS [IsIncremental]
		,isnull(SP.[IsIncrementalColumn],1) as [IsIncrementalColumn]
		,case when [LastLoadtime] is null then '1900.01.01' else LastLoadtime end  as LastLoadtime
FROM [configuration_demo].[Source_Parameter]  as SP
[/sql]
For each Activity
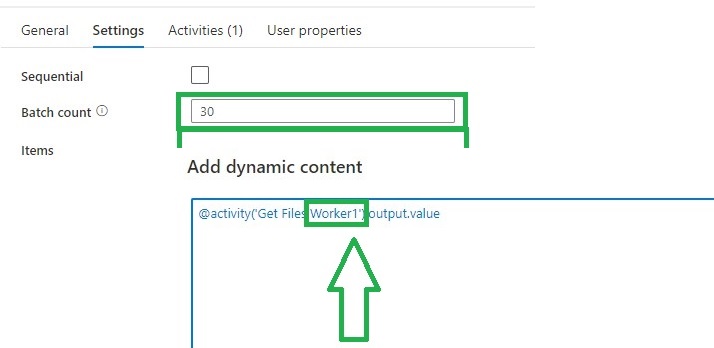
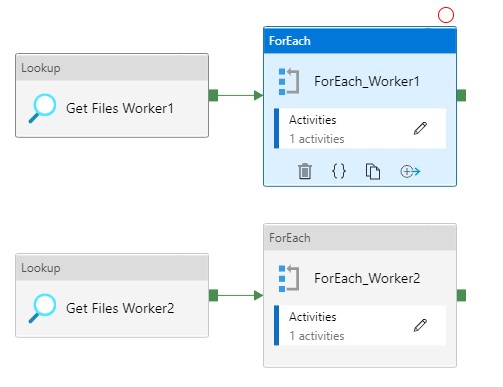
The ForEach Activity defines a repeating control flow in your pipeline. In this case it will call the Pipeline Activity based on the output of Lookup Activity Get Files Worker XX.
Within each Activity we add a Pipeline Activity, to finalize this Pipeline we first need to create the Execute Pipeline.
Execute Pipeline
Name: (PL_EXECUTE_COPY_ASQL_TO_ADLS_DEMO)
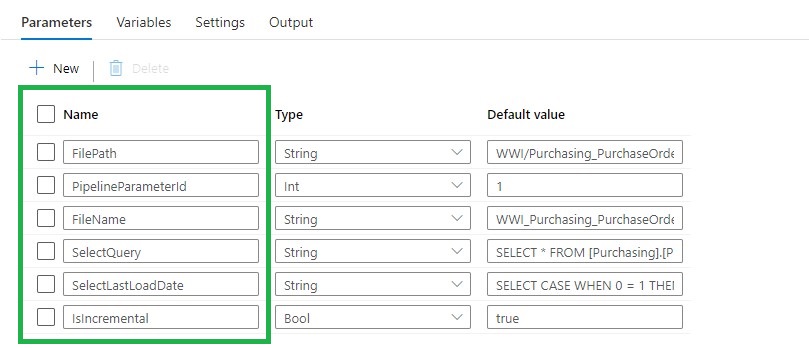
Add the following Parameters to the Pipeline:
Switch Activity
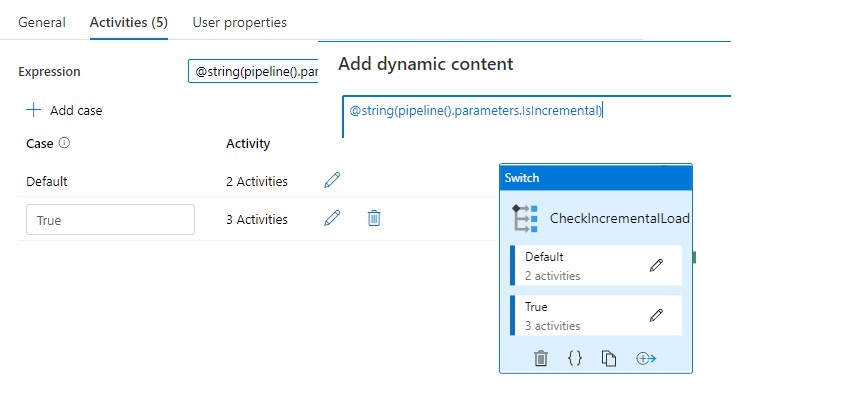
The Switch activity provides the same functionality that a switch statement provides in programming languages. It evaluates a set of activities corresponding to a case that matches the condition evaluation.
In this situation we create a case for Incremental Loads or Full loads. Why do we do this? We pay for every activity and every activity will take time. If we have a full load we don't need the last load date from the source. So in this situation it will save you 1 activity and 15 sec for every Full load.
Lookup Activity
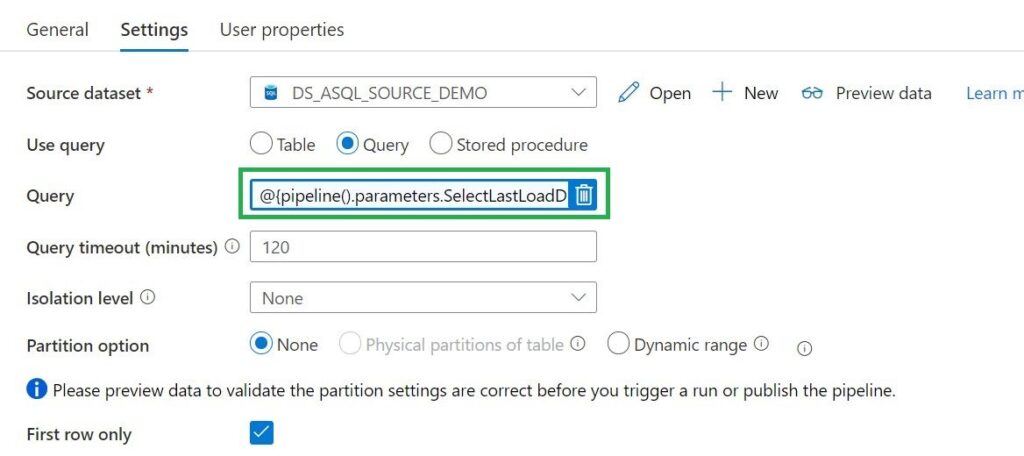
Use the Lookup Activity to get the LastLoadDateTime from a Source Table. We will store this value at the end of the process for incremental Loading purposes. In this way, we exactly know the correct value if we run the process the next time. This Activity is only used in the switch activity when the case Incremental = True .
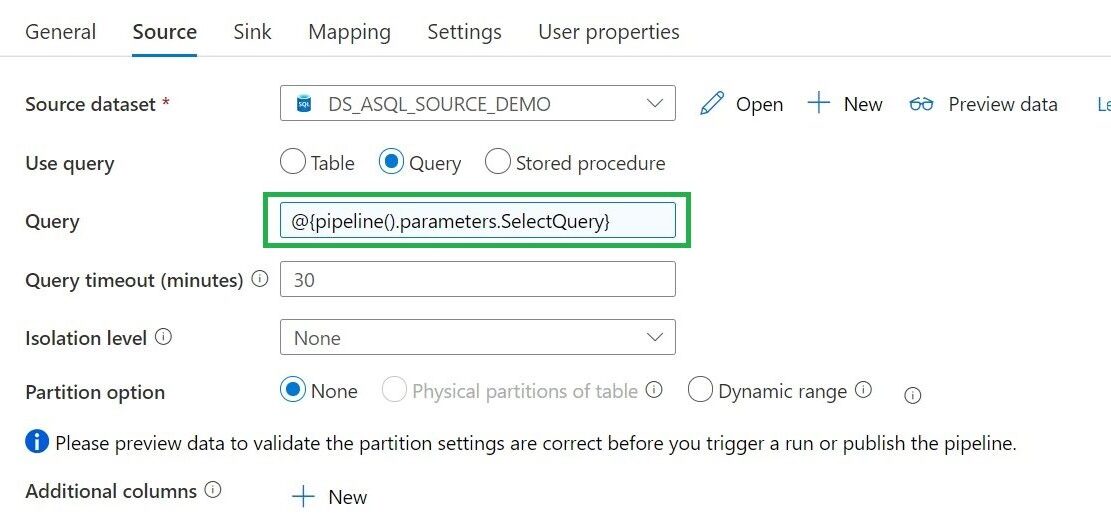
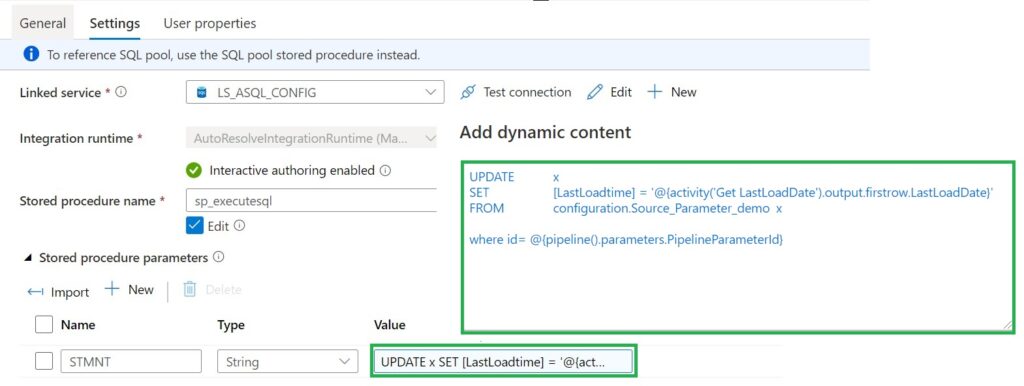
Use Stored procedure Activity to do data transformation activities in a Data Factory / Synapse pipeline to transform and process raw data into predictions and insights. We use it to update our control table with the Incremental Value from the source which we looked up in the beginning of our pipeline.
For the Full load Switch we replace "'@{activity('Get LastLoadDate').output.firstrow.LastLoadDate}' " with "getdate()"
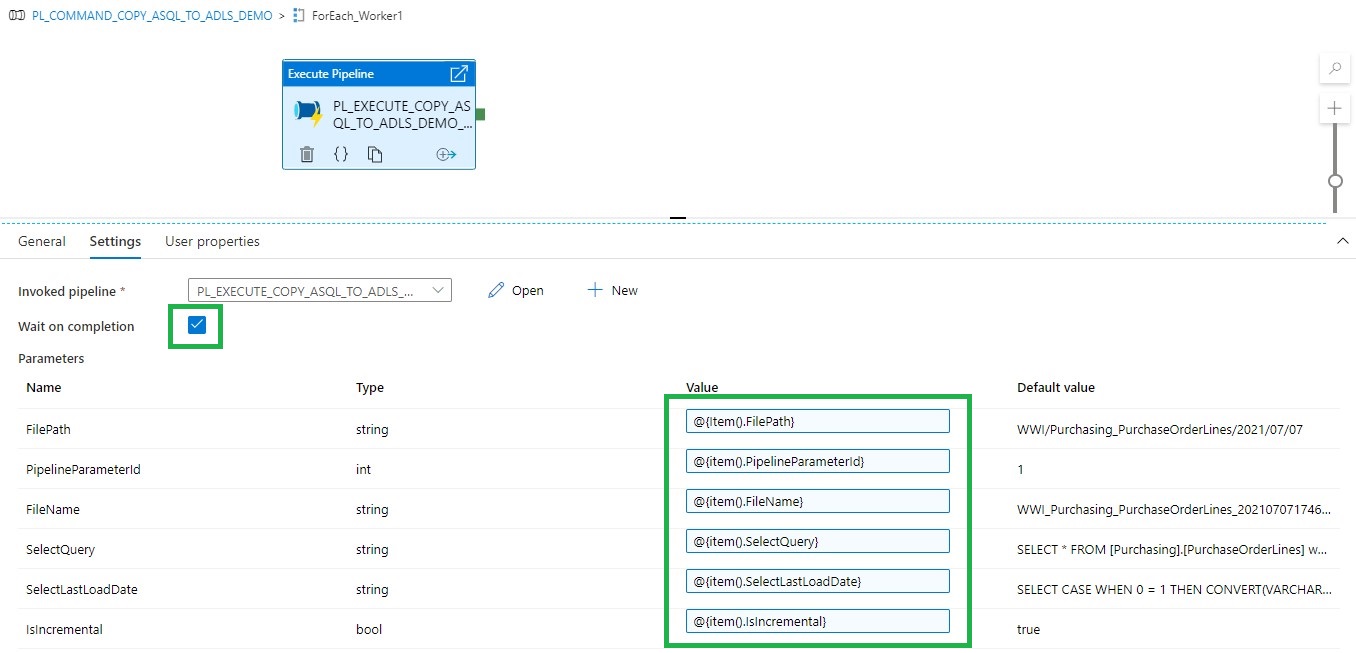
Now we have finalized our execute pipeline we need to finalize the command pipeline.
Fill in the parameters based on the output of the Get Files Worker1 and you're ready to rock.
Copy and Paste the Get Files Worker 1 and ForEach_Worker1 to the desired number or workers, rename them to 2,3,4,5 and so on. Change the worker number in the Lookup query or even easier just download both templates from my Github.
The great advantage of above solution is that you are now in control how your loads are running instead of the random slots in an For each Activity.
Hopefully this article has helped you a step further. As always, if you have any questions, leave them in the comments.
The Data Factory home page has been redesigned for a modern and more accessible (WCAG 2.1) experience. The new design is more fluid with better contrast and reflow capabilities.
Thank you to the complete product team for this great experience
Have you ever experienced that you accidentally deleted your Logical Server in Azure? Because, for example, you made your Pipeline wrong. Surely. And of course you didn't have a backup in your storage either. Well I must confess that happened to me recently. It was on my test environment but if you delete a configuration database with your metadata it is quite annoying.
How to Resolve?
But there is a solution to get the deleted Azure SQL databases back.
You need to take the following steps for this:
Recreate the Logical server with the same name and in the same region.
Do not re-deploy the deleted databases from your pipeline.
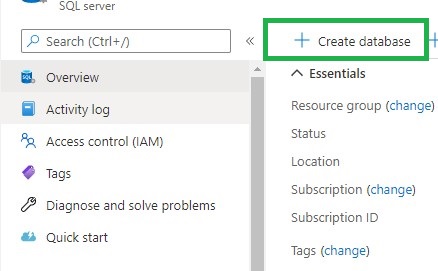
After the Logical Server has been created, click Create Database in the Azure Portal
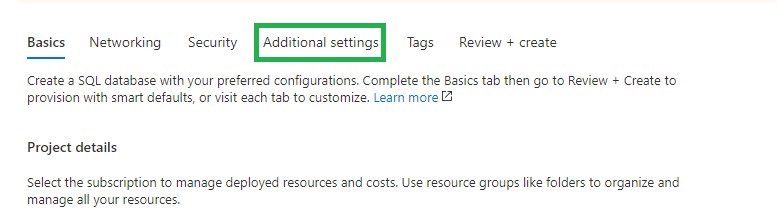
Go directly to the tab Additional Settings
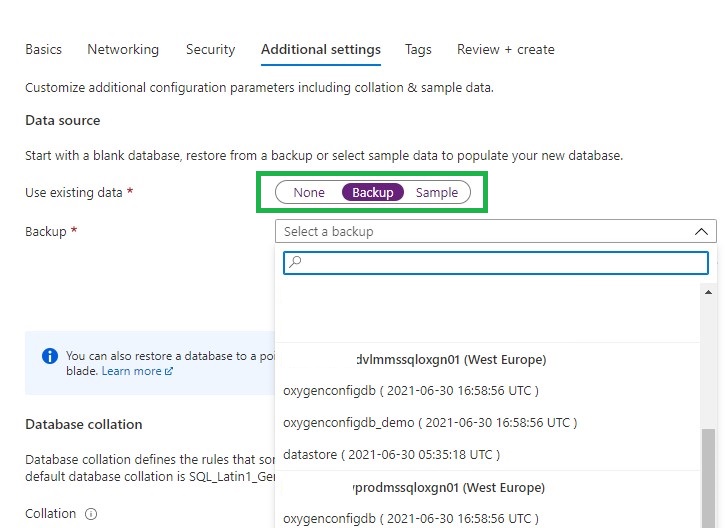
Select Backup
Search for your deleted Logical Server and you will see that you can restore your removed databases.
Select the correct database, click on review and create. Your database will now be restored
The last thing you need to do is to remove the datetime extension from your database
You can now start using your database again and all security roles that were there before are also present.
Repeat above steps in case you had more databases attached to the same server.
It's a fairly simple process, but you just need to know it. And it will ultimately save you a lot of time and frustration. If you have any questions regarding the above, please let me know.