Add custom comments to your Azure DevOps and Github commits
Finally
Finally and secretly hidden, we can now add a Comment to our commits in Azure Synapse Analytics and Azure Data Factory to Azure Dev Ops.
How do you activate this custom comment option in your existing environment. Read below.
Existing environment
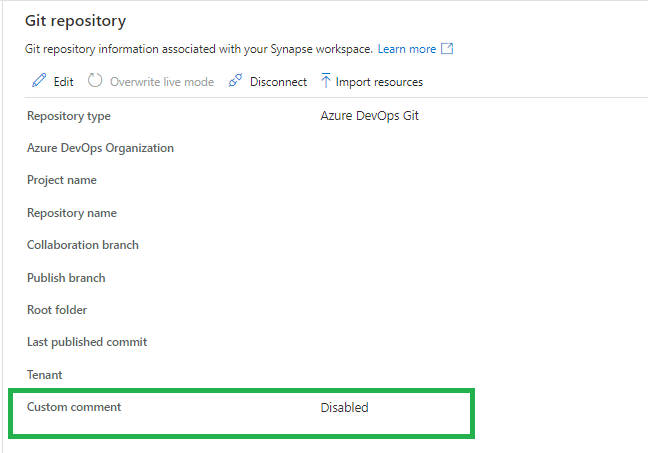
In Azure Synapse Analytics, go to the Git Configuration in the Management Activity Hub.
If the custom command is not enabled, you will see that this new feature is available.
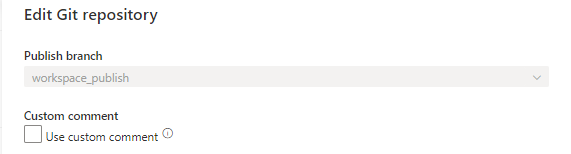
When you click on edit you can enable this new feature. Make sure you're are allowed to make changes to your current branch. Otherwise create a new feature and make the change in this feature before you merge(Pull request) it into your develop branch.
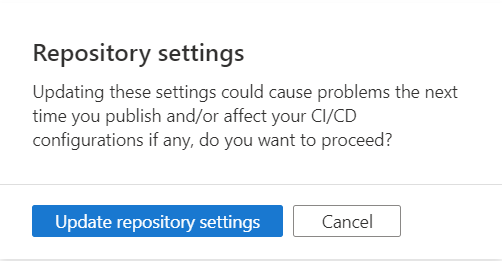
You will get a warning, this is mainly because you're updating a configuration file.
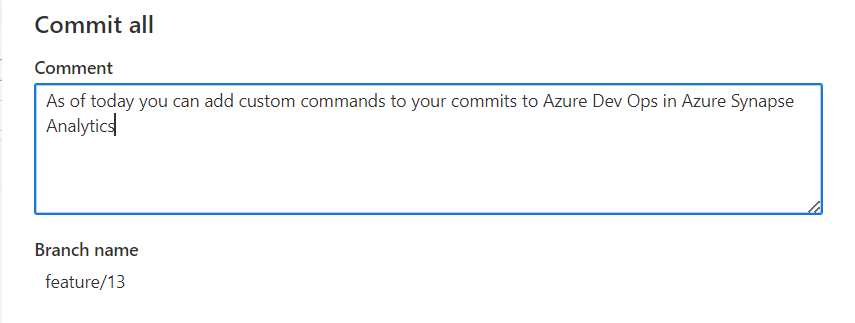
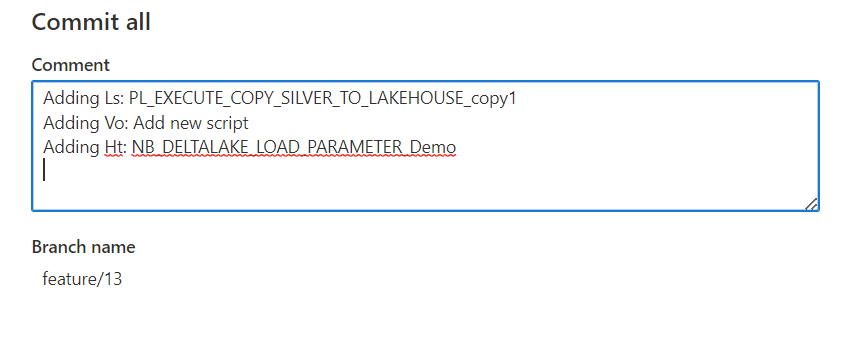
Once the option is enables, you will have the possibility to add a custom command on your commit. Which can be very useful.
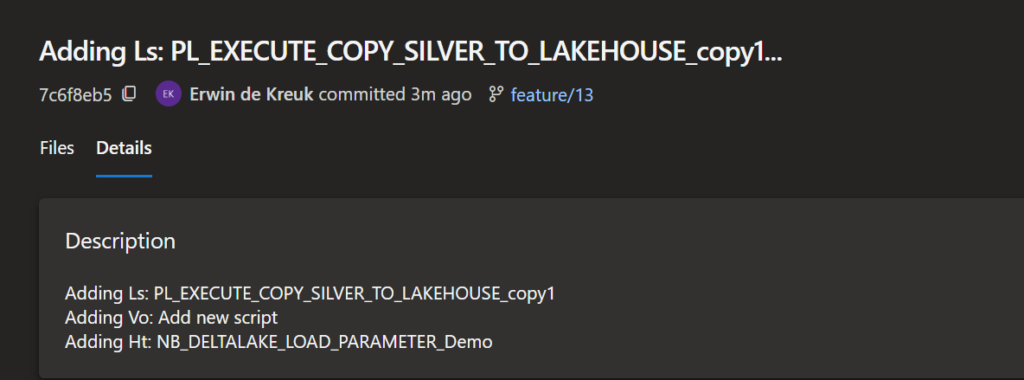
This message will be pushed to Azure DevOps as well and can be found on your commit, including the custom commands you added.
New environment
The new option is now also available when you connect Azure DevOps for the first time, just enable the option in the configuration pane.
Azure DevOps
You can enable this option also directly in Azure DevOps by adding the following option in enableGitComment":true in de publish_config.json file, which is located in the root folder of you Azure Synapse repository.
Azure Data Factory
The above steps are working the same in Azure Data Factory
Github
Custom comments are also available in Github, works the same as Azure DevOps
Remarks
The custom comment option is only working when you apply the Commit All button, it is not working on a single artifact commit.
Have fun with it and let me now your findings!
It's a fairly simple process, but you just need to know it. And it will ultimately makes the collaboration with your team members much easier.
If you have any questions regarding the above, please let me know.
Last weekend I had the honor to speak at Data Saturday in Stockholm. About one of my favourite topics Azure Synapse Analytics. It was nice to see everyone in person again. The organization was well organized down to the last detail, Daniel thanks for that. Thanks to all the sponsors this event could happen.
Below you find my slides and in case you have questions left, do not hesitate to contact me.
Source Control: Ensures that all your changes are saved and traceable, but also that you can easily go back to a previous version in case of a bug.
Continuous Integration and Continuous Delivery (CI/CD): Allows you to Create build and release pipelines for easy release to other Data Factory instance, manually or triggered(DTAP).
Collaboration: You have the ability to easily collaborate in the same Data Factory with different colleagues.
Performance: Your Data Factory from Git is 10 times faster then loading directly from the Data Factory Service.
So enough reasons to start enabling your Git Configuration.
How to setup your Code Repository in Azure Data Factory!
During the configuration/set up of your Data Factory you have the possibility to select either Azure DevOps or GitHub as your Git Configuration. If you haven't done that, you can still configure this integration in Azure Data Factory. The procedure for both options are the same. In my previous article, Creating an Azure Data Factory Instance, I skipped the Git Configuration. In this article I will explain how to do this in an already created Data Factory.
On the right of your splash screen when opening your Data Factory select the Setup Code Repository. Other options to start configuring your Code Repository are through the Management Hub or in the UX on the top left in the authoring canvas. If you don't see the option, Code Repository is already configured. You can check this in the Management Hub or UX.
We have the option to configure Azure DevOps or GitHub.
Azure DevOps integration
First I will take you through the configuration of Azure DevOps and then also create a similar configuration in GitHub. If you want to start directly in GitHub, click here.
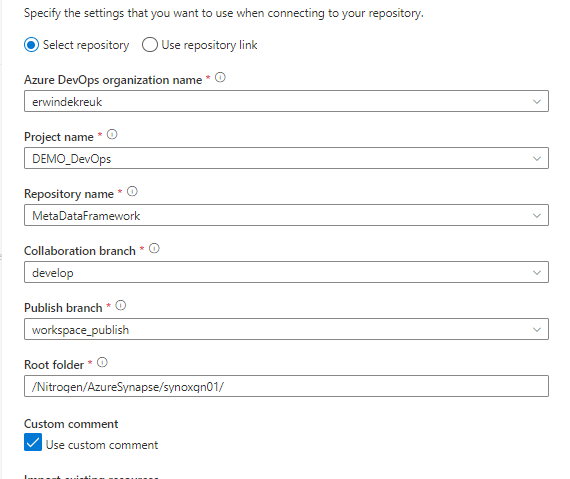
Select Azure DevOps Git:
Azure Active Directory: Select the AAD where your Azure DevOps environment is located. If you use another AAD, make sure that this account has rights to that environment.
Azure DevOps Account: Select your Account.
Project Name: Select the Project Name where you want to store your repository in.
Git Repository: Create a new Project.
Collaboration Branch: Change this to Main.
Publish Branch: Leave this on adf_publish.
Root folder: If you want to create a complete project with SQL,Azure Analysis Service, Azure DataBricks etc etc, you define a root folder and create your repository into that folder.
Import: When this is a blank Data Factory, you can disable this option. When you have create already resources in your Data Factory, you should enable this so already created resources are committed to the repository.
Click on apply and you will see that you repository is connected.
When you log in to your Azure Dev Ops Environment, you will see that a new Repository is created Main Branch.
Go back to your Data Factory and click on Publish.
In Azure DevOps the adf_publish Branch is now also created.
GitHub Integration
In the repository screen, select GitHub:
The first time you connect with your Data Factory you need to login in GitHub.
Once connect you to need to Authorize your Data Factory.
All the settings are almost the same as in Azure DevOps:
Use GitHub Server Enterprise: If enabled fill the The GitHub Enterprise root URL.
GitHub Account: Select your Account.
Project Name: Select the Project Name where you want to store your repository in.
Git Repository: Create a new Project.
Collaboration Branch: Leave this on Main.
Publish Branch: Leave this on adf_publish.
Root folder: If you want to create a complete project with SQL, Azure Analysis Service, Azure DataBricks etc etc, you define a root folder and create your repository into that folder.
Import: When this is a blank Data Factory, you can disable this option. When you have create already resources in your Data Factory, you should enable this so already created resources are committed to the repository.
Click on apply and you will see that you repository is connected.
Log in to your GitHub, a new Repository is created Main Branch. If you go back to your Data Factory and click on Publish.
In GitHub the adf_publish Branch is now also created.
As you can see the Setup for Azure Dev Ops and GitHub are mostly the same. You have now learned how to connect your Data Factory to a Code Repository. You're now ready to start building your Release and build pipeline's.
Thanks for reading and in case you have some questions, please leave them in the comments below.