Azure Data Factory: How to assign a Customer Managed Key
Customer key
With this new functionality you can add extra security to your Azure Data Factory environment. Where the data was first encrypted with a randomly generated key from Microsoft, you can now use the customer-managed key feature. With this Bring Your Own Key (BYOK) you can add extra security to your Azure Data Factory environment. If you use the customer-managed key functionality, the data will be encrypted in combination with the ADF system key. You can create your own key or have it generated by the Azure Key Vault API
Be careful, this new feature can only be enabled on an empty Azure Data Factory environment. Make sure your Azure Active Directory, Azure Data Factory and Azure KeyVault are all in the same region. If you use an Azure Landing Zone consisting of different subscriptions, this is also possible, as long as the services exist in the same region.
Please follow the steps below how to enable this new feature:
I assume that you already have an existing Azure KeyVault. If not, you will have to create one first. You can read how to do that here.
With an existing Azure KeyVault, it is important that you enable the options Soft Deletes and Purge protection.
Enable Soft Deletes and Purge protection

If you want to enable this via Powershell use the following command:
[code lang="ps"] ($resource = Get-AzResource -ResourceId (Get-AzKeyVault -VaultName 'YOURKEYVAULTNAME').ResourceId).Properties | Add-Member -MemberType 'NoteProperty' -Name 'enableSoftDelete' -Value 'true'

Set-AzResource -resourceid $resource.ResourceId -Properties $resource.Properties

($resource = Get-AzResource -ResourceId (Get-AzKeyVault -VaultName 'YOURKEYVAULTNAME').ResourceId).Properties | Add-Member -MemberType 'NoteProperty' -Name 'enablePurgeProtection' -Value 'true'

Set-AzResource -resourceid $resource.ResourceId -Properties $resource.Properties
Define Access policy
The next step is to enable your Grant Data Factory access to Azure Key Vault, you have to enable the following permissions: Get, Unwrap Key, and Wrap Key
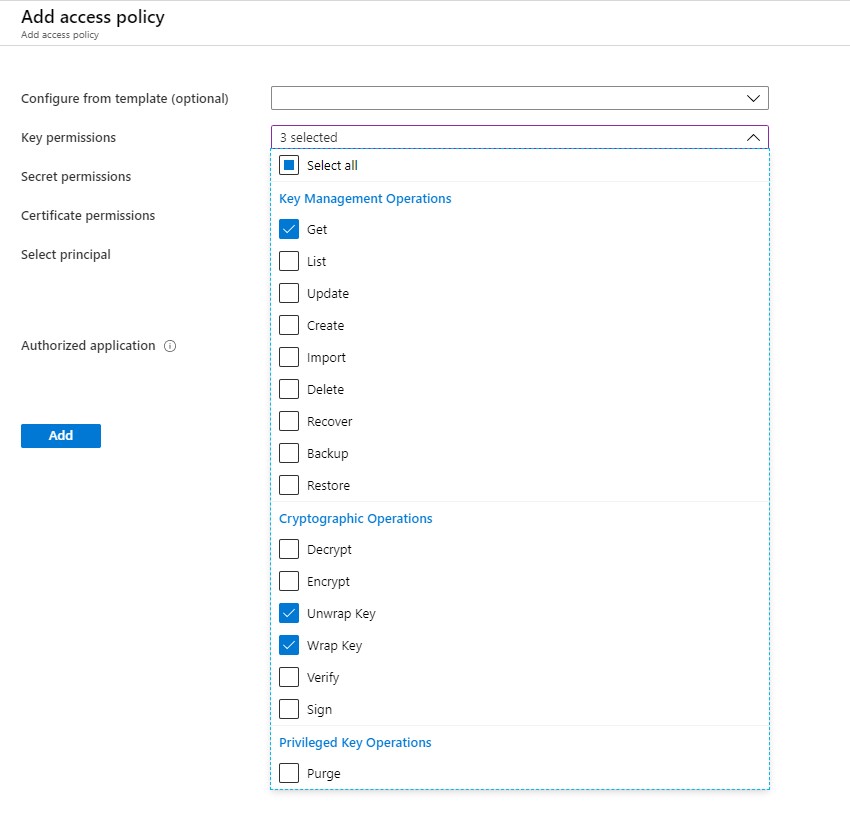
Search for Data Factory Instance and Select the correct one:

Create KEY
Once you have done that it’s time to create your Keys. Keep in mind that only RSA 2048-bit keys are supported by Azure Data Factory encryption.
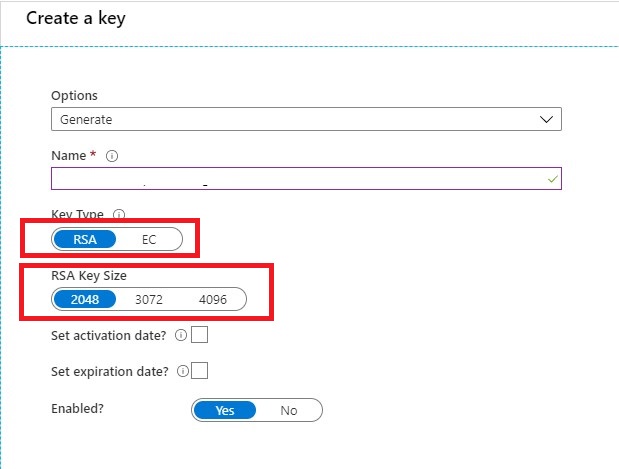
Very important step your key name must be in only letters. KEYADFNAMECUSTOMER will work, but KEY-ADFNAME-CUSTOMER isn’t and you will get an error in your Azure Data Factory Instance. It took me a while to figure this out. So it can saves you a lot of time.
After your KEY is created, copy the Key Identifier.
Assign Customer Key
The last step in this article is to assign the key to your Azure Data Factory Instance.
![]()
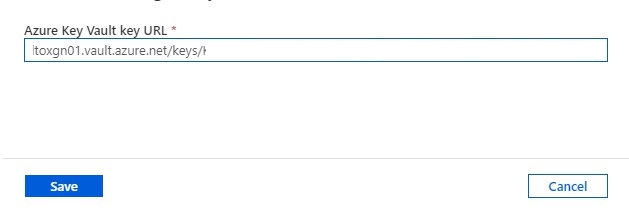
Paste the selected key in your Azure Data Factory Instance and save.
Errors
If your get an error “Invalid key Vault URL”

-Check if the Soft Deletes and Purge protection on your Key Vault is set.
-Check if your Key consists only of letters.
-Check if you enabled your Grant Data Factory access to Azure Key Vault.
-Check if Azure DataFactory, Azure KeyVault and your Azure Active Directory are in the same region.
If you still have errors, please send me a message and I will try to help you out.
Hopefully, this article has helped you to secure your environment.



i have this error message whtn im creating a data factoruy resource with a keyvault:
{
“status”: “Failed”,
“error”: {
“code”: “CustomerManagedKeyInvalidParameters”,
“message”: “Create or update failed. Encryption settings contain invalid parameters”
}
HI Kevin,
When do you get this error message?
Make sure you add a customer managed key on an empty ADF Instance
Did you checked the following requirements:
-Check if the Soft Deletes and Purge protection on your Key Vault is set.
-Check if your Key consists only of letters.
-Check if you enabled your Grant Data Factory access to Azure Key Vault.
-Check if Azure DataFactory, Azure KeyVault and your Azure Active Directory are in the same region.
Erwin