How to use notebookutils.notebook.runMultiple in Notebooks in Microsoft Fabric?

How to use notebookutils.notebook.runMultiple in Notebooks in Microsoft Fabric?

Month: January 2024

by Erwin | Jan 31, 2024

In the previous blog post we explored how to use the PySpark Executor. However, sometimes you may need to run multiple notebooks in a specific order or in parallel, depending on the dependencies and logic of your data pipeline. For example, you may have a notebook that preprocesses the data, another notebook that trains a machine learning model, and another notebook that evaluates the model and generates a report. How can you orchestrate these notebooks in Microsoft Fabric?

The answer is notebookutils.notebook.runMultiple, a built-in function that allows you to run multiple notebooks in parallel or with a predefined topological structure. With notebookutils.notebook.runMultiple, you can:

  • Execute multiple notebooks simultaneously, without waiting for each one to finish.
  • Specify the dependencies and order of execution for your notebooks, using a simple JSON format.
  • Optimize the use of Spark compute resources and reduce the cost of your Fabric projects.

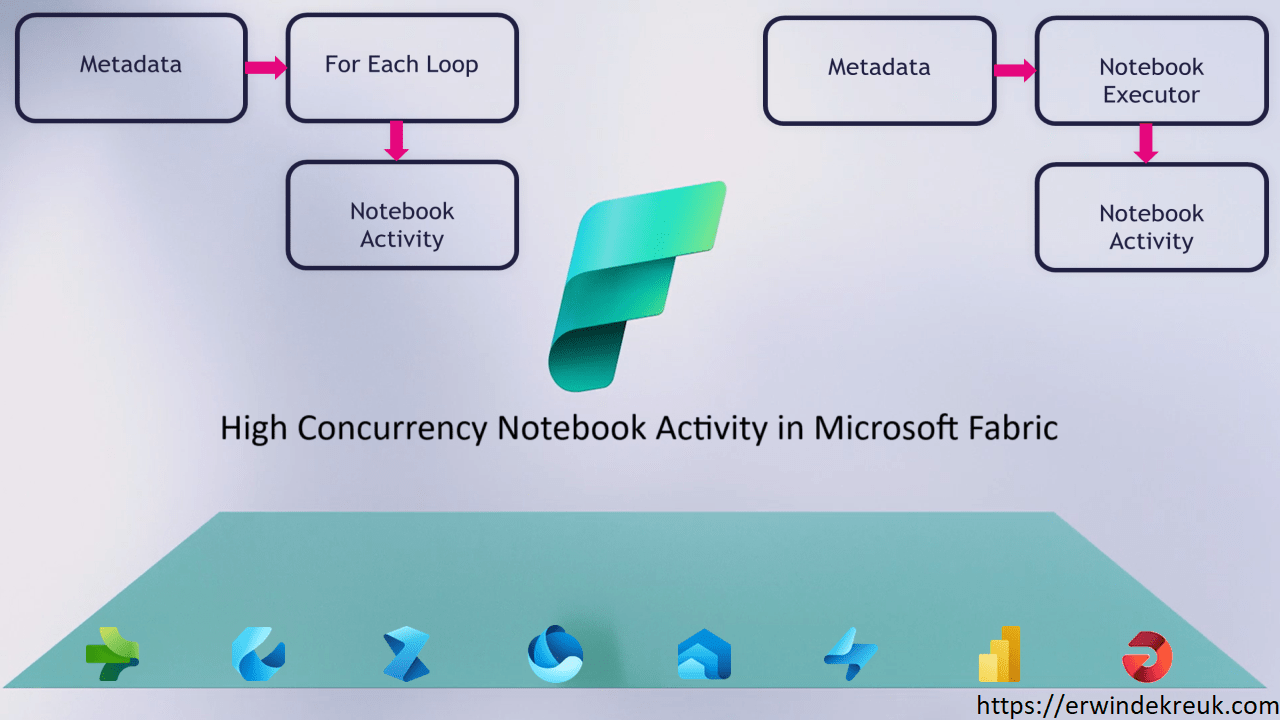
In this blog post, I will show you how to use notebookutils.notebook.runMultiple with DAG (Directed Acyclic Graph) in Notebooks in Microsoft Fabric to achieve high concurrency, flexibility, and scalability.

What is notebookutils.notebook.runMultiple()?

The method notebookutils.notebook.runMultiple() allows you to run multiple notebooks in parallel or with a predefined topological structure. The API is using a multi-thread implementation mechanism within a spark session, which means the compute resources are shared by the reference notebook runs. With notebookutils.notebook.runMultiple() , you can:

  • Run multiple notebooks in parallel, without any dependency or order among them.
  • Run multiple notebooks in a DAG, where each notebook can depend on the output of one or more previous notebooks.
  • Pass parameters to the notebooks, such as input data, configuration, or variables.
  • Get the output of the notebooks, such as return values, metrics, or logs.

How to use notebookutils.notebook.runMultiple()?

To use notebookutils.notebook.runMultiple() , you need to follow these steps:

  1. Create the notebooks that you want to run. You can use any language that is supported by Fabric, such as Pyspark(Python), Scala, or R. Make sure to save your notebooks in the same workspace or folder, and give them meaningful names. For example, you can create three notebooks: NB_LOAD_1, NB_LOAD_2 and NB_LOAD_3. Or you can just use 1 Notebook and execute the Notebook with different parameters.
  2. Define the DAG of your notebooks. You can use a Python dictionary to specify the dependency and order of your notebooks. The keys of the dictionary are the names of the notebooks, and the values are lists of the names of the notebooks that they depend on. For example, you can define a DAG like this:

Run multiple notebooks in parallel

Simple example of using notebookutils.notebook.runMultiple to run multiple notebooks in parallel, you can pass a list of notebook as input.

notebookutils.notebook.runMultiple(["NotebookSample1", "NotebookSample2"]) 

Run multiple notebooks with parameters sequential/in parallel

Run multiple notebooks with parameters sequential/in parallel

from notebookutils import notebookutils
DAG = {

    "activities": [

        {   "name": "NB_Bronze_Silver_Logging", # activity name, must be unique
            "path": "NB_Bronze_Silver_Logging", # notebook path
            "timeoutPerCellInSeconds": 90, # max timeout for each cell, default to 90 seconds

            "args": {"source_schema": "Application","source_name": "People","sourceLakehouse": "xxxxxxxxx",
			         "target_schema": "Application","target_name": "People","targetLakehouse": "xxxxxxxxxx",
                     "NotebookExecutionId": NotebookExecutionId,
                     'useRootDefaultLakehouse': True}, # notebook parameters

            #"workspace": "workspace1", # workspace name, default to current workspace
            "retry": 1, # max retry times, default to 0
            "retryIntervalInSeconds": 30, # retry interval, default to 0 seconds
            #"dependencies": [] # list of activity names that this activity depends on

        },
        {   "name": "NB_Bronze_Silver_Logging_1", # activity name, must be unique
            "path": "NB_Bronze_Silver_Logging", # notebook path
            "timeoutPerCellInSeconds": 90, # max timeout for each cell, default to 90 seconds

            "args": {"source_schema": "Application","source_name": "PaymentMethods","sourceLakehouse": "xxxxxxxxx",
			         "target_schema": "Application","target_name": "PaymentMethods","targetLakehouse": "xxxxxxxxxx",
                     "NotebookExecutionId": NotebookExecutionId,
                     'useRootDefaultLakehouse': True}, # notebook parameters

            #"workspace": "workspace1", # workspace name, default to current workspace
            "retry": 1, # max retry times, default to 0
            "retryIntervalInSeconds": 0, # retry interval, default to 0 seconds
            #"dependencies": [] # list of activity names that this activity depends on

        },
        {   "name": "NB_Bronze_Silver_Logging_2", # activity name, must be unique
            "path": "NB_Bronze_Silver_Logging", # notebook path
            "timeoutPerCellInSeconds": 90, # max timeout for each cell, default to 90 seconds
            "args": {"source_schema": "Application","source_name": "DeliveryMethods","sourceLakehouse": "xxxxxxxxx",
                     "target_schema": "Application","target_name": "DeliveryMethods","targetLakehouse": "xxxxxxxxxx",
                     "NotebookExecutionId": NotebookExecutionId,
                     'useRootDefaultLakehouse': True}, # notebook parameters

            #"workspace": "workspace1", # workspace name, default to current workspace
            "retry": 1, # max retry times, default to 0
            "retryIntervalInSeconds": 0, # retry interval, default to 0 seconds
            #"dependencies": [] # list of activity names that this activity depends on
        }

    ],

    "timeoutInSeconds": 43200, # max timeout for the entire pipeline, default to 12 hours
    "concurrency": 0 # max number of notebooks to run concurrently, default to unlimited
}

notebookutils.notebook.runMultiple(DAG)
 

Name: Name of the NotebookActivity, must be unique

Path: Name of the Notebook

Args: Notebook Parameters

Retry: Number of Retries when Notebook fails

Dependencies: List of NotebookActivity names that this activity depends on

The great functionality of using  the RunMultiple is that you have a progress bar and a direct overview which Notebook has run successfully and which one has failed. When using the exitvalue

Fabric-HC-Notebooks

Conclusion

In this blogpost, I showed you how to use notebookutils.notebook.runMultiple() to run multiple notebooks in parallel or with a DAG in Fabric. This method can help you achieve high concurrency, flexibility, and scalability for your data processing workflows. I hope you found this blogpost useful and informative. If you have any questions or feedback, please feel free to leave a comment below. Thank you for reading! 

If you want to learn more from notebookutilscheck the following link NotebookUtils (former MSSparkUtils) for Fabric

NOTE

  • MsSparkUtils has been officially renamed to NotebookUtils. The existing code will remain backward compatible and won't cause any breaking changes. It is strongly recommend upgrading to notebookutils to ensure continued support and access to new features. The mssparkutils namespace will be retired in the future.
  • NotebookUtils is designed to work with Spark 3.4(Runtime v1.2) and above. All new features and updates will be exclusively supported with notebookutils namespace going forward.


Feel free to leave a comment

Video: Learn Live Use Data Factory pipelines in Microsoft Fabric

Video: Learn Live Use Data Factory pipelines in Microsoft Fabric

Month: January 2024

by Erwin | Jan 31, 2024

Below you find the recording form the session for Learn Live which I did together with Javier.

Use Data Factory pipelines in Microsoft Fabric

Use Data Factory pipelines in Microsoft Fabric - Training | Microsoft Learn


After you have followed above learning path you can earn the badge below:

Fabric Data Factory Badge

Feel free to leave a comment

How to use the PySpark executor in Notebooks in Microsoft Fabric?

How to use the PySpark executor in Notebooks in Microsoft Fabric?

Month: January 2024

by Erwin | Jan 29, 2024

In this blog post, we will explore how to use the PySpark executor in Notebooks in Microsoft Fabric to leverage the power of Spark and achieve high concurrency, flexibility and scalability.

What is the PySpark executor?

The PySpark executor is a built-in kernel that allows you to run Python code on top of the remote Fabric Spark compute. This means that you can use the familiar PySpark API to interact with Spark and access its rich functionality, such as Spark SQL, Spark MLlib, Spark Streaming, and more. The PySpark executor also supports multiple languages in one notebook, so you can switch between Python, Scala, SQL, HTML, and R using magic commands.

The PySpark executor is designed to handle concurrent and parallel execution of notebook cells. This means that you can run multiple cells at the same time, without waiting for the previous ones to finish. This can improve the performance and efficiency of your notebook sessions, especially when you have long-running or complex tasks. The PySpark executor also allows you to share the same Spark session across multiple notebooks, which can reduce the overhead of creating and managing Spark contexts.

How to use the PySpark executor in Notebooks in Microsoft Fabric?

To use the PySpark executor in Notebooks in Microsoft Fabric, you need to do the following steps:

  1. Create a Fabric notebook. This is a web-based interactive environment where you can write and run code, visualize data, and document your analysis. You can create notebooks from scratch or use templates and samples provided by Microsoft Fabric.
  2. Set the primary language to PySpark (Python). This will make the PySpark executor the default kernel for your notebook. You can also use multiple languages in one notebook by specifying the language magic command at the beginning of a cell, such as %%pyspark, %%spark, %%sql, %%html, or %%sparkr.
  3. Write and run your PySpark code. You can use the PySpark API to interact with Spark and perform various data engineering and data science tasks. You can also use other Python libraries and packages, such as Pandas, NumPy, Matplotlib, and more. You can install and manage Python libraries using the mssparkutils package, which is a built-in utility that helps you perform common tasks in Fabric notebooks.
  4. Monitor and troubleshoot your notebook sessions. You can use the Fabric monitor to view the status and metrics of your Spark pool and notebook sessions. You can also use the Fabric debugger to debug your PySpark code and identify errors and issues.

Example: Using the PySpark executor to run multiple notebooks in parallel

In this example, we will use the PySpark executor to run multiple notebooks in parallel and collect their results. This can be useful when you have a set of notebooks that perform similar or related tasks, such as data preparation, feature engineering, model training, or evaluation. By running them in parallel, you can save time and resources, and also compare and analyze their outputs.

To run multiple notebooks in parallel, we will use the ThreadPoolExecutor class from the concurrent.futures module in Python. This class provides a high-level interface for asynchronously executing callables using a pool of threads. We will also use the mssparkutils.notebook.runNotebook function, which allows you to run a notebook and return its output as a JSON object.

The following cell needs to be defined in your Notebook as a Parameters cell:

path=[
{"path":"NB_Bronze_Silver","params":{"source_schema": "Application",
												"source_name": "People",
												"sourceLakehouse": "xxxxxxxxxxxxxxxxxxxxxxx",
												"target_schema": "Application",
												"target_name": "People",
												"targetLakehouse": "xxxxxxxxxxxxxxxxxxxxxxx",
												'useRootDefaultLakehouse': True}},
{"path":"NB_Bronze_Silver","params":{"source_schema": "Application",
												"source_name": "DeliveryMethods",
												"sourceLakehouse": "xxxxxxxxxxxxxxxxxxxxxxx",
												"target_schema": "Application",
												"target_name": "DeliveryMethods",
												"targetLakehouse": "xxxxxxxxxxxxxxxxxxxxxxx",
												'useRootDefaultLakehouse': True}}
												]

#Define Notebook to be executed
#Define Parameters to be passed through

The following code snippet shows how to use the PySpark executor to run multiple notebooks(above code snippet) in parallel and collect their results. We assume that we have a list of notebook names that we want to run, and a function called notebook_error_handle that handles any errors or exceptions that may occur during the execution.

# Import the modules
from concurrent.futures import ThreadPoolExecutor
from notebookutils import mssparkutils
timeout = 90

# Define the list of notebooks to run
notebooks = path

# Define a function to handle errors and exceptions
def notebook_error_handle(notebook):
    try:
        # Run the notebook and return the output as a JSON object
        result = mssparkutils.notebook.run(notebook["path"], timeout, notebook["params"])
        return result
    except Exception as e:
        # Print the error message and return None
        print(f"Error running {notebook}: {e}")
        return None

# Create an empty list to store the results
results = []

# Create a thread pool executor with the same number of threads as notebooks
with ThreadPoolExecutor(max_workers=len(notebooks)) as executor:
    # Submit the notebook tasks to the executor and store the futures
    notebook_tasks = [executor.submit(notebook_error_handle, notebook) for notebook in notebooks]
    # Iterate over the futures and append the results to the list
    for notebook_task in notebook_tasks:
        results.append(notebook_task.result())

# Print the results
print(results)

Fabic-HC-Executor

Conclusion

In this blog post, you have learned how to use the PySpark executor in Notebooks in Microsoft Fabric to achieve high concurrency, flexibility and scalability. You have seen how to use the ThreadPoolExecutor class to run multiple notebooks in parallel and collect their results. Ihope that this post has given you some insights and tips on how to leverage the power of Spark an concurrency in Microsoft Fabric. Happy coding!

Stay tuned

In my next blogpost I will explain the working of How to use mssparkutils.notebook.runMultiple in Notebooks in Microsoft Fabric?

Feel free to leave a comment

High Concurrency Notebook Activity in Microsoft Fabric

High Concurrency Notebook Activity in Microsoft Fabric

Month: January 2024

by Erwin | Jan 29, 2024

Microsoft Fabric is a cloud-based platform that provides integrated data engineering and data science solutions. One of the key features of Microsoft Fabric is the support for Apache Spark, a distributed computing framework that enables large-scale data processing and machine learning.

TooManyRequestsForCapacity

If you have ever built a Data Pipeline in Microsoft Fabric, you might have encountered this problem: using a For Each Loop container to run a Notebook with the Notebook Activity based on some input from Lookup or Web Activity, and getting this error message after running more than 4-5 Notebooks:

" [TooManyRequestsForCapacity] Unable to submit this request because all the available capacity is currently being used. Cancel a currently running Notebook or Spark Job Definition job, increase your available capacity, or try again later.HTTP status code: 430."

This means that you have reached the limit of concurrent Notebook executions in Microsoft Fabric. There is a way to enable High Concurrency mode for Notebooks in Microsoft Fabric, which allows you to run more Notebooks on the same session at the same time.

To learn how to enable this mode, follow this link:

Configure high concurrency mode for notebooks

Fabric-set-high-concurrency


Fabric-enable-high-concurrency

High Concurrency for Notebook Activity

However, this mode is not available when you use a Notebook Activity in a Pipeline. This feature is still on the roadmap.

In the upcoming blogs, I will show you different methods to achieve High Concurrency in Data Pipelines in Microsoft Fabric without using the For Each Loop Activity.

Fabric-pipeline-example

Find the different possibilities in the blogs below:

How to use the PySpark executor in Notebooks in Microsoft Fabric

How to use mssparkutils.notebook.runMultiple in Notebooks in Microsoft Fabric?

The choice between a Pyspark Executor or the mssparkutils.notebook.runMultiple depends on your use case and preference. Here are some factors to consider:

Pyspark Executor

A Pyspark Executor is designed to handle concurrent and parallel execution of notebook cells. This means that you can run multiple cells at the same time, without waiting for the previous ones to finish. This can be useful for interactive exploration and experimentation, as well as for speeding up long-running tasks.

mssparkutils.notebook.runMultiple

The mssparkutils.notebook.runMultiple method allows you to run multiple notebooks in parallel or with a predefined topological structure. The API uses a multi-thread implementation mechanism within a Spark session, which means the compute resources are shared by the reference notebook runs. This can be useful for orchestrating complex workflows and dependencies, as well as for reusing existing notebooks as modules.

Comparison and Trade-offs

Both options leverage the power of Spark to distribute the computation across multiple nodes and cores. However, they also have some limitations and trade-offs. For example, a Pyspark Executor may consume more memory and CPU resources than a single-threaded notebook, and the mssparkutils.notebook.runMultiple method may introduce some overhead and complexity in managing the notebook inputs and outputs.

Final Thoughts

In conclusion, there is no definitive answer to which option is better, as it depends on your specific scenario and requirements. You may want to try both options and compare their performance and usability for your use case. You can also refer to the documentation and examples of the Pyspark Executor and the Microsoft Spark Utilities (MSSparkUtils) for Fabric method for more details and guidance.


Thanks for reading


Feel free to leave a comment

Data Community Austria

Data Community Austria

Month: January 2024

by Erwin | Jan 26, 2024

Unleashing the Potential of Metadata-Driven ELT Framework in Synapse Analytics and Microsoft Fabric

Today, I had the opportunity to speak at the Data Community Austria Day 2024, a full day of sessions dedicated to data enthusiasts and professionals. The event was held at the Jufa Hotel in Wien and attracted more than 300 attendees.

My session was about “Unleashing the Potential of Metadata-Driven ELT Framework in Synapse Analytics and Microsoft Fabric.” I explained how metadata-driven pipelines can help you ingest and transform data with less code, reduced maintenance, and greater scalability than writing code or pipelines for every data source and destination. I also demonstrated how to leverage the medallion architecture (Landingzone, Bronze, Silver, Gold) and Delta tables to build a lakehouse in Microsoft Fabric, a new data platform that combines the best of data lakes and data warehouses.

The audience was very engaged and asked insightful questions. We had a lively discussion about the benefits and challenges of metadata-driven ELT frameworks, the features and capabilities of Synapse Analytics and Microsoft Fabric, and the best practices and tips for implementing them in real-world scenarios.

I want to thank the organizers and sponsors of Data Community Austria Day 2024 for inviting me to speak and for hosting such a wonderful event. I also want to thank all the attendees for their interest and participation. It was a pleasure to share my knowledge and experience with you and to learn from you as well.


My presentation and the code I used can be found on my Github, link below

Data Community Austria 2024

Feel free to leave a comment