Azure Synapse Analytics overwrite live mode

Azure Synapse Analytics overwrite live mode

Azure Synapse

by Erwin | Sep 23, 2021

Stale publish branch

In Azure Synapse Analytics and Azure Data Factory is an new option available "Overwrite Live Mode", which can be found in the Management Hub-Git Configuration.

With this new option your can directly overwrite your Azure Synapse Analytics or Azure Data Factory Live mode code with the current Branch from your Azure Dev Ops.

It will use the Publish option to overwrite everything into your Azure Synapse Analytics or Azure Data Factory, so be careful with doing this. If you have a lot of code, the deployment time can take a while based on the size  of the branch and the number of resources.

Synapse_overwritemode

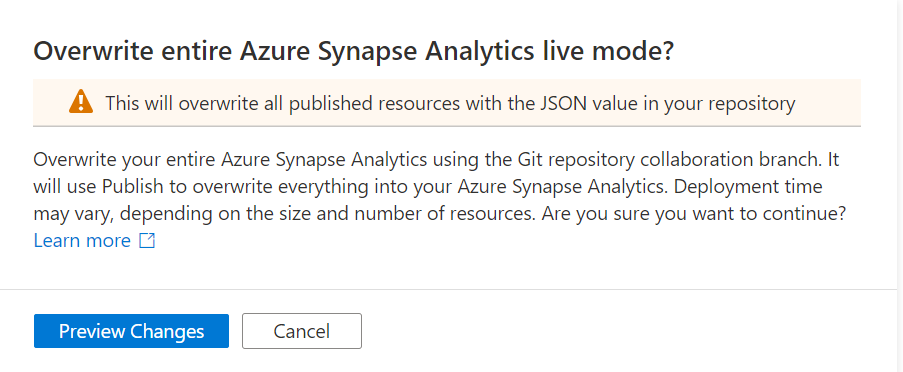
Once you click on Preview Changes you will see that all your code will be published. You need to confirm by clicking the Overwrite button.

Synapse_overwritemode_Publish

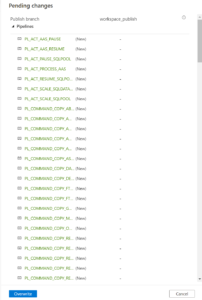
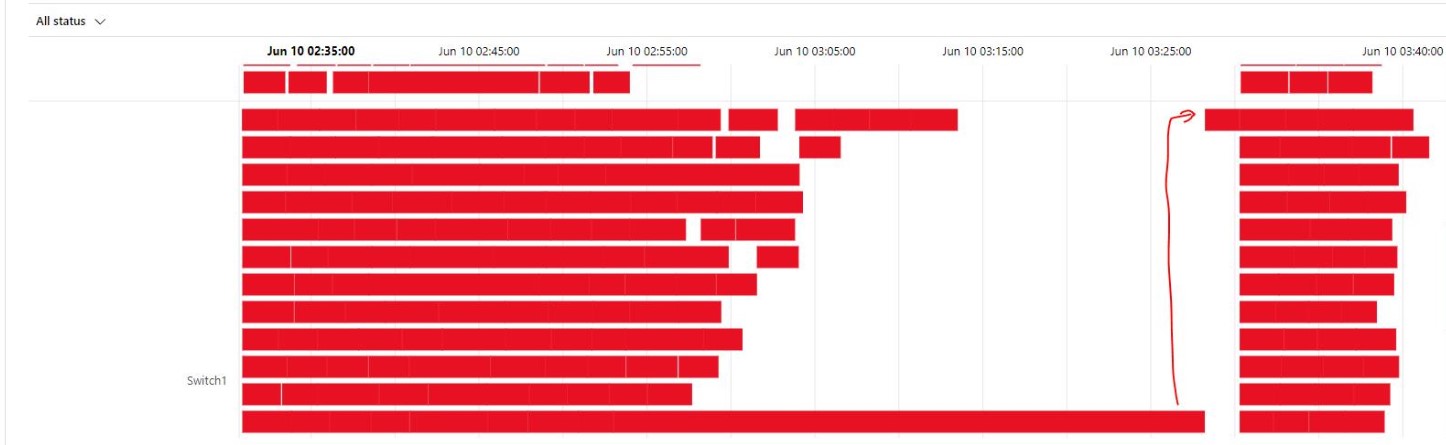
After you clicked on overwrite, it will start publishing.

Why?

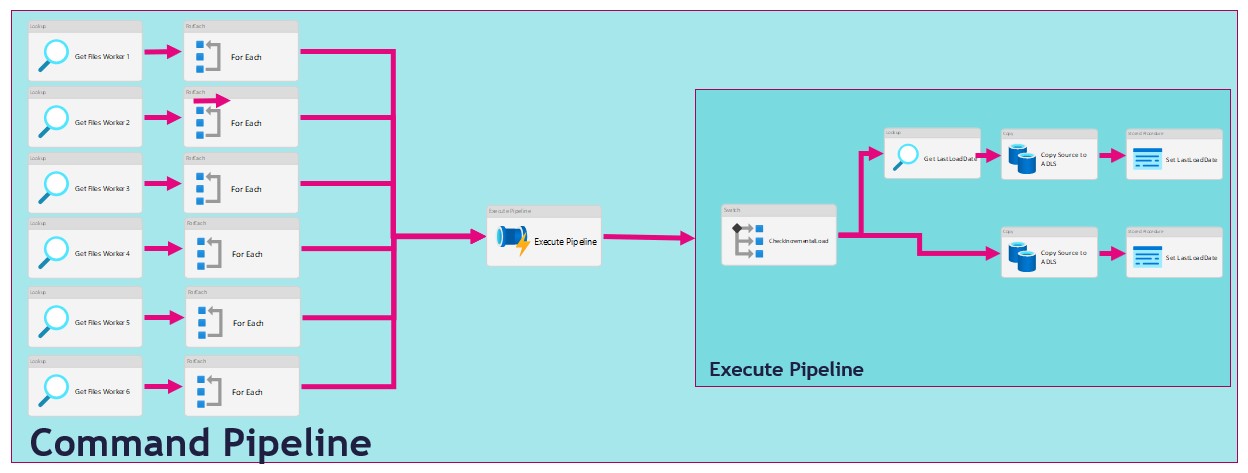
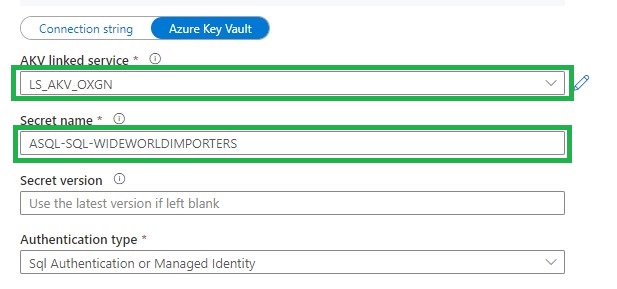
Sometimes your Live Mode has a different code than your current Git Branch, especially when it comes to Linked Services, Managed Vnets and when using multiple Feature Branches. Incidentally, this is also the case if you link your code (Solution Templates) to your Azure Synapse Workspace from Dev Ops for the first time. Then it is possible that you will not get this code published because there are still dependencies, what I've seen mostly because the use of Azure Key Vault or different Integration Runtime setup. According to the documentation from Microsoft which you can find here they add the following examples:

  • A user has multiple branches. In one feature branch, they deleted a linked service that isn't AKV associated (non-AKV linked services are published immediately regardless if they are in Git or not) and never merged the feature branch into the collaboration branch.
  • A user modified the Synapse or data factory using the SDK or PowerShell
  • A user moved all resources to a new branch and tried to publish for the first time. Linked services should be created manually when importing resources.
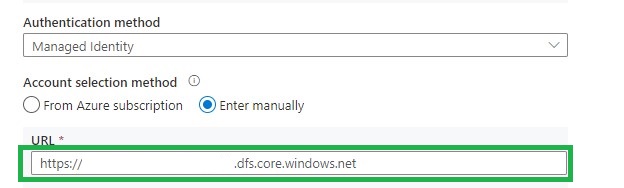
  • A user uploads a non-AKV linked service or an Integration Runtime JSON file manually. They reference that resource from another resource such as a dataset, linked service, or pipeline. A non-AKV linked service created through the UX is published immediately because the credentials need to be encrypted. If you upload a dataset referencing that linked service and try to publish, the UX will allow it because it exists in the git environment. It will be rejected at publish time since it does not exist in the Synapse or data factory service.

If the publish branch is out of sync with your collaboration branch and contains out-of-date resources despite a recent publish, you can use the solution above.

Conclusion

I used to disconnect my Git configuration, make the changes in Live Mode, and reconnect Azure Dev Ops again and imported the resource to my current Branch. This solution makes it much easier and will safe you definitely a lot of time.

If you haven't yet linked your Azure Synapse Workspace to Azure Dev Ops, read how to do this in a previous Blog.

Hopefully this article has helped you a step further. As always, if you have any questions, leave them in the comments.

Feel free to leave a comment

Get control of data loads in Azure Synapse

Get control of data loads in Azure Synapse

Azure Synapse

by Erwin | Jul 12, 2021

Load Source data to DataLake

There are several ways to extract data from a source in Azure Synapse Analytics or in Azure Data Factory. In this article I'm going to use a metadata-driven approach by using a control table in Azure SQL in which we configure the metadata(The data which we need to extract). We then load data from an Azure SQL Database to a Azure Data Lake. We will use 2 Pipelines for this activity:

  • The Command Pipeline in which we configure our metadata-driven approach
  • The Execute Pipeline in which we perform the actual data copy activity

Command Pipeline

As you can see in the figure above we use the For Each activity to call the execute pipeline. But when we use the For Each Activity, the Execute Pipelines are assigned during the start of the For Each Activity and not during run time. We will only see this behaviour while extracting a large amount of tables. I have noticed that slots are idle and not starting a new task before one the other task are finished. Due to this behaviour we will see gaps in the Execution window as we can see in the figure below.

For each activity dataload


In the article below I will give you a solution to get control of your data loads by using the Lookup Activity and based on a control table where we can define the workloads.

Metadata

When you're already using a database where you store your Metadata, use this database otherwise create a new one. We then need to create the table below where we store the table names which we need to extract.

[sql]
CREATE TABLE [configuration_demo].[Source_Parameter](
	[Id] [int] IDENTITY(1,1) NOT NULL,
	[SourceName] [nvarchar](500) NULL,
	[SourceSchema] [nvarchar](500) NULL,
	[SourceQueryCustom] [nvarchar](max) NULL,
	[DataLakeCatalog] [nvarchar](500) NULL,
	[Worker] [int] NULL,
	[WorkerOrder] [int] NULL,
	[TableDestinationName] [nvarchar](500) NULL,
	[TableDestinationSchema] [nvarchar](500) NULL,
	[IsActive] [bit] NOT NULL,
	[IsIncremental] [bit] NULL,
	[IsIncrementalColumn] [nvarchar](50) NULL,
	[LastLoadtime] [datetime] NULL,
 CONSTRAINT [PK_Source_Parameter] PRIMARY KEY CLUSTERED
(
	[Id] ASC
)WITH (STATISTICS_NORECOMPUTE = OFF, IGNORE_DUP_KEY = OFF, OPTIMIZE_FOR_SEQUENTIAL_KEY = OFF) ON [PRIMARY]
) ON [PRIMARY]
[/sql]

Metadata-Sourcetable

 
ColumnName Definition
SourceName Name of the Source Table or view
SourceSchema SchemaName of the Source Table or view
SourceQueryCustom Your own custom select querie to load data, do casting or just get a subset of columns
DataLakeCatalog Name of the datalake folder to store raw parquet files
Worker To divide and order the workload, a source can be assigned to 6 workers. These unassigned sources running parallel in batches of 30 (1-6)
WorkerOrder The loading order for the sources assigned to workers 1 till 6.
TableDestinationName Name of the datastore table to store source data
TableDestinationSchema Name of the datastore schema to store source data
IsActive Activate or disable the source from loading (1|0)
IsIncremental Set to 1 if the source needs to be delta loaded (1|0)
IsIncrementalColumn If above setting is set to 1, on which datetime column do we need to base the incremental load
LastLoadtime This field is updated on runtime when the source is loaded.

With the Worker we can define the workload, we can add a same set of tables, a mix of small and large tables, together. This worker can be changed any time.

Once we have filled the configuration we can start creating our Linked Services for the connections.

Create Linked Services

For these 2 Pipelines we need to create 4 different Linked Services.

Azure Key Vault (LS_AKV_OXGN), if you haven't created a Linked Service for Azure Key Vault before please read this page.

Azure Data Lake Storage Gen2 (LS_ADLS_DLS2), linked to your Azure Data Lake.

Linked Service DataLake

Grant workspace service managed identity  access to your Azure Data Lake Storage Gen2.

Azure SQL Source database (LS_ASQL_SOURCE)


Linked Service Sql Source

Create a entry in your Azure Key Vault secrets for the connection string  =>

integrated security=False;encrypt=True;connection timeout=30;data source=xxxxxxxxxx.database.windows.net;initial catalog=WideWorldImporters;user id=xxxxxx;password=xxxxxx

Grant workspace service managed identity access to your Azure SQL Database or create a read-only account in your Source Database

Azure SQL Configuration database (LS_ASQL_CONFIG)

Create a entry in your Azure Key Vault secrets for the connection string  =>

Integrated Security=False;Encrypt=True;Connection Timeout=30;Data Source=demoekeuwdvlmmssqloxgn01.database.windows.net;Initial Catalog=your configurationdatabase

Integration Datasets

Before we can start building our Pipeline we need to create the Integration Datasets.

Source database (DS_ASQL_SOURCE_DEMO)

Dataset SQL Source

Leave the Table Schema and Name empty,

Sink Datalake (DS_ADLS_RAW_PARQUET)

Parameters

  • FilePath
  • Filename

Metadata DB (DS_ASQL_CONFIG)

Dataset Config

Leave the Table Schema and Name empty,

Pipeline

The last step is to create 2 Pipelines, which you can both download over here.

Command Pipeline Worker

Command Pipeline

Name: (PL_COMMAND_COPY_ASQL_TO_ADLS_WORKER_DEMO)

Lookup Activity

Lookup activity can retrieve a dataset from any of the Azure Data Factory / Azure Synapse -supported data sources. For this case we use a query to load the Metadata from the control table so that we know which tables we need to extract.

Get Files Worker

For above Query I've created a view, in the view I have defined the name of the folder and the Filename with the DataLake based on the metadata from the control table.

[sql]
CREATE view [execution_demo].[Load_DataLake_Files]
AS
/**********************************************************************************************************
* View Name:  [execution_demo].[Load_DataLake_Files]
*
* Purpose:    View to show the records which should be processed
*
*
* Revision Date/Time: 

**********************************************************************************************************/
SELECT	 SP.Id as [PipelineParameterId]
		,SP.[SourceName]
		,isnull(CASE WHEN SP.[SourceSchema] != '' THEN SP.[SourceSchema] END, 'Unknown')  as SourceSchema
		,case when Worker not in (1,2,3,4,5,6)  then 1 else Worker end Worker
		,WorkerOrder
		,case	when	SourceQueryCustom is null
			then	'SELECT * FROM [' +isnull(CASE WHEN SP.[SourceSchema] != '' THEN SP.[SourceSchema] END, 'Unknown') + '].[' + SP.[SourceName] + '] where 0 = ' + convert(nvarchar(1),[IsIncremental]) + ' OR 1 = ' + convert(nvarchar(1),[IsIncremental]) + ' AND ' + isnull(SP.[IsIncrementalColumn],'1') +' >='''+convert(varchar(20),ISNULL([LastLoadtime], '1900.01.01'))+''''
			else	[SourceQueryCustom]
		 end As SelectQuery
		,'SELECT CASE WHEN ' + convert(nvarchar(1),[IsIncremental]) + ' = 1 THEN CONVERT(VARCHAR, MAX(' + isnull(SP.[IsIncrementalColumn],'1') +'), 120) ELSE CONVERT(VARCHAR, GETDATE(), 120) END AS [LastLoadDate] FROM [' +isnull(CASE WHEN SP.[SourceSchema] != '' THEN SP.[SourceSchema] END, 'Unknown') + '].[' + SP.[SourceName] + ']' AS [SelectLastLoaddate]
		,isnull(CASE WHEN SP.DataLakeCatalog != '' THEN SP.DataLakeCatalog END, 'Unknown') + '/' +
					isnull(CASE WHEN SP.[SourceSchema] != '' THEN SP.[SourceSchema] END, 'Unknown') + '_' +
					SP.TableDestinationName + '/' +
					FORMAT(GETUTCDATE(), 'yyyy') +'/'+
					FORMAT(GETUTCDATE(), 'MM') +'/'+
					FORMAT(GETUTCDATE(), 'dd')
           as  FilePath
		,isnull(CASE WHEN SP.DataLakeCatalog != '' THEN SP.DataLakeCatalog END, 'Unknown')  + '_' +
					isnull(CASE WHEN SP.[SourceSchema] != '' THEN SP.[SourceSchema] END, 'Unknown') + '_' +
					SP.TableDestinationName + '_' +
					FORMAT(GETUTCDATE(), 'yyyy') +
					FORMAT(GETUTCDATE(), 'MM') +
					FORMAT(GETUTCDATE(), 'dd') +
					FORMAT(GETUTCDATE(), 'HH') +
					FORMAT(GETUTCDATE(), 'mm') +'.parquet'
                --Equal to Filename
			 as [FileName]
		,SP.[TableDestinationName]
		,SP.[ProcessType]
		,cast(SP.[IsActive] as BIT) AS [IsActive]
		,cast(SP.[IsIncremental] as BIT) AS [IsIncremental]
		,isnull(SP.[IsIncrementalColumn],1) as [IsIncrementalColumn]
		,case when [LastLoadtime] is null then '1900.01.01' else LastLoadtime end  as LastLoadtime
FROM [configuration_demo].[Source_Parameter]  as SP
[/sql]

For each Activity

The ForEach Activity defines a repeating control flow in your pipeline. In this case it will call the Pipeline Activity based on the output of Lookup Activity Get Files Worker XX.

For each Activity


Within each Activity we add a Pipeline Activity, to finalize this Pipeline we first need to create the Execute Pipeline.

Execute Pipeline

Name: (PL_EXECUTE_COPY_ASQL_TO_ADLS_DEMO)

Add the following Parameters to the Pipeline:

Execute parameters pipeline

Switch Activity

The Switch activity provides the same functionality that a switch statement provides in programming languages. It evaluates a set of activities corresponding to a case that matches the condition evaluation.

In this situation we create a case for Incremental Loads or Full loads. Why do we do this? We pay for every activity and every activity will take time. If we have a full load we don't need the last load date from the source. So in this situation it will save you 1 activity and 15 sec for every Full load.

Switch Activity

Lookup Activity

Use the Lookup Activity to get the LastLoadDateTime from a Source Table. We will store this value at the end of the process for incremental Loading purposes. In this way, we exactly know the correct value if we run the process the next time.  This Activity is only used in the switch activity when the case Incremental = True .

Exexcute lastloaddate

Query = expression @{pipeline().parameters.SelectLastLoadDate}

Copy Activity

We can use the Copy activity to copy data among data stores located on-premises and in the cloud.

Execute copy source

Query = expression @{pipeline().parameters.SelectQuery}

Execute source ADLS

Stored procedure Activity

Use Stored procedure Activity to do data transformation activities in a Data Factory / Synapse pipeline to transform and process raw data into predictions and insights. We use it to update our control table with the Incremental Value from the source which we looked up in the beginning of our pipeline.

Execute set last loaddate

For the Full load Switch we replace "'@{activity('Get LastLoadDate').output.firstrow.LastLoadDate}' "  with "getdate()"

Now we have finalized our execute pipeline we need to finalize the command pipeline.

FEL Execute Pipeline


Fill in the parameters based on the output of the Get Files Worker1 and you're ready to rock.

Copy and Paste  the Get Files Worker 1 and ForEach_Worker1 to the desired number or workers, rename them to 2,3,4,5 and so on. Change the worker number in the Lookup query or even easier just download both templates from my Github.

Workers

The great advantage of above solution is that you are now in control how your loads are running instead of the random slots in an For each Activity.

Hopefully this article has helped you a step further. As always, if you have any questions, leave them in the comments.

Feel free to leave a comment

Scale SQL Database dynamically with Metadata

Scale SQL Database dynamically with Metadata

Azure Synapse

by Erwin | May 5, 2021

Scale SQL Database Dynamically with Metadata

Use this template to scale up and down an Azure SQL Database in Azure Synapse Analytics or in Azure Data Factory.

This article describes a solution template how you can Scale up or down a SQL Database within Azure Synapse Analytics or Azure Data Factory dynamically based on metadata. This is actually a necessary functionality during your Data Movement Solutions. In this way you can optimize costs and gain more performance during batch loading. The Pipeline can be added before and after your Nightly Run.

The template contains 8 activities:

  • Lookup Activity Get the necessary metadata from a table in your configuration database.
  • Until Activity to check a set of activities in a loop until the condition associated with the activity evaluates to true.
    • Web Activity activity which will check the current Status of the SQL Pool
    • Wait Activity activity which will wait before retry to check the Status of the SQL Database
  • If Condition Activity Activity to check if the SQL Database is Online
    • Web Activity Activity to Resume the SQL Database(Serverless only) if not Online
    • Wait Activity Activity to wait before to go to the next activity
  • Web Activity Activity to Scale the SQL Database up or down to the desired DatabaseLevel

Pipeline Parameters:

Parameter Value Description
WaitTime 10 Wait time in seconds before the Pipeline will finish
WaitTimeUntil 30 Wait time in seconds for the retry process
DatabaseLevel S1

The Database Service Objective Name

https://docs.microsoft.com/en-us/azure/azure-sql/database/resource-limits-vcore-single-databases

https://docs.microsoft.com/en-us/azure/azure-sql/database/resource-limits-dtu-single-databases

DatabaseName Datastore The Database Name

How to use this solution template

Create a control table in Azure SQL Database to store the Metadata.

[NOTE] > The table and stored procedure can be stored in any database, but preferred in a database where you store all your configuration in.

[sql]
CREATE TABLE [configuration].[Environment_Parameter1](
	[ParameterId] [int] IDENTITY(1,1) NOT NULL,
	[ParameterName] [varchar](128) NOT NULL,
	[ParameterValue] [nvarchar](max) NOT NULL,
	[Description] [nvarchar](max) NULL,

CONSTRAINT [PK_Environment_Parameter1] PRIMARY KEY CLUSTERED
    (
    	[ParameterId] ASC
    )WITH (STATISTICS_NORECOMPUTE = OFF, IGNORE_DUP_KEY = OFF, OPTIMIZE_FOR_SEQUENTIAL_KEY = OFF) ON [PRIMARY]
    ) ON [PRIMARY]

INSERT [configuration].[Environment_Parameter] ( [ParameterName], [ParameterValue], [Description]) VALUES (N'yourResourceGroupName', N'', N'ResourceGroupName of your Azure Synapse or ADF Instance')
GO
INSERT [configuration].[Environment_Parameter] ( [ParameterName], [ParameterValue], [Description]) VALUES (N'SubscriptionId', N'XXXXXXXX', N'SubscriptionId of your Azure Synapse or ADF Instance')
GO
INSERT [configuration].[Environment_Parameter] ( [ParameterName], [ParameterValue], [Description]) VALUES (N'SQLServer', N'yoursqlserver', N'Name of your SQL Server( Needed for scaling databases)')
GO
[/sql]
[sql]
CREATE PROCEDURE [configuration].[Environment]
    @ColumnToPivot  NVARCHAR(255),
    @ListToPivot    NVARCHAR(max)
    AS
      /**********************************************************************************************************
    * SP Name:		[configuration].[[Environment]]
    *
    * Purpose:		Procedure display record parameters for environment Settings
    *
    *
    * Revision Date/Time:
    *  2020-12-01		Erwin de Kreuk (InSpark) - Initial creation of SP
    *
    **********************************************************************************************************/
    BEGIN

      DECLARE @SqlStatement NVARCHAR(MAX)
      SET @SqlStatement = N'
        SELECT * FROM (
          SELECT

           [ParameterName] ,
           [ParameterValue]
          FROM [configuration].[Environment_Parameter]    ) EnvironmentTable
        PIVOT
        (max([ParameterValue])
          FOR ['+@ColumnToPivot+']
          IN ('+@ListToPivot+' )    ) AS PivotTable
      ';

      EXEC(@SqlStatement)

    END
[/sql]

After you have imported the Template you will see the following:

[NOTE] > Azure Synapse has no import functionality, create a new pipeline PL_ACT_SCALE_SQLDATABASE and copy the code into the pipeline. Once the pipeline is created manualy link the correct linked service for your Metadata table

Template-Scale-SQL-Database

Create a connection to the database where your metadata tables is stored. Followed by use this template.

Lookup Activity Name = Get SQL Server Name

SQL-Database-Lookup-actvity

Source Dataset = Linked Services to your Metadata Table

Stored Procedures = configuration.environment

Parameters:

ColumnToPivot= ParameterName

ListToPivot= [ResourceGroupName],[SubscriptionId],[SQLServer]

SQL-Database-lookup-preview

Until Check DatabaseStatus

Until Activity We can only change the DatabaseLevel when the SQL Database is Paused or Online. That’s why we need to add an Until activity to check for these statusses.

Web Activity Within the Until Activity we need to create a new Web Activity.

Web-Activity

Name = Check for Database Status

URL= https://management.azure.com/subscriptions/XXX/resourceGroups/XXX/providers/Microsoft.Sql/servers/XXX/databases/XXX/?api-version=2019-06-01-preview

Replace the XXX with Pipeline Parameters.

https://management.azure.com/subscriptions/@{activity('Get SQL Server Name').output.firstRow.SubscriptionId}/resourceGroups/@{activity('Get SQL Server Name').output.firstRow.ResourceGroupName}/providers/Microsoft.Sql/servers/@{activity('Get SQL Server Name').output.firstRow.SQLServer}/databases/@{pipeline().parameters.DatabaseName}/?api-version=2019-06-01-preview

Method = GET

Resource =https://management.azure.com/

After we have created the Web Activity, we can define the expression for the Until Activity.

Until-expression-SQL-Database

The Pipeline can only continue when the current status is not scaling. We can check this by comparing the currentServiceObjectiveName and the requestedServiceObjectiveName.

Expression: @equals(activity('Check for Database Status').Output.Properties.currentServiceObjectiveName,activity('Check for Database Status').Output.Properties.requestedServiceObjectiveName)

Time out: 0.00:20:00

The Until Activity will only continue, when the status from the above Web Activity output is equal, this can take a while and we don’t want to execute the Web Activity every time. That’s why we add a Wait Activity.

Wait Activity

A Wait Activity waits for the specified period of time before continuing with execution of subsequent activities.

Azure Synapse Wait Activity

Check for the SQL Database Status (Serverless Only)

If Condition Activity (Name: Check if Database is Paused). When is SQL Database is Paused, we need to Resume

Expression: @bool(startswith(activity('Check for Database Status').Output.Properties.status,'Paused'))

Web Activity In case the SQL Database is Paused we need to Resume.

URL: https://management.azure.com/subscriptions/XXX/resourceGroups/XXX/providers/Microsoft.Sql/servers/XXX/databases/XXX/{Action}?api-version=2019-06-01-preview

The XXX are replaced with the output from Lookup activity.

https://management.azure.com/subscriptions/@{activity('Get SQL Server Name').output.firstRow.SubscriptionId}/resourceGroups/@{activity('Get SQL Server Name').output.firstRow.ResourceGroupName}/providers/Microsoft.Sql/servers/@{activity('Get SQL Server Name').output.firstRow.SQLServer}/databases/@{activity('Get SQL Server Name').output.firstRow.DatabaseName}/Resume?api-version=2019-06-01-preview

It is almost the same URL we used in the First Web Actvity but have to add the action option Resume.

Method = Post

Header = {“Nothing”:”Nothing”}

Resource =https://management.azure.com/

Wait Activity the purpose of this activity is to wait a period before we start ingestion data(just to be sure the SQL Database is online)

Expression: @pipeline().parameters.WaitTime

SCALE SQL Database

Web Activity "SCALE SQL Database"

SQL-Database-Scale-Header

Name = SCALE SQL Database

URL= https://management.azure.com/subscriptions/XXX/resourceGroups/XXX/providers/Microsoft.sql/servers/XXX/databases/XXX/?api-version=2019-06-01-preview

The XXX are replaced with the output from Lookup activity.

https://management.azure.com/subscriptions/@{activity('Get SQL Server Name').output.firstRow.SubscriptionId}/resourceGroups/@{activity('Get SQL Server Name').output.firstRow.ResourceGroupName}/providers/Microsoft.Sql/servers/@{activity('Get SQL Server Name').output.firstRow.SQLServer}/databases/@{pipeline().parameters.DatabaseName}/?api-version=2019-06-01-preview

Method = PATCH

Headers = Name = Content-Type Value= application/json

Body = { “sku”: { “name”: ‘@{pipeline().parameters.DatabaseLevel}’ } }

Resource =https://management.azure.com/

Important

To allow Azure Synapse Analytics or Azure Data Factory to call the REST API we need to give the Synapse/ADF access to the SQL Database/Server. In the Access control (IAM) of the SQL Server assign the SQL Contributor role to Synapse/ADF.

Role-SQL-Contributor

Debug

Select Debug, enter the Parameters,  define the correct DatabaseLevel and DatabaseName to Scale and then select Finish.

SQL-Database-pipeline-debug

When the pipeline run completes successfully, you will see the result similar to the following example:

SQL-Database-Run

You can now call this pipeline from every other pipeline, you only need to change the DatabaseLevel and DatabaseName.

You have now learned how to Scale your SQL Database Dynamically with the use of Metadata.

Please feel free to download the Pipeline code here for Azure Synapse Analytics and for here for Azure Data Factory

Hopefully this article has helped you a step further. As always, if you have any questions, leave them in the comments.

Feel free to leave a comment