This Saturday I've joined the Data Toboggan to talk about Azure Synapse Analytics.
Azure Synapse Analytics
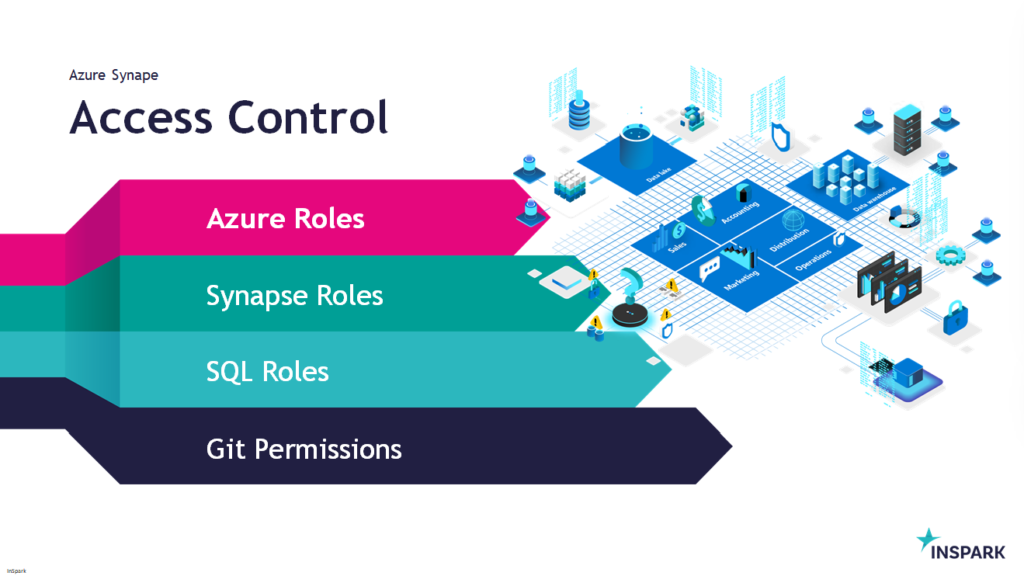
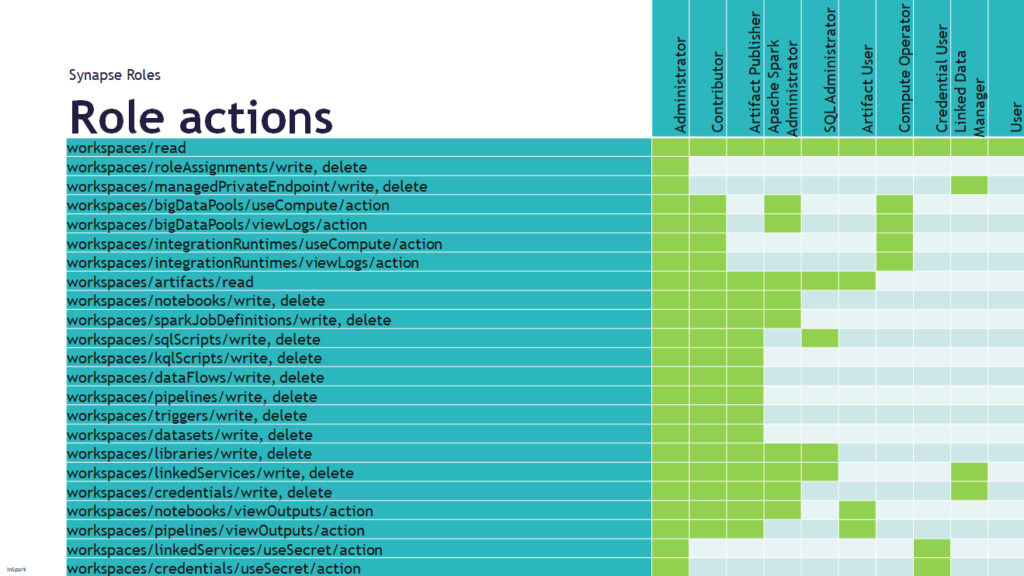
Today I've been talking on how to deal with all the different roles in Azure Synapse Analytics during Data Toboggan. An event 100% focussed on Azure Synapse Analytics.
This week I had a discussion with a colleague about how we can now make sure that a Pipeline does not start when it's already started.
He then indicated, have you ever thought of the concurrency option? I've seen this option before but never paid attention to it.
How does the concurrency work?
If you read the Microsoft documentation it says the following: The maximum number of concurrent runs the pipeline can have. By default, there is no maximum. If the concurrency limit is reached, additional pipeline runs are queued until earlier ones complete.
The concurrency option is working in Azure Synapse Analytics and in Azure Data Factory.
I started to test this functionality and there are certainly some nice use cases for that:
If the Pipeline was started via a Schedule and someone else triggers this Pipeline Manually, the Pipeline is placed in a queue.
Sometimes it happens that there is a delay in the processing of data or that more data is delivered. If you process this data every 30 minutes and the 1st run is not yet ready and the 2nd starts again, this could result in incorrect data. Also in this case the to be executed run is placed in a queue and only starts when the previous one is ready.
It is a fairly simple process but can be quite useful especially in the case of short loading windows.
Please pay attention, running the pipeline in a Debug modus has no effect on this and will run directly. Check the monitoring regularly to check if this situation is not happening all the time, if so, you better change the recurrence of your Triggered Pipeline. You still have the option to cancelled a queued pipeline.
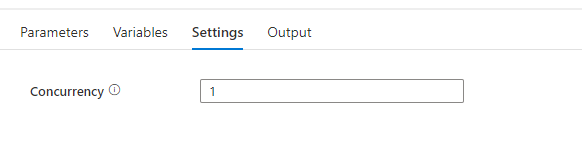
How to enable concurrency?
To enable concurrency in an Azure Synapse pipeline, you can use the Concurrency property in the pipeline settings. The default value is 1, which means that only one copy of the pipeline will run at a time. By default, there is no maximum. If the concurrency limit is reached, additional pipeline runs are queued until earlier ones complete. Setting the concurrency level to a higher value will cause multiple copies of the pipeline to run concurrently, which can improve performance if the pipeline is CPU-bound or if the data source can handle the increased load. If you leave the property blank the pipeline will not be queued.
When you have any questions regarding concurrency, please let me know.
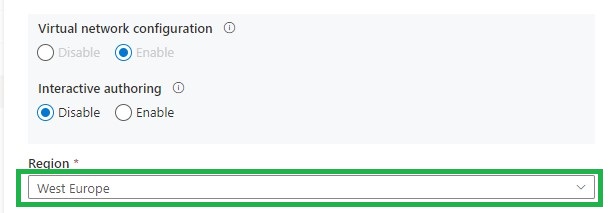
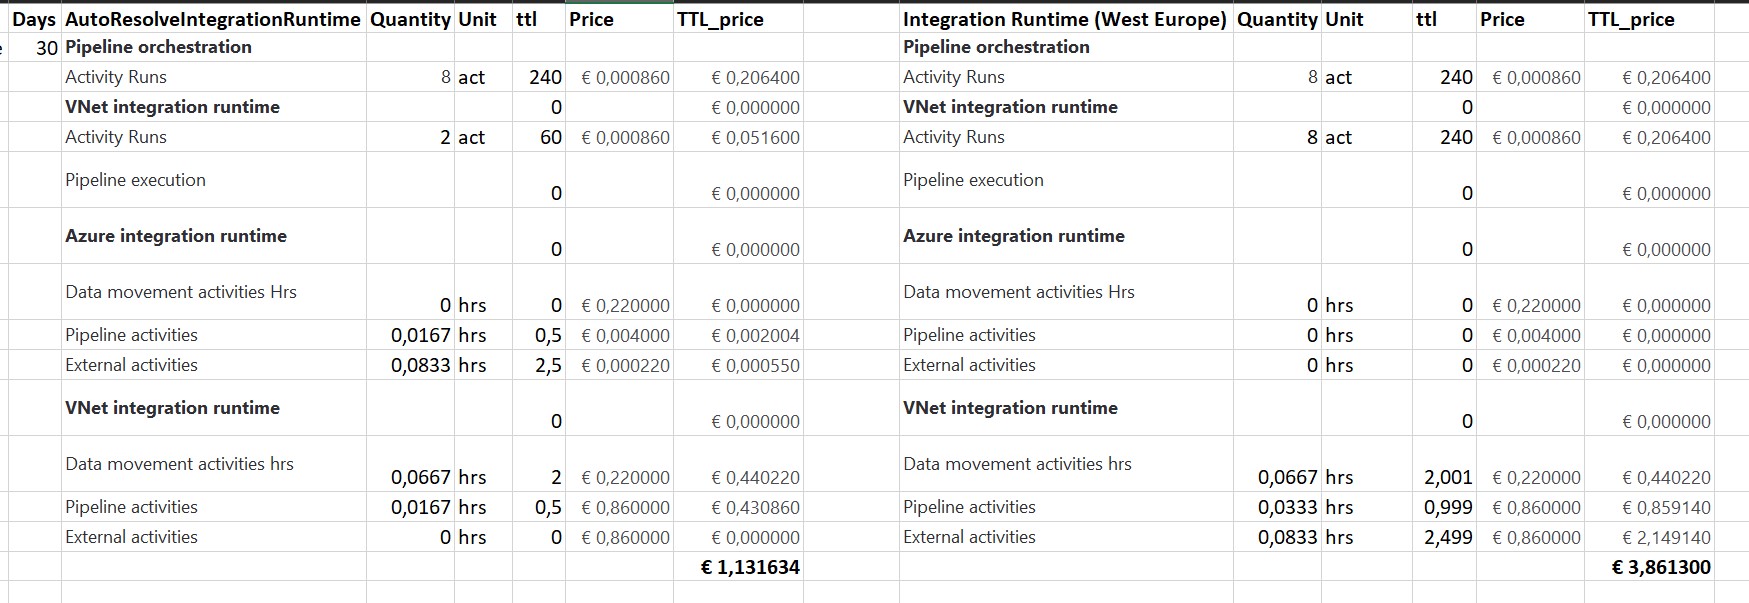
The last few days I’ve been following some discussions on Twitter on using a separate Integration Runtime in Azure Synapse Analytics running in the selected region instead of auto-resolve. The AutoResolveIntegrationRuntime is automatically deployed with Auto Resolve and cannot be changed. If you create a separate Integration Runtime you can set the Region.
The blogfrom Asanka Padmakumara has a good explanation why should you choose for a new Integration Runtime with a dedicated Region so I’m not going in detail of that.
I was more interested what this will do with the costs when Managed Virtual Network is enabled and run a certain Pipeline with AutoResolveIntegrationRuntime enabled or with a manual created Integration Runtime. The final result was quite surprising for me.
Case:
Azure Synapse Analytics deployed with Managed Virtual Network and Private Links in West-Europe region.
Copy data from a Azure SQL server to Datalake.
Result:
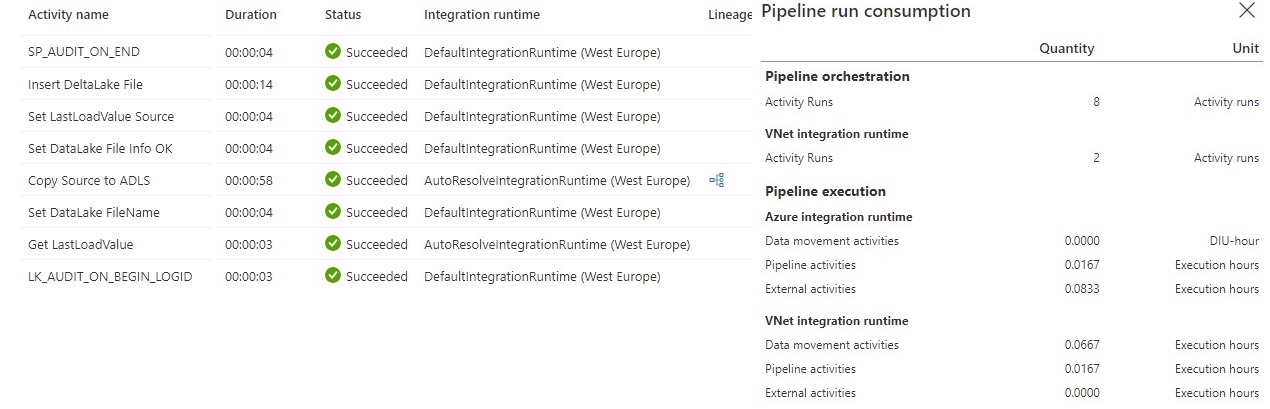
Pipeline Consumption with AutoResolveIntegrationRuntime
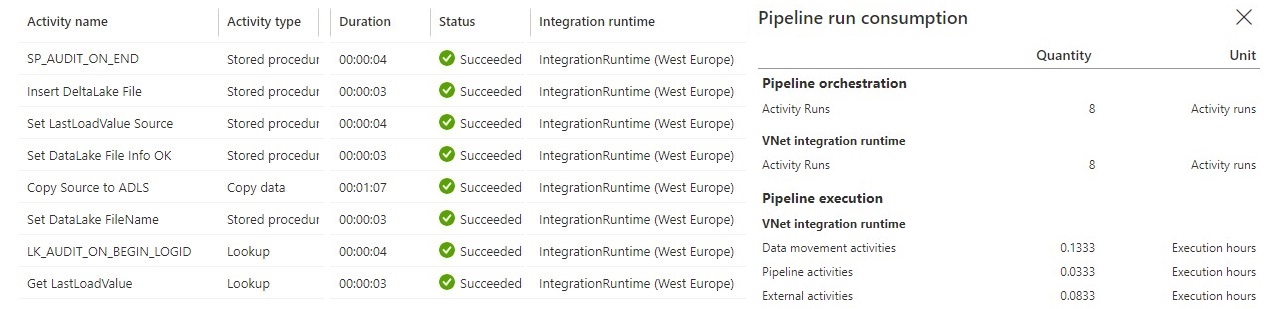
Pipeline Consumption with Integration Runtime created in West-Europe
I didn’t expect the consumption of these 2 Integration Runtimes to be different.
The next step is how does that compare in terms of costs based on the Azure Price Calculator. In the example below, I did the calculation based on above pipelines and that the pipeline has run 1 month every day(30days).
Conclusion:
When running all my Linked Services on the AutoResolveIntegrationRuntime it looks to be a little bit faster compared to an Integration Runtime created in West-Europe. But there was a huge difference in costs, you have to pay 350% more if you run on an Integration Runtime. That is quite a lot, especially if you run 100 of these Pipelines per day, which is almost € 270 on a monthly basis. These differences probably won’t be there if you don’t use the Managed Virtual Network.
Remarks:
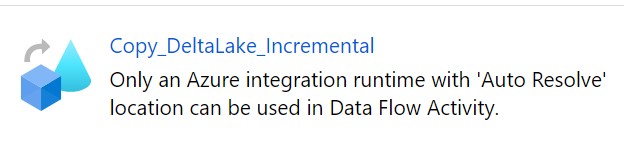
During my test of the Integration Runtime I also found out that you cannot change a DataFlow in Azure Synapse Analytics to an Integration Runtime without auto resolve.
If you enable Managed Virtual Network for auto-resolve Azure IR, the IR in the Data Factory or Synapse Workspace region is used.
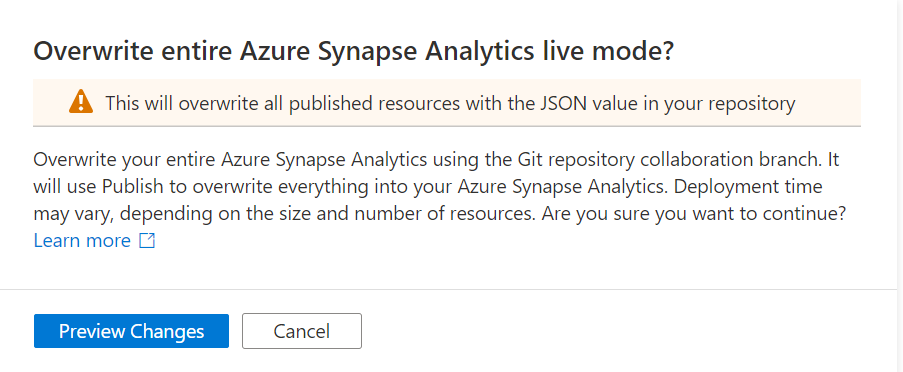
In Azure Synapse Analytics and Azure Data Factory is an new option available "Overwrite Live Mode", which can be found in the Management Hub-Git Configuration.
With this new option your can directly overwrite your Azure Synapse Analytics or Azure Data Factory Live mode code with the current Branch from your Azure Dev Ops.
It will use the Publish option to overwrite everything into your Azure Synapse Analytics or Azure Data Factory, so be careful with doing this. If you have a lot of code, the deployment time can take a while based on the size of the branch and the number of resources.
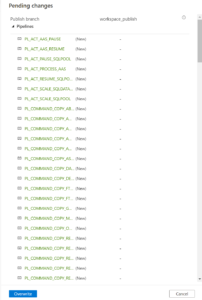
Once you click on Preview Changes you will see that all your code will be published. You need to confirm by clicking the Overwrite button.
After you clicked on overwrite, it will start publishing.
Why?
Sometimes your Live Mode has a different code than your current Git Branch, especially when it comes to Linked Services, Managed Vnets and when using multiple Feature Branches.Incidentally, this is also the case if you link your code (Solution Templates) to your Azure Synapse Workspace from Dev Ops for the first time.Then it is possible that you will not get this code published because there are still dependencies, what I've seen mostly because the use of Azure Key Vault or different Integration Runtime setup.According to the documentation from Microsoft which you can find here they add the following examples:
A user has multiple branches. In one feature branch, they deleted a linked service that isn't AKV associated (non-AKV linked services are published immediately regardless if they are in Git or not) and never merged the feature branch into the collaboration branch.
A user modified the Synapse or data factory using the SDK or PowerShell
A user moved all resources to a new branch and tried to publish for the first time. Linked services should be created manually when importing resources.
A user uploads a non-AKV linked service or an Integration Runtime JSON file manually. They reference that resource from another resource such as a dataset, linked service, or pipeline. A non-AKV linked service created through the UX is published immediately because the credentials need to be encrypted. If you upload a dataset referencing that linked service and try to publish, the UX will allow it because it exists in the git environment. It will be rejected at publish time since it does not exist in the Synapse or data factory service.
If the publish branch is out of sync with your collaboration branch and contains out-of-date resources despite a recent publish, you can use the solution above.
Conclusion
I used to disconnect my Git configuration, make the changes in Live Mode, and reconnect Azure Dev Ops again and imported the resource to my current Branch. This solution makes it much easier and will safe you definitely a lot of time.
If you haven't yet linked your Azure Synapse Workspace to Azure Dev Ops, read how to do this in a previous Blog.
Hopefully this article has helped you a step further. As always, if you have any questions, leave them in the comments.
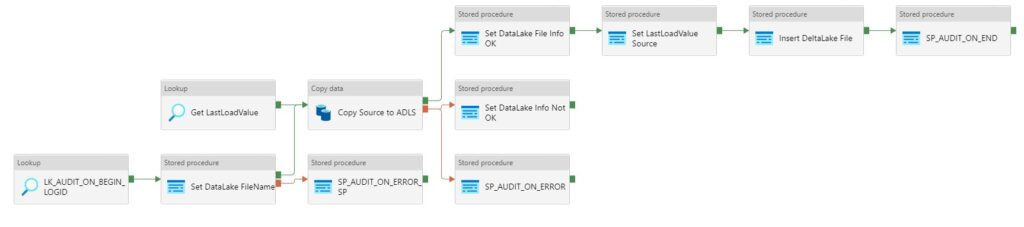
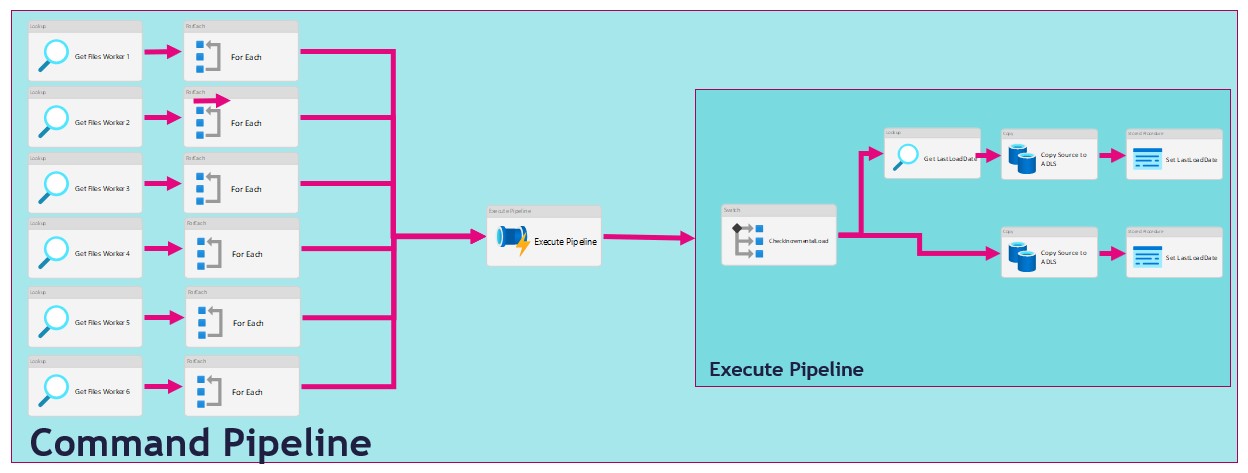
There are several ways to extract data from a source in Azure Synapse Analytics or in Azure Data Factory.In this article I'm going to use a metadata-driven approach by using a control table in Azure SQL in which we configure the metadata(The data which we need to extract).We then load data from an Azure SQL Database to a Azure Data Lake.We will use 2 Pipelines for this activity:
The Command Pipeline in which we configure our metadata-driven approach
The Execute Pipeline in which we perform the actual data copy activity
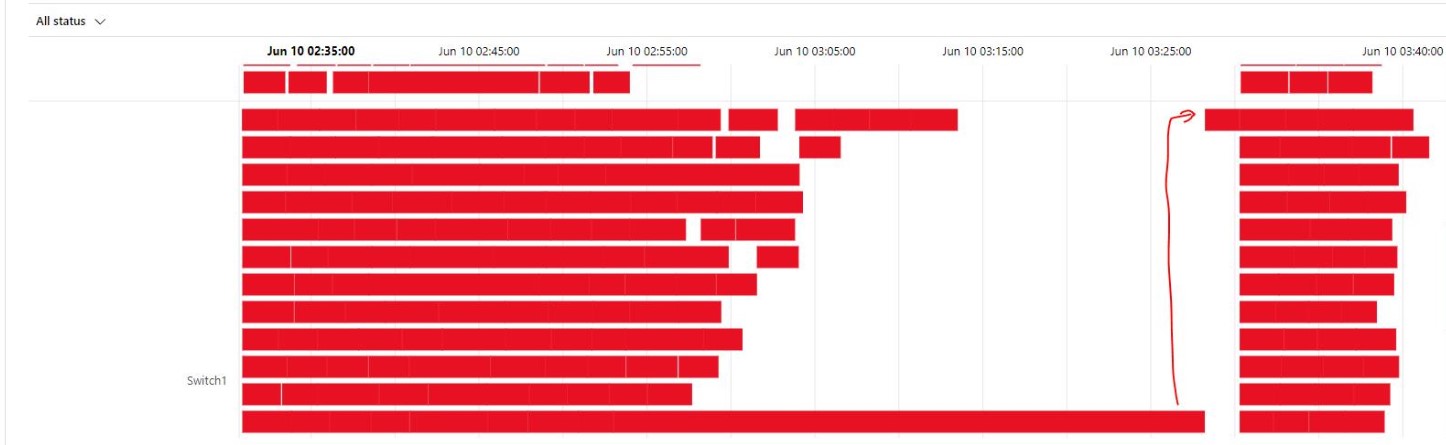
As you can see in the figure above we use the For Each activity to call the execute pipeline. But when we use the For Each Activity, the Execute Pipelines are assigned during the start of the For Each Activity and not during run time. We will only see this behaviour while extracting a large amount of tables. I have noticed that slots are idle and not starting a new task before one the other task are finished. Due to this behaviour we will see gaps in the Execution window as we can see in the figure below.
In the article below I will give you a solution to get control of your data loads by using the Lookup Activity and based on a control table where we can define the workloads.
Metadata
When you're already using a database where you store your Metadata, use this database otherwise create a new one. We then need to create the table below where we store the table names which we need to extract.
Your own custom select querie to load data, do casting or just get a subset of columns
DataLakeCatalog
Name of the datalake folder to store raw parquet files
Worker
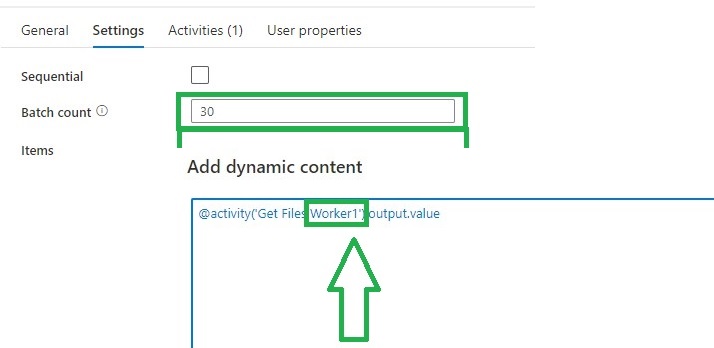
To divide and order the workload, a source can be assigned to 6 workers. These unassigned sources running parallel in batches of 30 (1-6)
WorkerOrder
The loading order for the sources assigned to workers 1 till 6.
TableDestinationName
Name of the datastore table to store source data
TableDestinationSchema
Name of the datastore schema to store source data
IsActive
Activate or disable the source from loading (1|0)
IsIncremental
Set to 1 if the source needs to be delta loaded (1|0)
IsIncrementalColumn
If above setting is set to 1, on which datetime column do we need to base the incremental load
LastLoadtime
This field is updated on runtime when the source is loaded.
With the Worker we can define the workload, we can add a same set of tables, a mix of small and large tables, together. This worker can be changed any time.
Once we have filled the configuration we can start creating our Linked Services for the connections.
Create Linked Services
For these 2 Pipelines we need to create 4 different Linked Services.
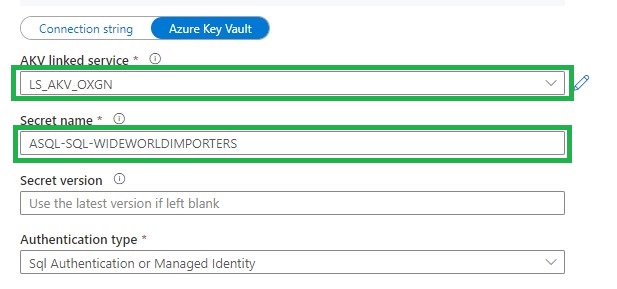
Azure Key Vault (LS_AKV_OXGN), if you haven't created a Linked Service for Azure Key Vault before please read this page.
Azure Data Lake Storage Gen2 (LS_ADLS_DLS2), linked to your Azure Data Lake.
Before we can start building our Pipeline we need to create the Integration Datasets.
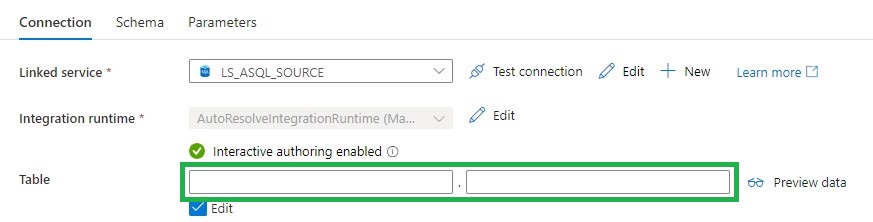
Source database (DS_ASQL_SOURCE_DEMO)
Leave the Table Schema and Name empty,
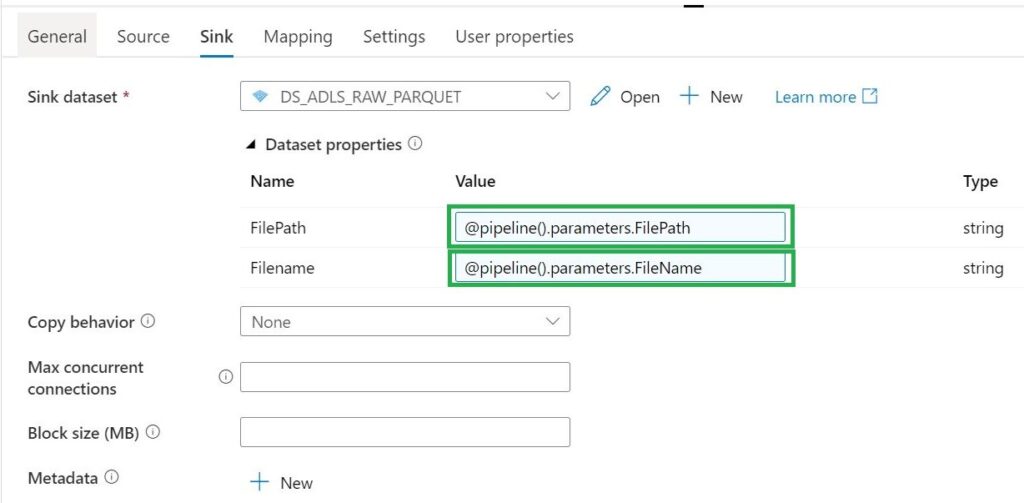
Sink Datalake (DS_ADLS_RAW_PARQUET)
Parameters
FilePath
Filename
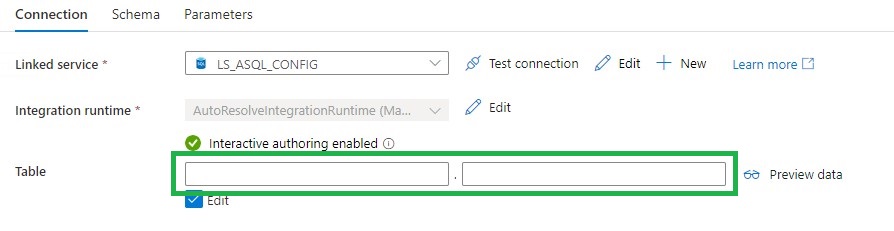
Metadata DB (DS_ASQL_CONFIG)
Leave the Table Schema and Name empty,
Pipeline
The last step is to create 2 Pipelines, which you can both download over here.
Command Pipeline
Name: (PL_COMMAND_COPY_ASQL_TO_ADLS_WORKER_DEMO)
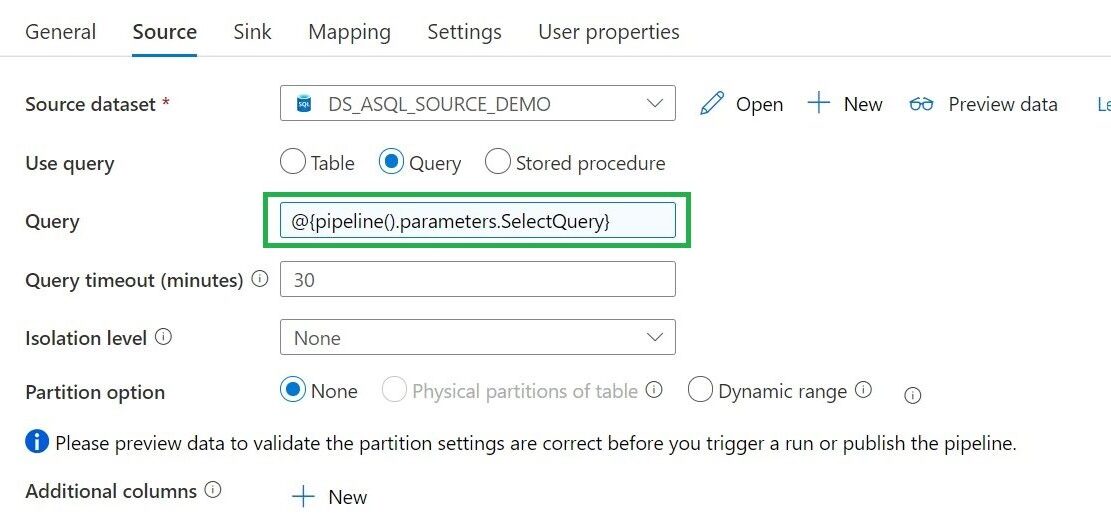
Lookup Activity
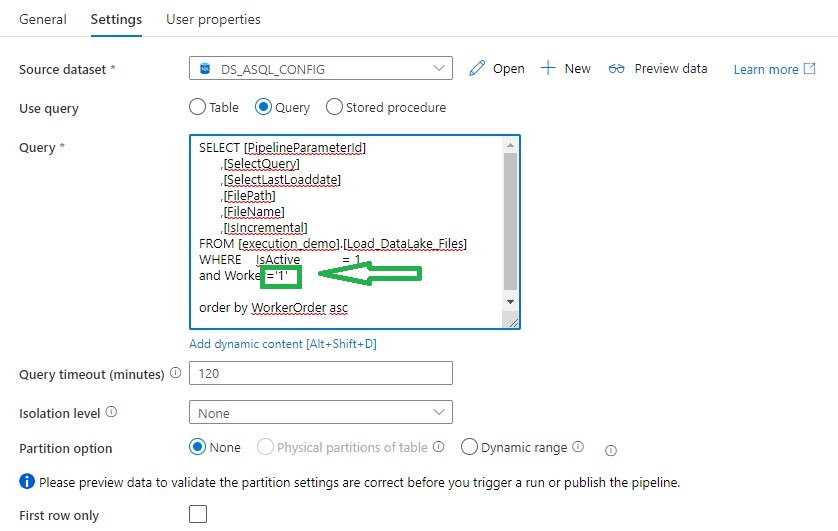
Lookup activity can retrieve a dataset from any of the Azure Data Factory / Azure Synapse -supported data sources. For this case we use a query to load the Metadata from the control table so that we know which tables we need to extract.
For above Query I've created a view, in the view I have defined the name of the folder and the Filename with the DataLake based on the metadata from the control table.
[sql]
CREATE view [execution_demo].[Load_DataLake_Files]
AS
/**********************************************************************************************************
* View Name:  [execution_demo].[Load_DataLake_Files]
*
* Purpose:    View to show the records which should be processed
*
*
* Revision Date/Time:

**********************************************************************************************************/
SELECT	 SP.Id as [PipelineParameterId]
		,SP.[SourceName]
		,isnull(CASE WHEN SP.[SourceSchema] != '' THEN SP.[SourceSchema] END, 'Unknown')  as SourceSchema
		,case when Worker not in (1,2,3,4,5,6)  then 1 else Worker end Worker
		,WorkerOrder
		,case	when	SourceQueryCustom is null
			then	'SELECT * FROM [' +isnull(CASE WHEN SP.[SourceSchema] != '' THEN SP.[SourceSchema] END, 'Unknown') + '].[' + SP.[SourceName] + '] where 0 = ' + convert(nvarchar(1),[IsIncremental]) + ' OR 1 = ' + convert(nvarchar(1),[IsIncremental]) + ' AND ' + isnull(SP.[IsIncrementalColumn],'1') +' >='''+convert(varchar(20),ISNULL([LastLoadtime], '1900.01.01'))+''''
			else	[SourceQueryCustom]
		 end As SelectQuery
		,'SELECT CASE WHEN ' + convert(nvarchar(1),[IsIncremental]) + ' = 1 THEN CONVERT(VARCHAR, MAX(' + isnull(SP.[IsIncrementalColumn],'1') +'), 120) ELSE CONVERT(VARCHAR, GETDATE(), 120) END AS [LastLoadDate] FROM [' +isnull(CASE WHEN SP.[SourceSchema] != '' THEN SP.[SourceSchema] END, 'Unknown') + '].[' + SP.[SourceName] + ']' AS [SelectLastLoaddate]
		,isnull(CASE WHEN SP.DataLakeCatalog != '' THEN SP.DataLakeCatalog END, 'Unknown') + '/' +
					isnull(CASE WHEN SP.[SourceSchema] != '' THEN SP.[SourceSchema] END, 'Unknown') + '_' +
					SP.TableDestinationName + '/' +
					FORMAT(GETUTCDATE(), 'yyyy') +'/'+
					FORMAT(GETUTCDATE(), 'MM') +'/'+
					FORMAT(GETUTCDATE(), 'dd')
           as  FilePath
		,isnull(CASE WHEN SP.DataLakeCatalog != '' THEN SP.DataLakeCatalog END, 'Unknown')  + '_' +
					isnull(CASE WHEN SP.[SourceSchema] != '' THEN SP.[SourceSchema] END, 'Unknown') + '_' +
					SP.TableDestinationName + '_' +
					FORMAT(GETUTCDATE(), 'yyyy') +
					FORMAT(GETUTCDATE(), 'MM') +
					FORMAT(GETUTCDATE(), 'dd') +
					FORMAT(GETUTCDATE(), 'HH') +
					FORMAT(GETUTCDATE(), 'mm') +'.parquet'
                --Equal to Filename
			 as [FileName]
		,SP.[TableDestinationName]
		,SP.[ProcessType]
		,cast(SP.[IsActive] as BIT) AS [IsActive]
		,cast(SP.[IsIncremental] as BIT) AS [IsIncremental]
		,isnull(SP.[IsIncrementalColumn],1) as [IsIncrementalColumn]
		,case when [LastLoadtime] is null then '1900.01.01' else LastLoadtime end  as LastLoadtime
FROM [configuration_demo].[Source_Parameter]  as SP
[/sql]
For each Activity
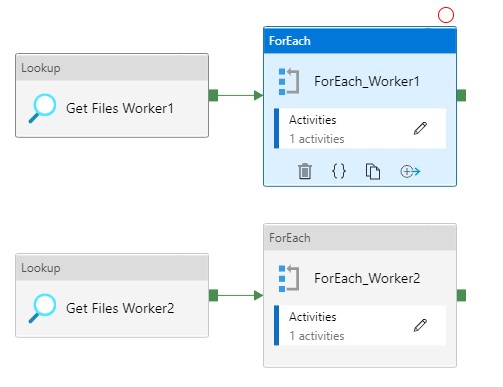
The ForEach Activity defines a repeating control flow in your pipeline. In this case it will call the Pipeline Activity based on the output of Lookup Activity Get Files Worker XX.
Within each Activity we add a Pipeline Activity, to finalize this Pipeline we first need to create the Execute Pipeline.
Execute Pipeline
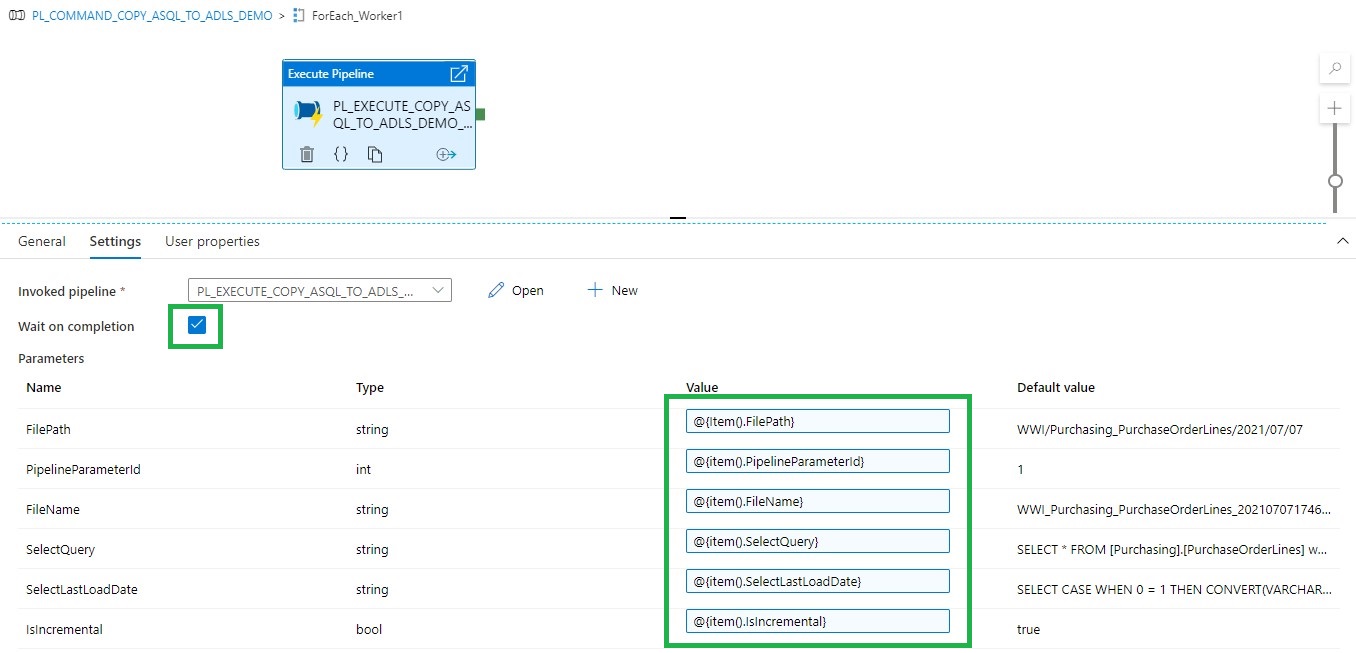
Name: (PL_EXECUTE_COPY_ASQL_TO_ADLS_DEMO)
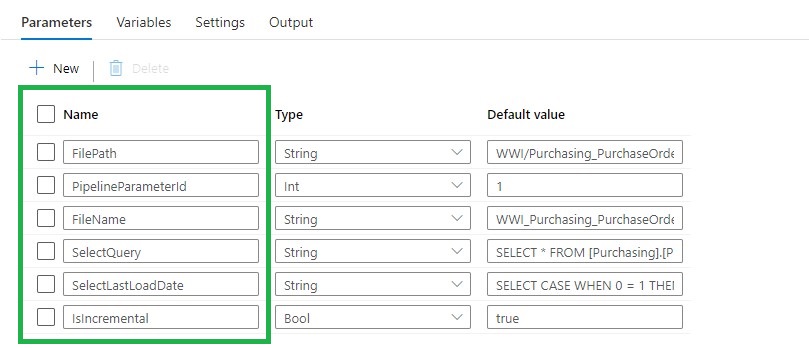
Add the following Parameters to the Pipeline:
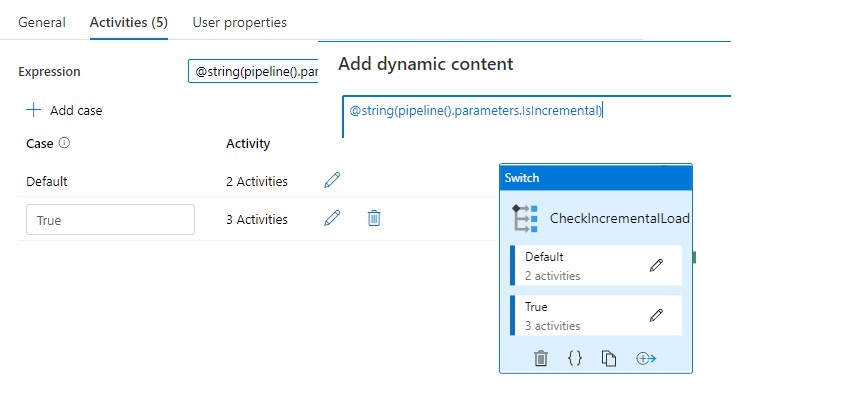
Switch Activity
The Switch activity provides the same functionality that a switch statement provides in programming languages. It evaluates a set of activities corresponding to a case that matches the condition evaluation.
In this situation we create a case for Incremental Loads or Full loads. Why do we do this? We pay for every activity and every activity will take time. If we have a full load we don't need the last load date from the source. So in this situation it will save you 1 activity and 15 sec for every Full load.
Lookup Activity
Use the Lookup Activity to get the LastLoadDateTime from a Source Table. We will store this value at the end of the process for incremental Loading purposes. In this way, we exactly know the correct value if we run the process the next time. This Activity is only used in the switch activity when the case Incremental = True .
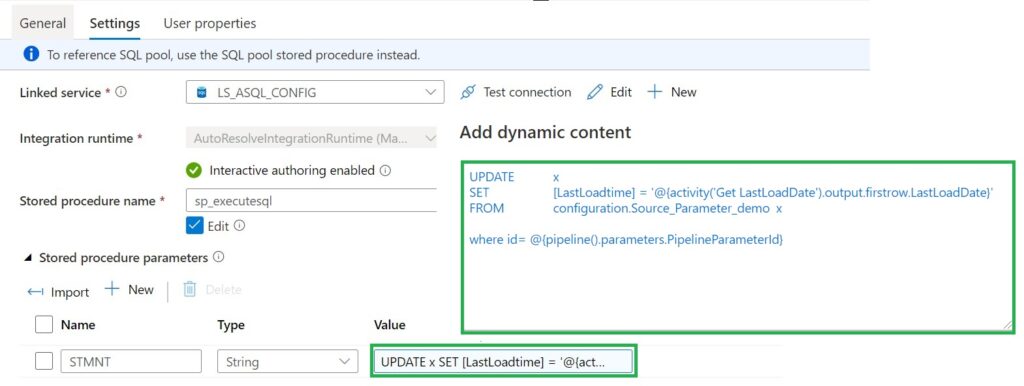
Use Stored procedure Activity to do data transformation activities in a Data Factory / Synapse pipeline to transform and process raw data into predictions and insights. We use it to update our control table with the Incremental Value from the source which we looked up in the beginning of our pipeline.
For the Full load Switch we replace "'@{activity('Get LastLoadDate').output.firstrow.LastLoadDate}' " with "getdate()"
Now we have finalized our execute pipeline we need to finalize the command pipeline.
Fill in the parameters based on the output of the Get Files Worker1 and you're ready to rock.
Copy and Paste the Get Files Worker 1 and ForEach_Worker1 to the desired number or workers, rename them to 2,3,4,5 and so on. Change the worker number in the Lookup query or even easier just download both templates from my Github.
The great advantage of above solution is that you are now in control how your loads are running instead of the random slots in an For each Activity.
Hopefully this article has helped you a step further. As always, if you have any questions, leave them in the comments.