New Features in Microsoft Fabric Data Factory: Import, Export, and Use Templates in Data Pipelines
The latest enhancements in Fabric Data Factory that will significantly streamline your data integration processes. The new features—Import, Export, and Use Templates—are now available, making it easier than ever to manage and automate your data pipelines.
Import Data Pipelines
The Import feature allows you to bring in existing data pipelines from other workspaces or projects. This is particularly useful for teams that need to replicate successful data workflows across different departments or for those migrating from other data integration tools. With a few clicks, you can import your pipelines, ensuring consistency and saving valuable time.
How to Import a Data Pipeline:
Navigate to the Data Pipelines section in Data Factory.
Click on the “Import” button.
Select the file or source from which you want to import the pipeline.
Follow the prompts to complete the import process.
Export Data Pipelines
Exporting your data pipelines is now a breeze. This feature enables you to back up your pipelines, share them with colleagues, or move them to different workspaces. Exporting ensures that your data integration processes are portable and can be easily restored or replicated.
How to Export a Data Pipeline:
Go to the Data Pipelines section.
Select the pipeline you wish to export.
Click on the “Export” button.
Complete the export process by following the on-screen instructions.
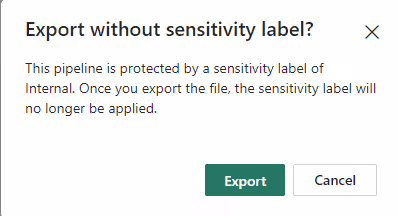
Sensitivity labels will be removed
Your Pipeline will be saved as .zip file in your default download folder.
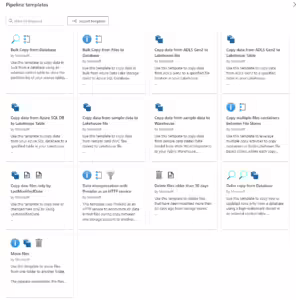
Use Templates
Templates are a powerful addition to Data Factory, allowing you to standardize and accelerate the creation of data pipelines. Whether you are setting up a new ETL/ELT process or automating data transfers, templates provide a starting point that can be customized to meet your specific needs.
How to Use Templates:
In the Data Pipelines section, click on the “Templates” button.
Browse through the available templates or search for a specific one.
Select a template and click “Use Template.”
Configure the required inputs
Click on Use this Template, the required activities will now be deployed to your pipeline.
Import Data Pipelines from Azure Data Factory or Synapse Workspace is not supported. Migration steps will follow later.
The main difference between Microsoft Fabric and ADF or Synapse is, that we use in Fabric connections and ADF/Synapse datasets and Linked services
Conclusion
The new Import, Export, and Use Templates features in Data Factory are designed to enhance your productivity and ensure seamless data integration. By leveraging these tools, you can simplify your workflows, maintain consistency across projects, and accelerate the configuration of data pipelines.
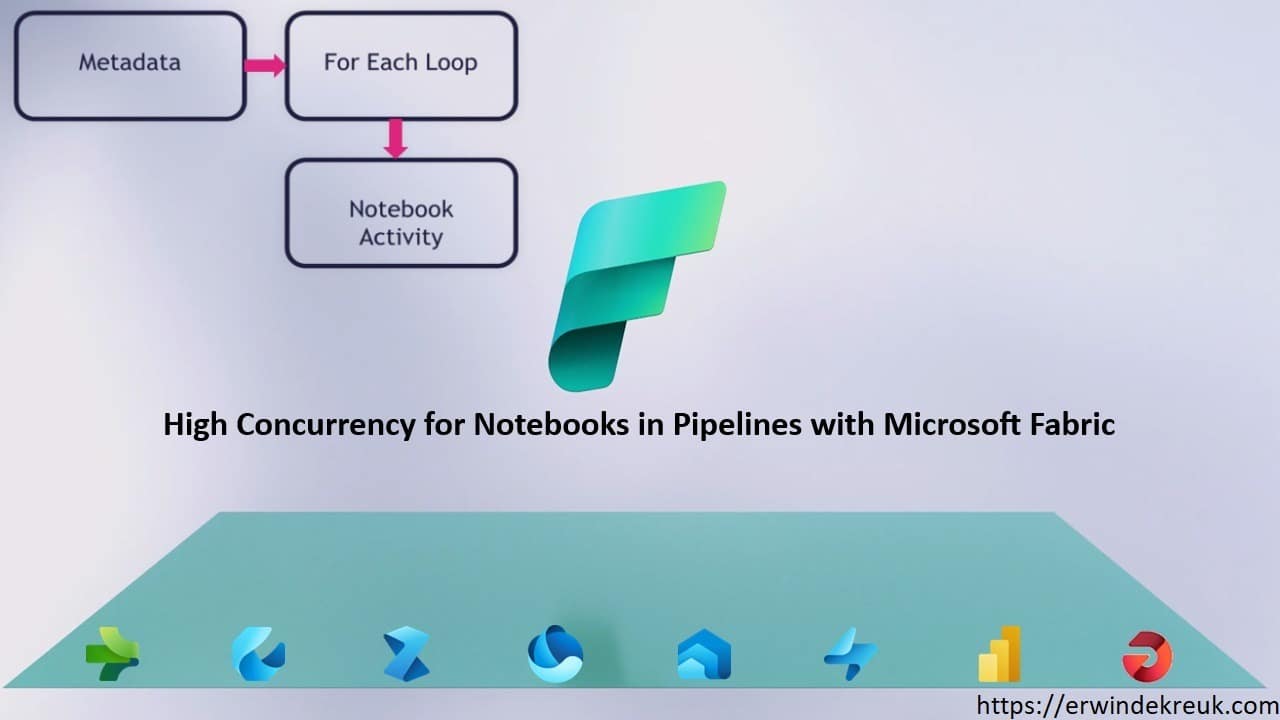
How to Use and Enable High Concurrency for Notebooks in Pipelines with Microsoft Fabric
High Concurrency Mode for Notebooks in Pipelines is a game-changer for data engineers and data scientists using Microsoft Fabric. This feature allows multiple notebooks to share a single Spark session, significantly improving performance and reducing costs. One of the other advanced is as well that Microsoft Fabric is not running to all the capacity limits due to the fact that every Notebook was starting a new session. In one of my other blogpost I explained how you could solve this with notebookutils.notebook.runMultiple.
Here’s how you can enable and use this feature effectively.
Why Use High Concurrency Mode?
High Concurrency Mode offers several benefits:
Faster Session Start: Notebooks can attach to pre-warmed Spark sessions, reducing startup time to around 5 seconds.
Cost Savings: By sharing a single Spark session across multiple notebooks, you only pay for one session, which can lead to significant cost reductions.
Improved Efficiency: This mode optimizes pipeline execution, making it faster and more efficient.
Enabling High Concurrency Mode
To enable High Concurrency Mode in your Fabric workspace, follow these steps:
Access Workspace Settings:
Go to your Fabric workspace and select theWorkspace Settingsoption.
Navigate to High Concurrency Settings:
In the settings menu, go to theData Engineering and Sciencesection.
SelectSpark Computeand thenHigh Concurrency.
Enable High Concurrency:
In the High Concurrency section, enable the optionFor pipeline running multiple notebooks.
Save your changes.
Enable High Concurrency in WorkspaceOnce enabled, all notebook sessions triggered by pipelines will be packed into high concurrency sessions automatically.
Using High Concurrency Mode
After enabling High Concurrency Mode, you can start using it in your pipelines:
Create a Pipeline:
Open your Fabric workspace and create a new pipeline item from theCreatemenu.
Add Notebook Activities:
Navigate to theActivitiestab and add aNotebookactivity to your pipeline.
Create Pipeline with Notebook Activity
Configure Session Tags:
In the advanced settings of the notebook activity, specify a session tag. This tag helps group notebooks into shared sessions based on matching criteria.
Enable session tag on Notebook
Session Tags
When you define a Session Tag, the Notebook will use shared sessions. These sessions tags can be used across pipelines but not across workspaces, a new session will be created even if you use the same session tag. Just see a sort of grouping. You define a session on your own or create add dynamic content. But be aware Session tag can only contain letters, numbers, and underscores.
Monitoring
In the monitoring you will now see all the executed Notebooks one by one, while this was not the case notebookutils.notebook.runMultiple(DAG), you only saw the Main Notebook. This is a great step forwards while building monitoring solutions.
Below an overview in the Monitor before the session started:
Notebook Execution before session startedBelow an overview in the Monitor when the session started
Notebook Execution when session startedOverview of all the executed Notebooks
Notebook Execution when session was finishedThe Notebook name is extended with the Livy id.
Remark: It looks like that currently the Snapshots from the Notebooks are incorrect because every Notebook execution is showing the Snapshots(from the first Notebook), so debugging from the Monitor is not yet possible. I've already created a note to the PM team.
RunMultiple
With the notebookutils.notebook.runMultiple(DAG) you have some more options.
Define any dependency or order among them.
Define timeouts per Cell
Run multiple notebooks in a DAG, where each notebook can depend on the output of one or more previous notebooks.
Conclusion
High Concurrency Mode for Notebooks in Pipelines with Microsoft Fabric is a powerful feature that enhances performance, reduces costs, and improves efficiency. By following the steps outlined above, you can easily enable and start using this feature to optimize your data engineering and data science workflows. Personally I'm very happy with these new functionality, you can define easier outputs for every notebook for logging purposes.
Exciting enhancements were also revealed for Fabric Data Factory Pipelines, including new activities like Invoke Remote Pipeline and support for Fabric User Data Functions.These enhancements aim to make data workflows more robust and flexible. This new functionality makes it even easier to build Meta Data Driven Frameworks.
In the afternoon, I hosted my own session Microsoft Fabric: Building a Data Ingestion and Processing framework to Drive Efficiency in a packed room. Thank you all for attending, engaging, and asking questions. As promised, you can find the session code on my GitHub.
All released Blog post during the conference
I've made a collection of all the blogpost which have been released during the Conference, just to summarize:
The energy and enthusiasm at #FabConEurope were palpable. The event not only showcased the latest technological advancements but also fostered a sense of community and collaboration. In conclusion, #FabConEurope was a resounding success, setting the stage for future advancements in the Microsoft Fabric ecosystem. The announcements and discussions at the conference have paved the way for a more integrated, efficient, and responsible approach to data management and analytics.
In the previous blog post we explored how to use the PySpark Executor. However, sometimes you may need to run multiple notebooks in a specific order or in parallel, depending on the dependencies and logic of your data pipeline. For example, you may have a notebook that preprocesses the data, another notebook that trains a machine learning model, and another notebook that evaluates the model and generates a report. How can you orchestrate these notebooks in Microsoft Fabric?
The answer is notebookutils.notebook.runMultiple, a built-in function that allows you to run multiple notebooks in parallel or with a predefined topological structure. With notebookutils.notebook.runMultiple, you can:
Execute multiple notebooks simultaneously, without waiting for each one to finish.
Specify the dependencies and order of execution for your notebooks, using a simple JSON format.
Optimize the use of Spark compute resources and reduce the cost of your Fabric projects.
In this blog post, I will show you how to use notebookutils.notebook.runMultiple with DAG (Directed Acyclic Graph) in Notebooks in Microsoft Fabric to achieve high concurrency, flexibility, and scalability.
What is notebookutils.notebook.runMultiple()?
The methodnotebookutils.notebook.runMultiple()allows you to run multiple notebooks in parallel or with a predefined topological structure. The API is using a multi-thread implementation mechanism within a spark session, which means the compute resources are shared by the reference notebook runs. Withnotebookutils.notebook.runMultiple() , you can:
Run multiple notebooks in parallel, without any dependency or order among them.
Run multiple notebooks in a DAG, where each notebook can depend on the output of one or more previous notebooks.
Pass parameters to the notebooks, such as input data, configuration, or variables.
Get the output of the notebooks, such as return values, metrics, or logs.
How to use notebookutils.notebook.runMultiple()?
To usenotebookutils.notebook.runMultiple() , you need to follow these steps:
Create the notebooks that you want to run. You can use any language that is supported by Fabric, such as Pyspark(Python), Scala, or R. Make sure to save your notebooks in the same workspace or folder, and give them meaningful names. For example, you can create three notebooks: NB_LOAD_1, NB_LOAD_2 and NB_LOAD_3. Or you can just use 1 Notebook and execute the Notebook with different parameters.
Define the DAG of your notebooks. You can use a Python dictionary to specify the dependency and order of your notebooks. The keys of the dictionary are the names of the notebooks, and the values are lists of the names of the notebooks that they depend on. For example, you can define a DAG like this:
Run multiple notebooks in parallel
Simple example of using notebookutils.notebook.runMultiple to run multiple notebooks in parallel, you can pass a list of notebook as input.
Run multiple notebooks with parameters sequential/in parallel
Run multiple notebooks with parameters sequential/in parallel
from notebookutils import notebookutils
DAG = {

    "activities": [

        {   "name": "NB_Bronze_Silver_Logging", # activity name, must be unique
            "path": "NB_Bronze_Silver_Logging", # notebook path
            "timeoutPerCellInSeconds": 90, # max timeout for each cell, default to 90 seconds

            "args": {"source_schema": "Application","source_name": "People","sourceLakehouse": "xxxxxxxxx",
			         "target_schema": "Application","target_name": "People","targetLakehouse": "xxxxxxxxxx",
                     "NotebookExecutionId": NotebookExecutionId,
                     'useRootDefaultLakehouse': True}, # notebook parameters

            #"workspace": "workspace1", # workspace name, default to current workspace
            "retry": 1, # max retry times, default to 0
            "retryIntervalInSeconds": 30, # retry interval, default to 0 seconds
            #"dependencies": [] # list of activity names that this activity depends on

        },
        {   "name": "NB_Bronze_Silver_Logging_1", # activity name, must be unique
            "path": "NB_Bronze_Silver_Logging", # notebook path
            "timeoutPerCellInSeconds": 90, # max timeout for each cell, default to 90 seconds

            "args": {"source_schema": "Application","source_name": "PaymentMethods","sourceLakehouse": "xxxxxxxxx",
			         "target_schema": "Application","target_name": "PaymentMethods","targetLakehouse": "xxxxxxxxxx",
                     "NotebookExecutionId": NotebookExecutionId,
                     'useRootDefaultLakehouse': True}, # notebook parameters

            #"workspace": "workspace1", # workspace name, default to current workspace
            "retry": 1, # max retry times, default to 0
            "retryIntervalInSeconds": 0, # retry interval, default to 0 seconds
            #"dependencies": [] # list of activity names that this activity depends on

        },
        {   "name": "NB_Bronze_Silver_Logging_2", # activity name, must be unique
            "path": "NB_Bronze_Silver_Logging", # notebook path
            "timeoutPerCellInSeconds": 90, # max timeout for each cell, default to 90 seconds
            "args": {"source_schema": "Application","source_name": "DeliveryMethods","sourceLakehouse": "xxxxxxxxx",
                     "target_schema": "Application","target_name": "DeliveryMethods","targetLakehouse": "xxxxxxxxxx",
                     "NotebookExecutionId": NotebookExecutionId,
                     'useRootDefaultLakehouse': True}, # notebook parameters

            #"workspace": "workspace1", # workspace name, default to current workspace
            "retry": 1, # max retry times, default to 0
            "retryIntervalInSeconds": 0, # retry interval, default to 0 seconds
            #"dependencies": [] # list of activity names that this activity depends on
        }

    ],

    "timeoutInSeconds": 43200, # max timeout for the entire pipeline, default to 12 hours
    "concurrency": 0 # max number of notebooks to run concurrently, default to unlimited
}

notebookutils.notebook.runMultiple(DAG)
Name: Name of the NotebookActivity, must be unique
Path: Name of the Notebook
Args: Notebook Parameters
Retry: Number of Retries when Notebook fails
Dependencies: List of NotebookActivity names that this activity depends on
The great functionality of using the RunMultiple is that you have a progress bar and a direct overview which Notebook has run successfully and which one has failed. When using the exitvalue
Conclusion
In this blogpost, I showed you how to usenotebookutils.notebook.runMultiple()to run multiple notebooks in parallel or with a DAG in Fabric. This method can help you achieve high concurrency, flexibility, and scalability for your data processing workflows. I hope you found this blogpost useful and informative. If you have any questions or feedback, please feel free to leave a comment below. Thank you for reading!
MsSparkUtils has been officially renamed toNotebookUtils. The existing code will remainbackward compatibleand won't cause any breaking changes. It isstrongly recommendupgrading to notebookutils to ensure continued support and access to new features. The mssparkutils namespace will be retired in the future.
NotebookUtils is designed to work withSpark 3.4(Runtime v1.2) and above. All new features and updates will be exclusively supported with notebookutils namespace going forward.
In this blog post, we will explore how to use the PySpark executor in Notebooks in Microsoft Fabric to leverage the power of Spark and achieve high concurrency, flexibility and scalability.
What is the PySpark executor?
The PySpark executor is a built-in kernel that allows you to run Python code on top of the remote Fabric Spark compute. This means that you can use the familiar PySpark API to interact with Spark and access its rich functionality, such as Spark SQL, Spark MLlib, Spark Streaming, and more. The PySpark executor also supports multiple languages in one notebook, so you can switch between Python, Scala, SQL, HTML, and R using magic commands.
The PySpark executor is designed to handle concurrent and parallel execution of notebook cells. This means that you can run multiple cells at the same time, without waiting for the previous ones to finish. This can improve the performance and efficiency of your notebook sessions, especially when you have long-running or complex tasks. The PySpark executor also allows you to share the same Spark session across multiple notebooks, which can reduce the overhead of creating and managing Spark contexts.
How to use the PySpark executor in Notebooks in Microsoft Fabric?
To use the PySpark executor in Notebooks in Microsoft Fabric, you need to do the following steps:
Create a Fabric notebook. This is a web-based interactive environment where you can write and run code, visualize data, and document your analysis. You can create notebooks from scratch or use templates and samples provided by Microsoft Fabric.
Set the primary language to PySpark (Python). This will make the PySpark executor the default kernel for your notebook. You can also use multiple languages in one notebook by specifying the language magic command at the beginning of a cell, such as %%pyspark, %%spark, %%sql, %%html, or %%sparkr.
Write and run your PySpark code. You can use the PySpark API to interact with Spark and perform various data engineering and data science tasks. You can also use other Python libraries and packages, such as Pandas, NumPy, Matplotlib, and more. You can install and manage Python libraries using the mssparkutils package, which is a built-in utility that helps you perform common tasks in Fabric notebooks.
Monitor and troubleshoot your notebook sessions. You can use the Fabric monitor to view the status and metrics of your Spark pool and notebook sessions. You can also use the Fabric debugger to debug your PySpark code and identify errors and issues.
Example: Using the PySpark executor to run multiple notebooks in parallel
In this example, we will use the PySpark executor to run multiple notebooks in parallel and collect their results. This can be useful when you have a set of notebooks that perform similar or related tasks, such as data preparation, feature engineering, model training, or evaluation. By running them in parallel, you can save time and resources, and also compare and analyze their outputs.
To run multiple notebooks in parallel, we will use the ThreadPoolExecutor class from the concurrent.futures module in Python. This class provides a high-level interface for asynchronously executing callables using a pool of threads. We will also use the mssparkutils.notebook.runNotebook function, which allows you to run a notebook and return its output as a JSON object.
The following cell needs to be defined in your Notebook as a Parameters cell:
path=[
{"path":"NB_Bronze_Silver","params":{"source_schema": "Application",
												"source_name": "People",
												"sourceLakehouse": "xxxxxxxxxxxxxxxxxxxxxxx",
												"target_schema": "Application",
												"target_name": "People",
												"targetLakehouse": "xxxxxxxxxxxxxxxxxxxxxxx",
												'useRootDefaultLakehouse': True}},
{"path":"NB_Bronze_Silver","params":{"source_schema": "Application",
												"source_name": "DeliveryMethods",
												"sourceLakehouse": "xxxxxxxxxxxxxxxxxxxxxxx",
												"target_schema": "Application",
												"target_name": "DeliveryMethods",
												"targetLakehouse": "xxxxxxxxxxxxxxxxxxxxxxx",
												'useRootDefaultLakehouse': True}}
												]

#Define Notebook to be executed
#Define Parameters to be passed through
The following code snippet shows how to use the PySpark executor to run multiple notebooks(above code snippet) in parallel and collect their results. We assume that we have a list of notebook names that we want to run, and a function called notebook_error_handle that handles any errors or exceptions that may occur during the execution.
# Import the modules
from concurrent.futures import ThreadPoolExecutor
from notebookutils import mssparkutils
timeout = 90

# Define the list of notebooks to run
notebooks = path

# Define a function to handle errors and exceptions
def notebook_error_handle(notebook):
    try:
        # Run the notebook and return the output as a JSON object
        result = mssparkutils.notebook.run(notebook["path"], timeout, notebook["params"])
        return result
    except Exception as e:
        # Print the error message and return None
        print(f"Error running {notebook}: {e}")
        return None

# Create an empty list to store the results
results = []

# Create a thread pool executor with the same number of threads as notebooks
with ThreadPoolExecutor(max_workers=len(notebooks)) as executor:
    # Submit the notebook tasks to the executor and store the futures
    notebook_tasks = [executor.submit(notebook_error_handle, notebook) for notebook in notebooks]
    # Iterate over the futures and append the results to the list
    for notebook_task in notebook_tasks:
        results.append(notebook_task.result())

# Print the results
print(results)
Conclusion
In this blog post, you have learned how to use the PySpark executor in Notebooks in Microsoft Fabric to achieve high concurrency, flexibility and scalability. You have seen how to use the ThreadPoolExecutor class to run multiple notebooks in parallel and collect their results. Ihope that this post has given you some insights and tips on how to leverage the power of Spark an concurrency in Microsoft Fabric. Happy coding!


 Enable High Concurrency in WorkspaceOnce enabled, all notebook sessions triggered by pipelines will be packed into high concurrency sessions automatically.
 Create Pipeline with Notebook Activity
 Enable session tag on Notebook
 Notebook Execution before session startedBelow an overview in the Monitor when the session started
 Notebook Execution when session startedOverview of all the executed Notebooks
 Notebook Execution when session was finished


 In the afternoon, I hosted my own session Microsoft Fabric: Building a Data Ingestion and Processing framework to Drive Efficiency in a packed room. Thank you all for attending, engaging, and asking questions. As promised, you can find the session code on my


