Open your Synapse Studio and select the Management Hub.
Add a new Linked Service
If you haven’t connect to Power BI before, you will see the screen above. If you want to add another Power BI Linked Service(Workspace).
Search for Power BI in the available Linked Services.
Connect or Select the Power BI Icon.
Select the correct Power BI Workspace Name. You can only selected a Power BI Workspace which is connect to the same Azure tenant as your Azure Synapse Analytics Workspace. So both Services needs to be in the same Azure Tenant.
Once you have connected to your Workspace, you can see all the existing Reports from that Workspace.
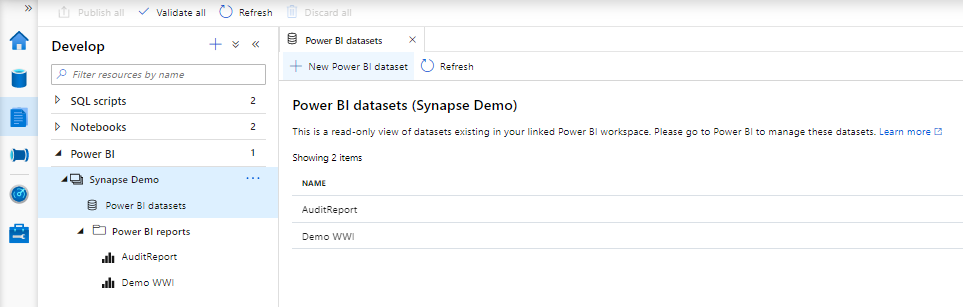
Browse in your Synapse Studio to the Develop Tab.
Create a new Power BI dataset
From the same develop tab , you can also create a new dataset for Power BI. Click on the New Power BI dataset.
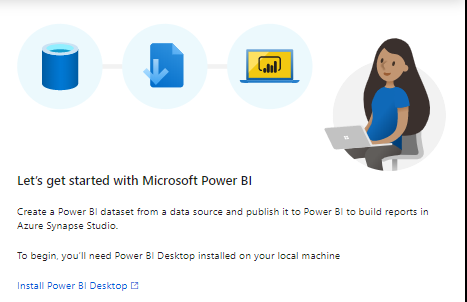
The following screen will open on the right site of your Synapse Studio.
Make sure you have Power BI Desktop installed. If not you should do in now.
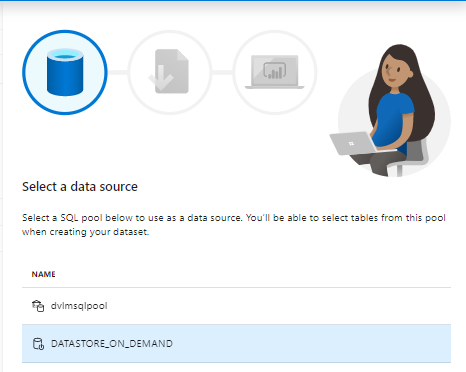
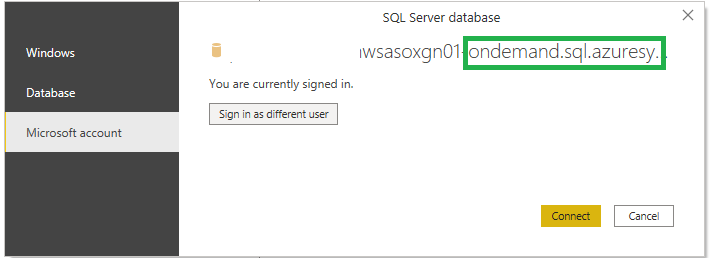
Select a Data Source. You will find here your SQL Pool and if you have created Databases as SQL on Demand as well. How to create a SQL on Demand database I will explain in another article.
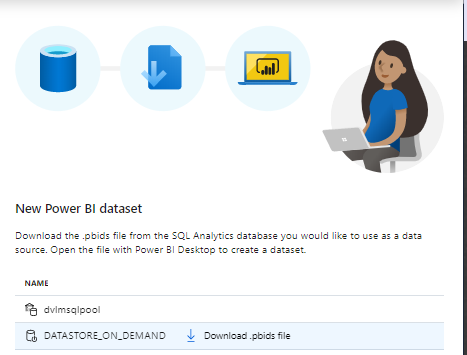
Download the created .pbids file.
Open Power BI Desktop. Sign in with the correct credentials
Now you can start building your report. Once you’re ready, upload the report to your Workspace and the DataSet and the Report will be visible in your Synapse Studio.
You can now use your report, create new reports or change the reports.
Currently you can not download the report. So once you have changed the report, you have to go back to the Power BI Service to download the pbix file. Same for all other Power BI settings, like scheduling.
In 1 of my next articles I will go deeper into the various possibilities such as import, direct query or the use of Azure Analysis Services in combination with Power BI.
Thanks for reading and like always, feel to free send questions.
There are 2 options to create a SQL Pool. Go to your Synapse Workspace in de Azure Portal and add a new SQL Pool.
Or go to the Management Tab in your Azure Synapse Workspace and add a new Pool.
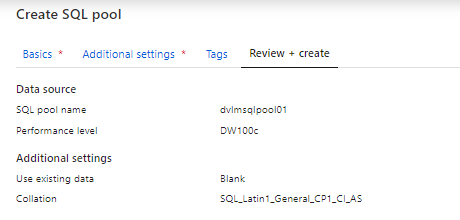
Creating a new SQL Pool
SQL Pool Name (SQL pool name should not be greater than 15 characters) and select the correct Performance Level. Be careful in selecting the Performance Level. DW 1000c will cost you € 12,73 per hour excluding storage. My advice is to start small and scale up when necessary. More about DWc units can be foundhere.
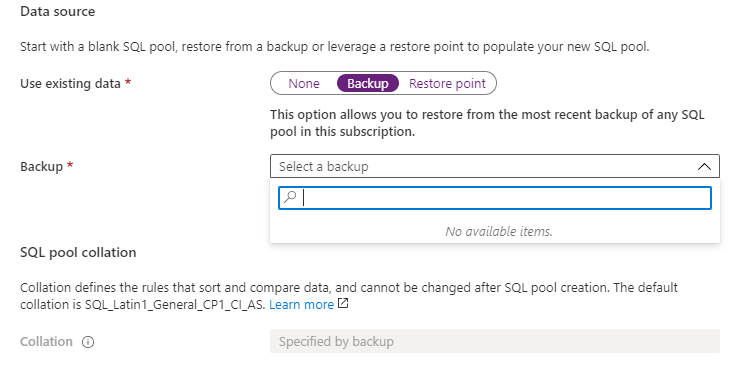
If you want to use Data from an existing pool, select Backup or Restore Point. Otherwise select none
Use existing data-Backup
Use existing data-Restore Point
Use existing data-None
Review your settings and your SQL Pool will be created.
Remarks
Be aware that if you already have another Azure SQL DW running, you cannot select or add it to your Azure Synapse Workspace. Adding an SQL pool is only possible via the Azure Synapse Workspace(Azure Portal or Studio).
If you install it as a standalone component through the Azure portal, the SQL Pool cannot be added to the Azure Synapse Workspace.
And if you don’t use your SQL pool please PAUSE it. It will save you a lot of money.
There are 2 options to create an Apache Spark Pool. Go to your Azure Synapse Analytics Workspace in de Azure Portal and add a new Apache Spark Pool.
Or go to the Management Tab in your Azure Synapse Analytics Workspace and add a new Apache Spark Pool.
Create an Apache Spark Pool
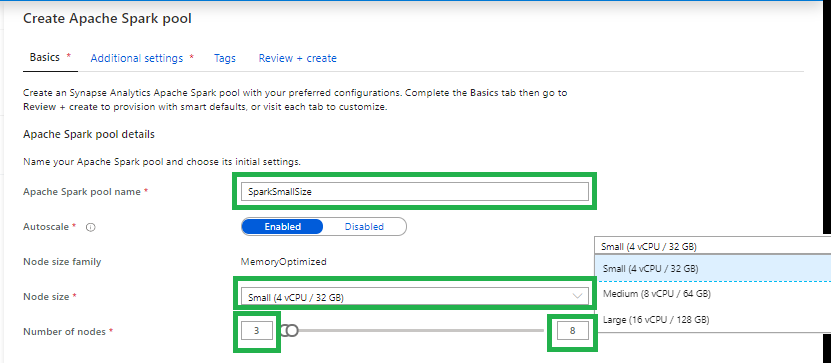
Apache Spark pool name
Note that there are specific limitations for the names that Apache Spark Pools can use. Names must contain letters or numbers only, must be 15 or less characters, must start with a letter, not contain reserved words, and be unique in the workspace.
Node size
Small(4vCPU)
Medium(8vCPU)
Large(16vCPU)
Autoscale
Enabled: Based on your workloads the Spark Pool will scale up or down.
Disabled: You have to define a fix number of nodes.
Number of nodes.
You can select 3 up to 200 nodes
Make sure that
Contact an Owner of the storage account, and verify that the following role assignments have been made:
Assign the workspace MSI to the Storage Blob Data Contributor role on the storage account
Assign you and other users to the Storage Blob Data Contributor role on the storage account
Once those assignments are made, the following Spark features can be used: (1) Spark Library Management, (2) Read and Write data to SQL pool databases via the Spark SQL connector, and (3) Create Spark databases and tables.
If you haven’t assign the Storage Blob Data Contributor role to your user, you will get the following error when you want to browse the date in your Linked Workspace.
Currently you can only select Apache Spark version 2.4.
Make sure you enable the Auto Pause settings. If will save you a lot of money. Your cluster will turn off after the configured Idle minutes.
Python packages can be added at the Spark pool level and .jar based packages can be added at the Spark job definition level.
If the package you are installing is large or takes a long time to install, this affects the Spark instance start up time.
Packages which require compiler support at install time, such as GCC, are not supported.
Packages can not be downgraded, only added or upgraded.
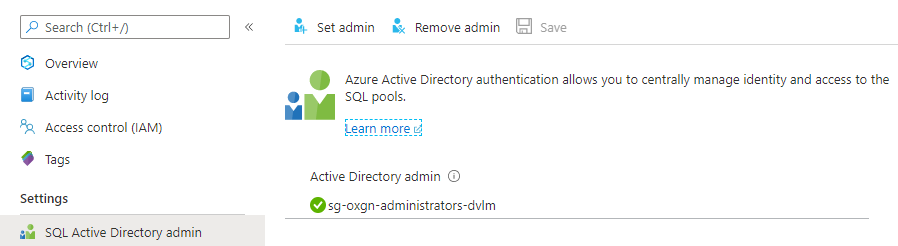
Most configuration and settings can be done through the Synapse Studio. In your Workspace you need to set the SQL Active Directory Admin, like you have to do for a Logical Server.
SQL Active Directory Admin
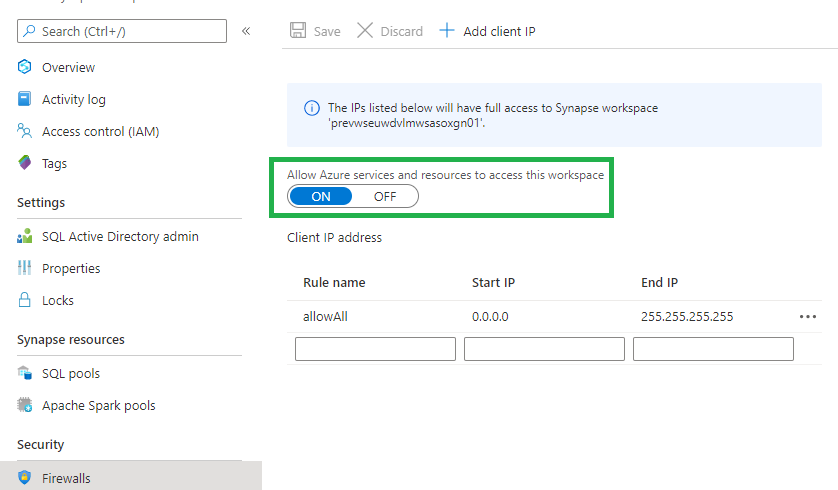
Firewall
Change the IP-address to you own IP-address or to one of your employer if you work from the office. Make sure that you enable the option “Allow Azure service and Resources to access this Workspace” is enabled. Every trusted Azure Service or Resource can connect to this Workspace. Not all Public Preview Azure Services or Resources are Trusted yet.
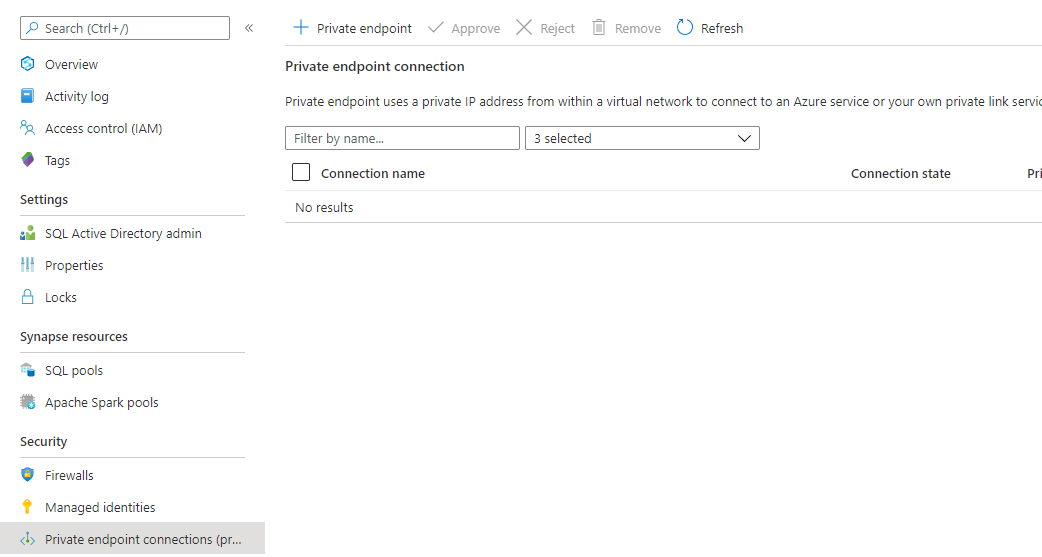
Private Endpoint Connections
Define your Private Endpoint Connections to your Services to use a Private IP-address form your Virtual Network. More details on how to setup a Private Endpoint Connection can be found here.
Launch Azure Synapse Analytics Studio
After you have opened the portal, the following screen will appear. Personally I am very charmed of this brand new Portal, you now get 1 place where you can access all your data. But also an integration with your Power BI reporting. But more about that later. Let’s walk through each tab below.
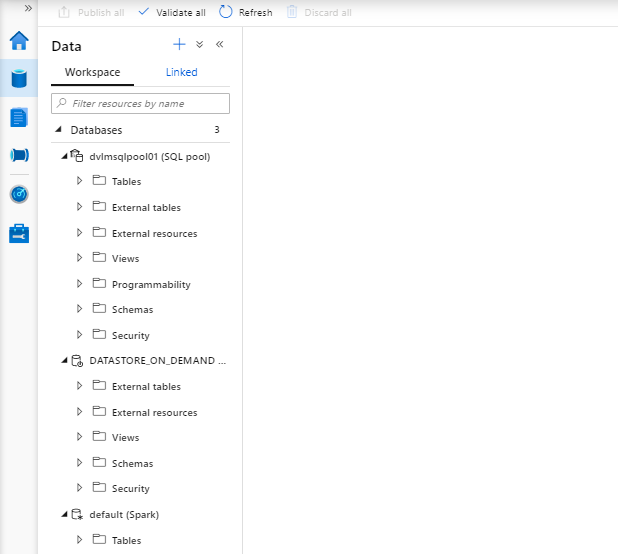
Data
The data Tab is Divided into 2 different parts Linked and Workspace
Linked
All Dataset likes you’re used to create in Azure Data Factory are stored here.
Your can now directly browse files within your Azure Data Lake Storage.
But you can also connect to External Data.
Workspace
Here you will find all your databases which you have created with Sparks, SQL on Demand or SQL Pools. How to create these database I will explain later in another article.
Develop
The Develop tab, is the location, where your SQL Scripts, Notebooks, Dataflows, Spark Job Definitions and Power BI Reports are stored. In a later stage you can commit your work to Azure Dev Ops or GitHub.
Orchestrate
What do we see here , nothing more then you were used to see in Azure Data Factory except the addition of the Synapse Activities.
Monitor
In the monitor tab you will find similar things to ADF except for the SQL requests and the Apache Spark Applications
Orchestration:
Pipeline runs
Overview of all Executed Pipelines
Trigger Runs
Overview of all Executed Trigger Runs
Integration runtimes
Overview of all created Integration Runtimes
Activities:
Apache Spark applications
Monitor your Apache Spark Executions
SQL requests
Monitor your SQL on Demand or SQL Pool queries
SQL request
All running(currently) SQl request for your SQL on Demand and your SQL Pools
Apache Spark Applications
All Apache Spark request.
A detailed explanation of the Apache Spark Application monitor can be found here.
Management HUB
The Synapse Analytics Management HUB offers the following options:
Analytic Pools:
SQL pools
Here you can manage(Scale up or Down) your previously created SQL pools or create new ones.
Apache Spark pools
Create multiple instances of Spark pools depending on the workload requirements. Once you have your Instance created you also change Auto Scaling, Node Size and Number of Nodes from here.
External Connections:
Linked Services
Create and manage connections to different services, same as in Azure Data Factory
Orchestration:
Triggers
Create and manage Triggers for your Pipelines, same as in Azure Data Factory
Integration runtimes
Create and manage your different types of Integration Runtime: Azure: execute workloads between Azure services or Azure Data Factory Mapping Data Flows. Self-Hosted: execute workloads between on-premises environments and Azure. Azure-SSIS: execute SQL Server Integration Services packages in Azure Data Factory.
Security:
Access control
Azure Synapse Analytics comes with role-based access control. The available roles: Workspace admin Apache Spark admin SQL admin
Managed Private Endpoint
Private link enables you to access Azure services from your Azure VNet securely. More details on Managed Private Endpoints can be found here
At the beginning of this article, I indicated that I was very charmed of this new Portal. Microsoft has ensured that we can now approach almost all our services seamlessly from 1 Portal and there will be much more to come in the future. And as you can see you don’t have to use the SQL Pools which is a reasonably expensive solution for customers who use a lot of data. But you can use Azure Synapse Analytics for almost every customer. I would say if you haven’t started trying Azure Synapse Analytics yet, start today and see how you can help your customers with this. If there are any questions I would like to hear them.
In the article below I would like to take you through, how you can configure an Azure Synapse Workspace and not the already existing Azure Synapse Analytics SQL Pool(formerly Azure SQL DW):
In de Azure Portal search for Azure Synapse Analytics. Make sure you select Workspaces Preview.
Click on Create to start the configuration of your Workspace.
Make sure you select the correct:
Subscription
Resource Group
The seconds part of this configuration is to setup your Workspace:
Workspace Name
I’m using <customername><environment><wsas><department> wsas=WorkSpace Azure Synapse prevwsdvlmwsasoxgn01
Region
The desired Region <West Europe>
Data Lake Storage Gen 2
Select an existing Data Lake Storage Gen 2
Data Lake Storage Gen 2 File System
I’m creating a new container here temp. This directory is used to store temporary files and workspace settings and I don’t want to mix this temporary data in 1 of my other containers.
The above option will assign the managed identity of the workspace the Storaqe Blob Data Contributor role with full access on the selected Data Lake Storage Gen2 file system. Leave the option to on unless you want to grant access manualy.
You can set the sqladmin user. But it can set be in a later stage as well.
Leave this option empty, I will explain in a later article how this will work.
Normally you do not want to allow all IP addresses, for our initially setup we leave is as is. We can also adjust these settings in a later stage.
Review all your settings and click on create. And you deployment is underway.
After the deployment is finalized, the workspace will be available in your selected Resource Group.
You have now created your Azure Synapse Analytics Workspace and you can start using the new functionalities which are currently in Public Preview
Public Preview Features
Azure Synapse studio Unified Security Model Private endpoints Power BI integration Azure Machine Learning integration Data lake exploration Apache Spark integration Data Movement Pipeline Orchestration On-demand query Notebooks SQL Script editor
In my next articleI will walk you through the new Azure Synapse Studio. Stay tuned!