Azure Synapse Analytics Code Repository has arrived

Azure Synapse Analytics Code Repository has arrived

Azure Synapse Analytics Code repository

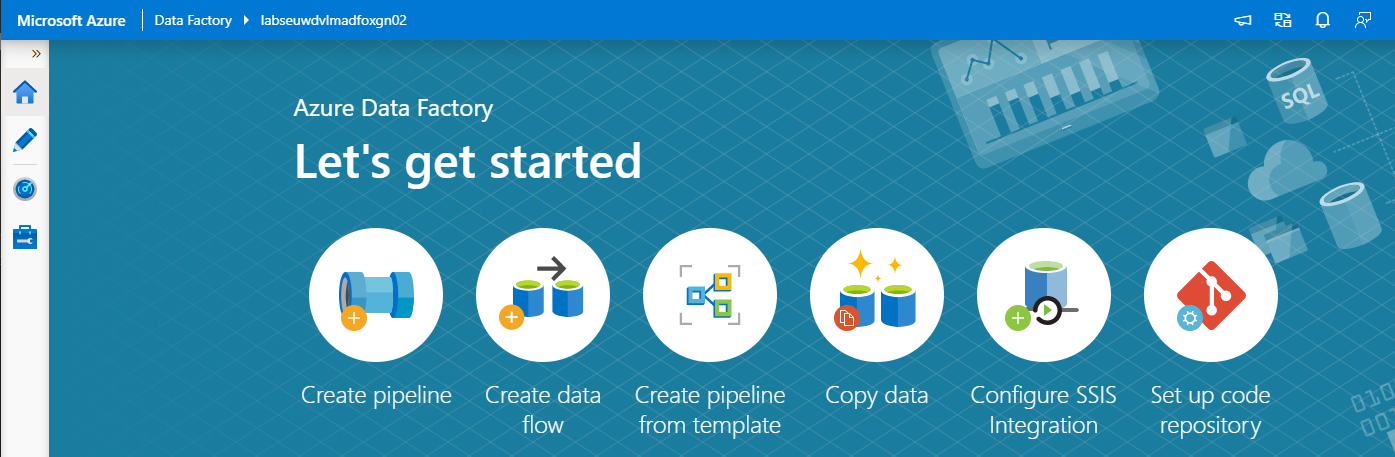
‎I just opened my Azure Synapse Analytics Workspace and got a great surprise, the option Git Configuration is available as of today‎.


After a long wait, today the Git Configuration option became available in Azure Synapse Analytics.

The setup isn't much different from Azure Data Factory, which can be found in this link.

The difference is that we no longer use an adf_publish branch but a workspace_publish branch. Which makes sense if you want to use both Azure Services side by side. In this blog I do quick walkthrough with the Azure Dev Ops Configuration enabled.

Azure Synapse GIT Config

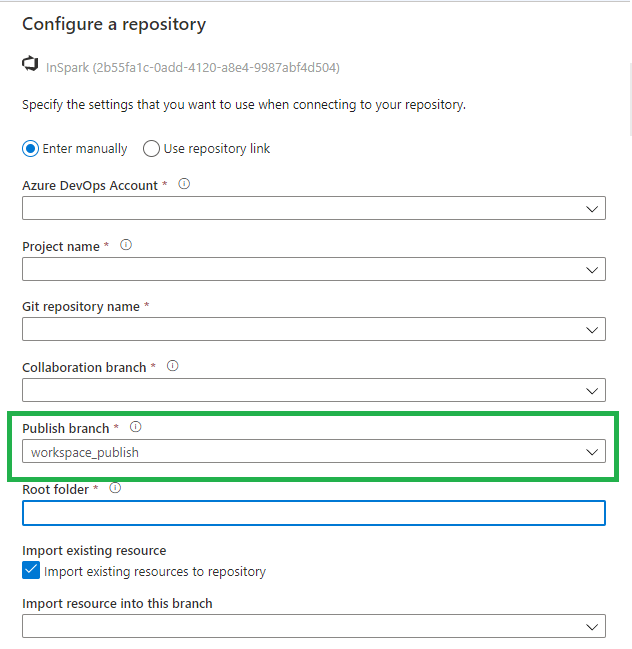
Once we have configured everything, we can walk through the Git Configuration options within Azure Synapse Analytics. I'm sure there will be a lot of them, but below is a list of the ones I noticed first.

Synapse live

After you published your code, it will be available in Synapse Live, like in Azure Data Factory you develop everything in Azure DevOps branches.
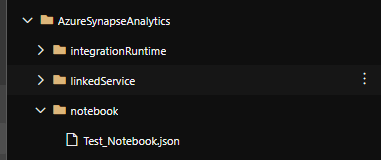
Synapse Live

Notebooks

After creating a Notebook, we have the option Commit, after you have committed it will be directly saved within your current working branch.

Azure Synapse Notebooks  Azure Synapse Notebooks

SQL Scripts

Like Notebooks,  After creating a SQL Script, we can Commit, after you have committed it will be directly saved within your current working branch.

Azure Synapse SQL Script

Azure Synapse SQL Scripts

Pipelines

Also here we have now a Commit option.
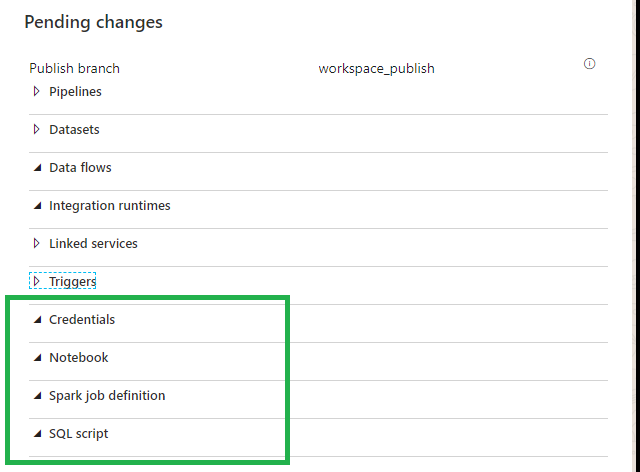
Azure Synapse Pipelines

Workspace_publish

Beside the Notebooks and the SQL Scripts we can also store the Credentials and Spark Job definitions in Azure Dev Ops

Azure Synapse Publish

Differences

So as we can see the main differences between Azure Data Factory and Azure Synapse Analytics are:

Workspace_publish branch instead of adf_publish branch.

Commit instead of Save.

Azure Data Factory Pipelines

By moving your code from Azure Data Factory to Azure Synapse Analytics in Azure Dev Ops your Azure Data Factory Configuration will be available in Azure Synapse Analytics.

I added my ADF code to Azure Synapse in Azure Dev Ops and it looks the same.

Azure Synapse Dev Ops Example

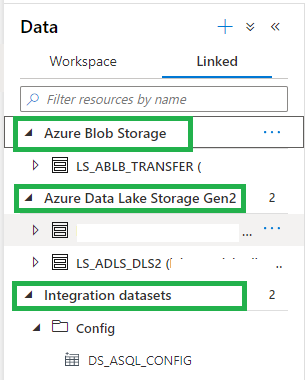
After Refreshing the Azure Synapse Analytics Workspace, in the Data Hub we see the Integration Datasets(ADF DataSets) and the Linked Storage accounts.

Azure Synapse Data Example

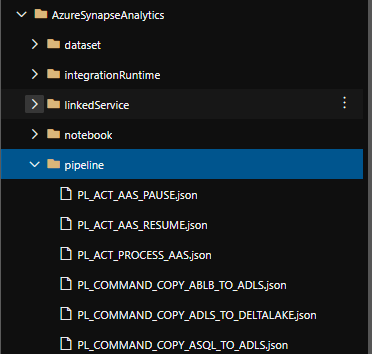
And in the Integrate Hub, we see all our Pipelines. And the same is working for our triggers

Azure Synapse PipeLine Example

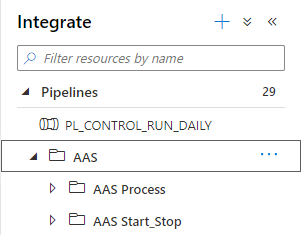
It looks like that we can reuse our code quite easily. I haven't tested everything yet but I wanted to share this with you as quick as possible. I'm sure a easier way to migrate from Azure Data Factory to Azure Synapse will be on his way, you can use above as a start.

Integration Runtimes

Does everything work as in Azure Data Factory, NO at this moment you can't use the Azure SSIS Integration Runtime and the shared Self Hosted Integration Runtime? But hopefully this will take not that long before it will arrive.

Thank you for reading, this was a quick overview of the first changes I discovered. Please feel free to leave comment if you have discovered more.

Do you want to become more familiar with the various possibilities of Azure Synapse Analytics, please read the following articles which I published a while ago:

✅ Creating your Azure Synapse Analytics Workspace

✅ Exploring the new Azure Synapse Analytics Studio

Creating an Apache Spark Pool

Creating a SQL Pool

Integration with Power BI

How to setup Code Repository in Azure Data Factory

How to setup Code Repository in Azure Data Factory

Azure

by Erwin | Nov 5, 2020

Why activate a Git Configuration?

The main reasons are:

  1. Source Control: Ensures that all your changes are saved and traceable, but also that you can easily go back to a previous version in case of a bug.
  2. Continuous Integration and Continuous Delivery (CI/CD): Allows you to Create build and release pipelines for easy release to other Data Factory instance, manually or triggered(DTAP).
  3. Collaboration: You have the ability to easily collaborate in the same Data Factory with different colleagues.
  4. Performance: Your Data Factory from Git is 10 times faster then loading directly from the Data Factory Service.

So enough reasons to start enabling your Git Configuration.

How to setup your Code Repository in Azure Data Factory!

During the configuration/set up of your Data Factory you have the possibility to select either Azure DevOps or GitHub as your Git Configuration. If you haven't done that, you can still configure this integration in Azure Data Factory. The procedure for both options are the same.
Create ADF Version Control
In my previous article, Creating an Azure Data Factory Instance, I skipped the Git Configuration. In this article I will explain how to do this in an already created Data Factory.

Azure Data Factory Source Control

On the right of your splash screen when opening your Data Factory select the Setup Code Repository. Other options to start configuring your Code Repository are through the Management Hub or in the UX on the top left in the authoring canvas. If you don't see the option, Code Repository is already configured. You can check this in the Management Hub or UX.

We have the option to configure Azure DevOps or GitHub.

Azure DevOps integration

First I will take you through the configuration of Azure DevOps and then also create a similar configuration in GitHub. If you want to start directly in GitHub, click here.

Select Azure DevOps Git:

Azure Dev Ops Config

  1. Azure Active Directory: Select the AAD where your Azure DevOps environment is located. If you use another AAD, make sure that this account has rights to that environment.
  2. Azure DevOps Account: Select your Account.
  3. Project Name: Select the Project Name where you want to store your repository in.
  4. Git Repository: Create a new Project.
  5. Collaboration Branch: Change this to Main.
  6. Publish Branch: Leave this on adf_publish.
  7. Root folder: If you want to create a complete project with SQL,Azure Analysis Service, Azure DataBricks etc etc, you define a root folder and create your repository into that folder.
  8. Import: When this is a blank Data Factory, you can disable this option. When you have create already resources in your Data Factory, you should enable this so already created resources are committed to the repository.

Click on apply and you will see that you repository is connected.

Repo Connected

When you log in to your Azure Dev Ops Environment, you will see that a new Repository is created Main Branch. Azure Dev Ops Main

Go back to your Data Factory and click on Publish.

Data Factory Publish

In Azure DevOps the adf_publish Branch is now also created.Azure Dev Ops Publish

GitHub Integration

In the repository screen, select GitHub:

Github login

The first time you connect with your Data Factory you need to login in GitHub.

Github authorize

Once connect you to need to Authorize your Data Factory.

Github Configuration

All the settings are almost the same as in Azure DevOps:

  1. Use GitHub Server Enterprise: If enabled fill the The GitHub Enterprise root URL.
  2. GitHub Account: Select your Account.
  3. Project Name: Select the Project Name where you want to store your repository in.
  4. Git Repository: Create a new Project.
  5. Collaboration Branch: Leave this on Main.
  6. Publish Branch: Leave this on adf_publish.
  7. Root folder: If you want to create a complete project with SQL, Azure Analysis Service, Azure DataBricks etc etc, you define a root folder and create your repository into that folder.
  8. Import: When this is a blank Data Factory, you can disable this option. When you have create already resources in your Data Factory, you should enable this so already created resources are committed to the repository.

Click on apply and you will see that you repository is connected.

Repo Connected

Log in to your GitHub, a new Repository is created Main Branch. If you go back to your Data Factory and click on Publish.

Data Factory Publish

In GitHub the adf_publish Branch is now also created.

GitHub Publish

As you can see the Setup for Azure Dev Ops and GitHub are mostly the same. You have now learned how to connect your Data Factory to a Code Repository. You're now ready to start building your Release and build pipeline's.

Thanks for reading and in case you have some questions, please leave them in the comments below.

Feel free to leave a comment

Azure Data Factory Let’s get started

Azure Data Factory Let’s get started

Creating an Azure Data Factory Instance, let’s get started

Many blogs nowadays are about which functionalities we can use within Azure Data Factory. 
But how do we create an Azure Data Factory instance in Azure for the first time and what should you take into account?  In this article I will take you step by step on how to get started.

First we have to login in the Azure Portal.

Azure Data Factory

Search for Data Factories and select the Data Factory  service.

Create ADF

Secondly we have to create a Data Factory Instance.

Create ADF names

Fill in the required fields:

  1. Subscription => Select your Azure subscription in which you want to create the Data Factory.
  2. Resource Group =>Select Use existing, and select an existing resource group from the list or click on Create new, and enter the name of a resource group(a new Resource Group will be created)
  3. Region => Select the desired Region/Location, this is where your Azure Data Factory meta data will be stored and has nothing to do where you create your compute or store your Data Stores.
  4. Name = > Create a unique name in Azure.
  5. Version => Always select V2 here, this contains the very latest developments and functionalities. V1 is only used for migration from another V1 instance.

Select Next: Git configuration

Azure Data Factory Git Configuration

Enable the option to configure Git later,  we will configure this later in Azure Data Factory.

Select Next: Networking:

Create Azure Data Factory Networking

Leave the options as is. I will explain the Connectivity Method in one of my next articles.

Select Next: Review + Create:

Create Azure Data Factory Validation

Your Azure Data Factory Instance will be created. Once you have created your Azure Data Factory, it is ready to use and you can open it from selected Resource Groups above:

Open Azure Data Factory

Select Author & Monitor:

Azure Data Factory let's get started

Encrypt your Azure Data Factory with customer-managed keys

Azure Data Factory encrypts data at rest, including entity definitions and any data cached while runs are in progress. By default, data is encrypted with a randomly generated Microsoft-managed key that is uniquely assigned to your data factory. But you also Bring Your Own Key (BYOK) more details can be find in my previous written article “Azure Data Factory: How to assign a Customer Managed Key

Please be aware that you have to assign this key on an empty Azure Data Factory Instance.

Roles for Azure Data Factory

Data Factory Contributor role:

Assign the built-in Data Factory Contributor role, must be set on Resource Group Level if you want the user to create a new Data Factory on Resource Group Level otherwise you need to set it on Subscription Level.

User can:

  1. Create, edit, and delete data factories and child resources including datasets, linked services, pipelines, triggers, and integration runtimes.
  2. Deploy Resource Manager templates. Resource Manager deployment is the deployment method used by Data Factory in the Azure portal.
  3. Manage App Insights alerts for a Data Factory.
  4. Create support tickets.

Reader Role:

Assign the built-in reader role on the Data Factory resource for the user.

User can:

  1. View and monitor the selected Data Factory, but user can not edit or change it.

More on how to assign roles and permissions can be found here.

Thanks for reading, I my next blog I will describe how to Set up your Code Repository.

My Virtual Session at SQLBits 2020

My Virtual Session at SQLBits 2020

SQL BITS 2020, the greatest data show 

Last week was SQL BITS week.

After the event was moved from April to September, it eventually became a Virtual event. Setting up a Virtual event requires a lot of adjustments in the Organization.

Recording

All regular sessions had to be recorded in advance so that during the event itself it could not go wrong.
For some of us this was new and others have done it before. In any case, it was new to me, but the organization did everything it could, to help us with various sessions in which everything was explained and in which we could ask all kinds of questions. Thanks for that.

Is it strange to pre-record a session?

Yes, it is, you are trying to find an environment in which you have no ambient noise, a good microphone and a good camera. But you don't always have an influence on ambient sounds. And presenting to a webcam is strange.

After practicing my session again, I recorded my session in one go and did not edit anything in the session. After all, something can always go wrong or go in a different way in a session, even if you record it in advance. Once you start adjusting or editing that, the end is lost and a lot of time goes into it. But also the charm of  a session is gone. After all, we are data professionals and not movie stars.

My Session

Back to the day itself, half an hour in advance I could log in to my session and must say that it was quite exciting. Would the video start, how do I come across and some more questions where in my head?
But all nerves for nothing, the session started right on time. In the meantime I had created a few polls which you could have the audience answer in between.
But also being able to answer the questions live during the session and sometimes even with a link to some extra information was now easy.SQL BITS Poll

I was delighted to see at the outcome of the last poll, most of the people who attended my session will now start using Azure Key Vault in their day-to-day work. In the end that's why we do it for(help or advice others).

My presentation can me found here.

Conclusion

I saw a very great event, the quality of the sessions were very high. And there was so much choice, but luckily they will be soon available to watch On-Demand.
A big round of applause to the entire organization, you have organized a fantastic event with a super nice portal, including exhibitor hall, networking, chat rooms and much more. Thank you for having me and see you next year.


Use Global Parameters to Suspend and Resume your Analysis Services in ADF

Use Global Parameters to Suspend and Resume your Analysis Services in ADF

Suspend or Resume your Azure Analysis Services in Azure Data Factory

Last week one of my customer asked me if they could start or stop his Azure Analysis Services within Azure Data Factory. After a search on the internet I came across a blog from Joost, I’m using that blog as input for this post. Most of the credits goes to him. For me the focus was more on making it parameterized so that I can reuse these Pipelines for all of my customers. A couple of weeks ago the ADF team released the Global Parameters and in this post I’m going to use these parameters.

Global Parameters

Global parameters are constants across a data factory that can be consumed by a pipeline in any expression. They are useful when you have multiple pipelines with identical parameter names and values.

Creation and management of global parameters is done in the management hub.

ADF and GlobalParameter

ADF and GlobalParameter

Create above Global Parameters to build the Pipeline.

The following parameters can now be used across all your Data Factory Activities:

@pipeline().globalParameters.AAS_ResourceGroupName
@pipeline().globalParameters.AAS_ServerName
@pipeline().globalParameters.SubscriptionId

Build Pipeline

Create a new Pipeline PL_ACT_AAS_SUSPEND_GP 

Add a Parameter to the Pipeline Action to easily reuse this Pipeline to Resume our AAS.

ADF and GlobalParameters

Add a Web Activity.

Name = Suspend_AAS  (depends on the Action).

As Joost Mentioned in his blog we first have to define the Rest API Url in the Settings Tab.

https://management.azure.com/subscriptions/<xxx>/resourceGroups/<xxx>/providers/Microsoft.AnalysisServices/servers/<xxx>/<ACTION>?api-version=2017-08-01

The  <xxx> we need to replace with the Global Parameters and the <Action> with the Pipeline Parameter. The final Result will be:

https://management.azure.com/subscriptions/@{pipeline().globalParameters.SubscriptionId}/resourceGroups/@{pipeline().globalParameters.AAS_ResourceGroupName}/providers/Microsoft.AnalysisServices/servers/@{pipeline().globalParameters.AAS_ServerName}/@{pipeline().parameters.Action}?api-version=2017-08-01

Method = POST

Body = Create a dummy json message, it is not used by the Rest API.

ADF and GlobalParameters

Add Azure Data Factory as Contributor to Azure Analysis Services

Before you can debug or test your Pipelines you should add your ADF Instance with Contributor Role to your Azure Analysis Services.

ADF and GlobalParameters

After you have done this, you can Debug your Pipeline.

ADF and GlobalParameters

Error

I got an error because my AAS is already Suspend Or Resumed. We can solve this by adding a check, to check  what the Status of Analysis Services is.

Check Analysis Services Status

To check if our Analysis Services is already Suspended or Resumed we can at Web Activity to check the Status.

Add a Web Activity to your Pipeline  or make a copy of the existing Web Activity

Name = Check_Status_AAS

URL= Https://management.azure.com/subscriptions/@{pipeline().globalParameters.SubscriptionId}/resourceGroups/@{pipeline().globalParameters.AAS_ResourceGroupName}/providers/Microsoft.AnalysisServices/servers/@{pipeline().globalParameters.AAS_ServerName}?api-version=2017-08-01

Method = GET

ADF and GlobalParameters

Add IF Condition Activity (Check if AAS is Running)

ADF and GlobalParameters

Add an Expression on the If Condition Activity  @bool(startswith(activity(‘Check_AAS_Status’).output.properties.state,’Paused’))

This expression will check if the Analysis Services is Running or not. If we want to to Suspend our Analysis Services we have to add to the Web Activity Suspend_AAS  to False (Cut from the main frame and Paste in the False Activity). In case the Analysis Services is already Suspended we do nothing(True).

ADF and GlobalParameter

Debug your Pipeline, to see what is happening

Analysis Services was running, Web Activity Suspend AAS is called:

ADF and GlobalParameter

Analysis Services was already Paused/Suspended, no action required:

ADF and GlobalParameter

Create Pipeline to Resume your Analysis Services

Clone your PL_ACT_AAS_SUSPEND_GP and rename it to PL_ACT_AAS_RESUME_GP. Change your action Parameter to “Resume”.

ADF and GlobalParameter

Within the IF Condition move the Web Activity Suspend AAS from False to True and rename to Resume AAS

Debug to see if everything is working fine:

ADF and GlobalParameter

You have now learned how to Suspend and Resume your Azure Analysis Services Dynamically with the use of Global Parameters. Both Pipelines can be easily transferred to different customers.

Please feel free to download the Pipeline Templates here

If you’re already using a database where you store your Meta Data, then you have also the possibility to store the necessary parameters in the database. The only thing you need to do is to add a Lookup Activity to get the parameters from your database(and replace the global parameters with the output from the lookup activity)

ADF and GlobalParameter


Hopefully this article has helped you a step further. As always, if you have any questions, leave them in the comments.


Based on above article you should now also be able to build a Pipeline to Process your Analysis Services Model with some help from this blog or you download the Pipeline Template from here.