Blog Serie: Provision users and groups from AAD to Azure Databricks
Blog Series
This blog post series contains topics on how to Provision users and groups from Azure Active Directory to Azure Databricks using the Enterprise Application(SCIM). This is a summary of the all the blogs I posted the last couple of days. I am very happy with all the feedback and tips I have received about this blog series. Thank you.
- Configure the Enterprise Application(SCIM) for Azure Databricks Account Level provisioning
- Assign and Provision users and groups in the Enterprise Application(SCIM)
- Creating a metastore in your Azure Databricks account to assign an Azure Databricks Workspace
- Assign Users and groups to an Azure Databricks Workspace and define the correct entitlements
- Add Service Principals to your Azure Databricks account using the account console
- Configure the Enterprise Application(SCIM) for Azure Databricks Workspace provisioning
Key Takeaways
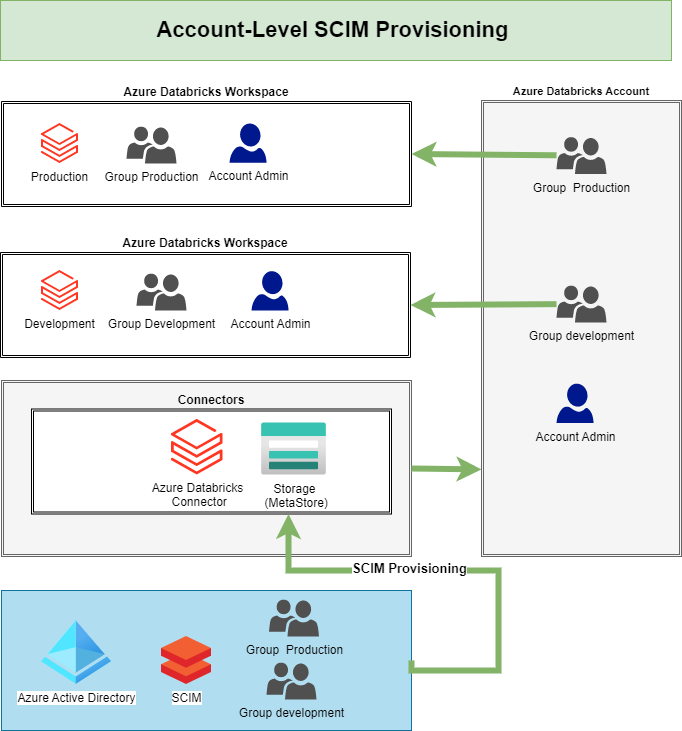
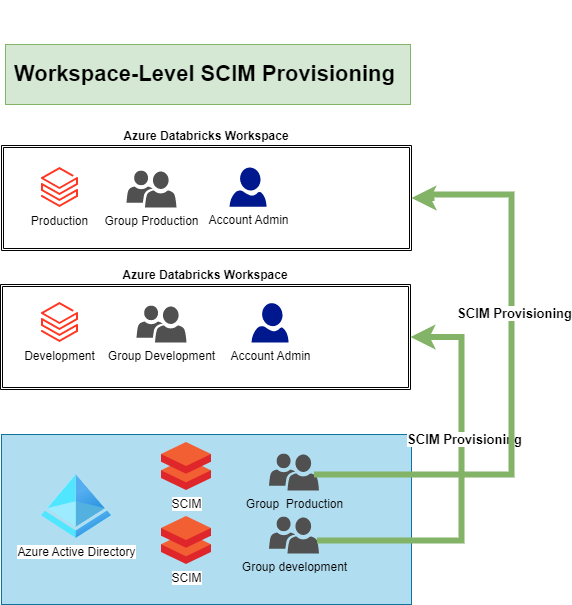
There are 2 different options to provision users and groups to Azure Databricks using Azure Active Directory (AAD) at the Azure Databricks account level or at the Azure Databricks workspace level.
Azure Databricks account level
Azure Databricks workspace level
Databricks recommends using SCIM provisioning to sync users and groups automatically from Azure Active Directory to your Azure Databricks account.
Preview
Update 23-02: Azure Databricks account level is out of preview. Azure Databricks workspace level is still in preview
We can define 3 different identities:
• Users: User identities recognized by Azure Databricks and represented by email addresses.
• Service principals: Identities for use with jobs, automated tools, and systems such as scripts, apps, and CI/CD platforms.
• Groups: Groups simplify identity management, making it easier to assign access to workspaces, data, and other securable objects.
As you can read in the various blog posts, the setup of Account-Level provisioning is a bit more work, but it will provide you with many more benefits now and in the future. If you only use 1 Azure Databricks Workspace, then I would simply apply the Workspace-Level Provisioning. The most important thing is that you set up SCIM so that users are not added manually in the Azure Databricks. Adding Service Principals is much easier with the Account Level Setup.
Metastore
Only one Metastore per Region can be created, pay close attention to where you create it(samen or separate Subscription/Resource Group) and whether the Metastore should be part of the Data Management Landing Zone.
User, Service Principals and Groups
- Users with the Contributor or Owner role on the workspace resource in Azure are automatically added as workspace administrators.
- Azure Active Directory does not support the automatic provisioning of service principals to Azure Databricks.
- User removed manually from an Azure Databricks workspace will no be synced again using the Azure Active Directory provisioning.
- The sync is running every 40 minutes
- Updates of Username or email address needs to be done in the AAD.
- Nested groups are not supported by Azure Active Directory automatic provisioning.
Scoping Filters
My colleague Pim Jacobs gave me a tip that you can also use Scoping Filters. A scoping filter allows you to include or exclude any users who have an attribute that matches a specific value. For example you only want to sync a subset of users in a group to Databricks based on a specific attribute you have defined in your AAD(only users in the department Advanced Analytics).

Documentation
For the blog series I partly used the documentation below. The documentation is fairly scattered, from that idea I started this blog series.
Manage users, service principals, and groups – Azure Databricks | Microsoft Learn
Manage users – Azure Databricks | Microsoft Learn
Manage groups – Azure Databricks | Microsoft Learn
Manage service principals – Azure Databricks | Microsoft Learn
Sync users and groups from Azure Active Directory – Azure Databricks | Microsoft Learn
Create a Unity Catalog metastore – Azure Databricks | Microsoft Learn

0 Comments